My Account
 Sign Out

As cross-platform file transfer continues to become prevalent, formatting a USB drive for use between Windows and Mac devices has become increasingly vital. However, it can be challenging to format an external hard drive for Mac users unfamiliar with this process. This guide will walk you through the simple process of formatting a USB flash drive on a Mac. In just a few steps, the new USB drive will be at your disposal for storing and transferring files seamlessly between your Mac and other operating systems.
What Is Formatting?
Before a storage device like a flash drive or solid-state drive can effectively store information, it needs to be formatted. It works by creating a filing system optimized for organizing data. Drives typically require formatting when requiring additional space or transitioning to a new operating system. Formatting ensures full compatibility and sets the stage for seamlessly adding more files.
File Systems for a USB Drive on Mac
When formatting a flash drive on a Mac, it’s important to understand the available format options. Check the commonly used file systems in USB drives:
| ⛏APFS (Apple File System) | This default file system was introduced with MacOS 10.13. It comes with features including cloning and file-level encryption. However, it can’t be read by a non-Apple machine, and Macs running software older than High Sierra won’t be able to read the drive. If none of the above-mentioned factors may affect you, you can choose this format. |
| 💻Mac OS Extended (Journaled) | This format is built into Mac devices and equipped with the maximum file size. If you choose this format, you can’t move the files to this drive, but you can read the files of the drive on a Windows computer. |
| 🔧MS-DOT (FAT) | This format is built into Mac devices and equipped with the maximum file size. If you choose this format, you can’t move the files to this drive, but you can read the files on the drive on a Windows computer. |
| 📢ExFAT | ExFAT performs better than FAT32, as it offers larger storage space and supports files over 4GB in size. This file system is compatible with most Windows and Mac OS. |
| ✨NTFS | This is the Windows equivalent to APFS. One of the benefits is that a Mac computer can read files on an NTFS drive, however, it can not write files to that drive. This file format is a good choice if you’re formatting the drive for a Windows computer. |
What to Do Before Formatting a USB Drive on Mac?
Formatting a USB flash drive will erase all existing data. Thus, it’s important to take precautions and avoid formatting the wrong disk.
- Back-Up Before Formatting a USB Drive
If you want to keep the file or data in your USB drive, you need to backup them before formatting a USB device. You can accomplish this in several different ways depending on the amount of data or file in your USB drive and the space available on your Mac.
- Back-Up to Your Internal Drive
You can back up the data by creating a new folder on your Mac computer and moving the files or data from the USB drive. After finishing this, you can format the device without any worries.
- Back-Up to Another USB Device
If the internal drive doesn’t have enough space, then you can back up the data in another USB drive. You just need to transfer the file between the two devices.
- Back-Up to the Cloud
If the above-mentioned two options are not appropriate for you, you can choose to back up the data to the Cloud which features large storage space. You just need to plug the drive into your computer and transfer the data over the network.
How to Format a USB Drive on a Mac?
After learning about the different file systems of Mac and Windows, you may feel the process of formatting the USB drive on Mac is complicated. If you follow the tips below, formatting a USB drive becomes much easier than you thought.
Format a USB Flash Drive on Mac with Disk Utility
Mac has a very handy built-in tool which is called disk utility. It can be used to format any storage device. It is safe to say using a disk utility to format the USB drive is the simplest way. The main steps to format a USB drive with the disk utility on Mac are listed below:
Step1: Plug the USB drive into the Mac computer
Step2: Select “Finder”

Step 3: Go to Applications and choose Utilities
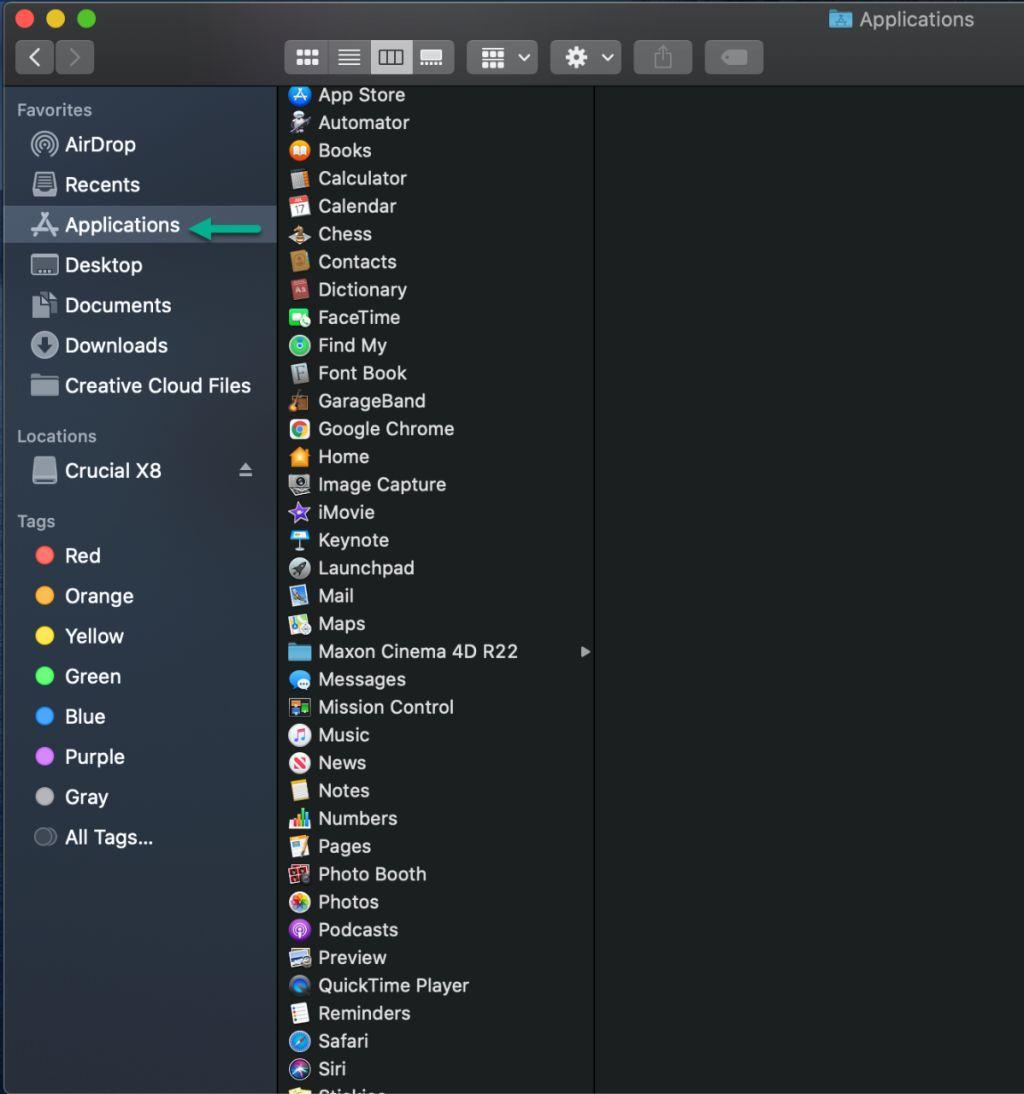
Step 4: Select “Disk Utility”
You will see the main window with a list of available storage devices on the left and various disk management options on the right. At the bottom of the main window are storage device details, including disk description, connection type, USB serial number, total capacity, write status, S.M.A.R.T. status, and partition map scheme.

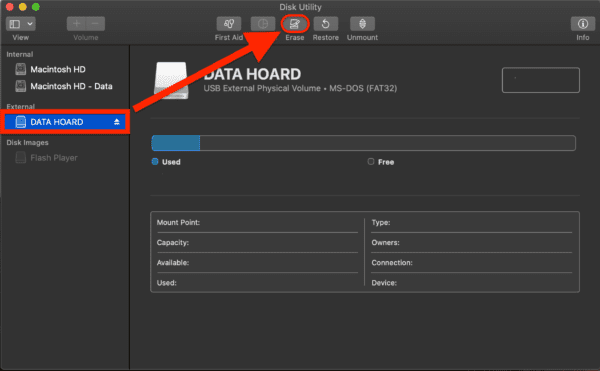
Step 5: Select a drive from the list on the left
After launching the disk utility, you will see the following picture. On the left, you need to choose a drive you are going to format.

Step 6: Choose the tab “Erase”
Then you need to choose the tab “Erase” on the first picture. After clicking this button, a dropdown menu will pop up in the second picture. And in this picture, you may notice “Name” and “Format”. You are required to give a new name to your drive. After renaming the drive, you need to choose the format you are going to reformat the drive to. Then you can click the button below “erase” and then click “done”.


Wipe a Flash Drive on Mac Using Terminal
Another way to convert USB drive to FAT32/ExFAT is using Terminal. It only takes a few steps to get the USB successfully formatted.
Step 1. Connect the pen drive to your Mac computer
Step 2. Click on cmd + space to run Spotlight, input terminal then hit Enter key.
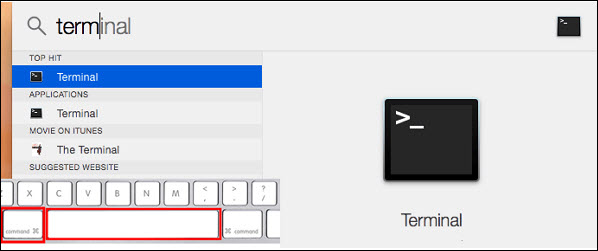
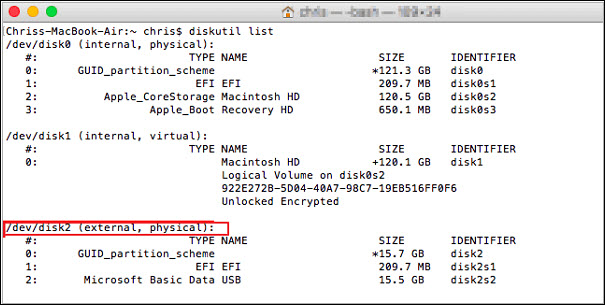
Step 3. Locate your USB drive by typing diskutil list.
Step 4. Type sudo diskutil eraseDisk FAT32 MBRFormat/dev/disk2
⚠ Note: If you want to format USB to ExFAT, you can replace FAT32 with ExFAT in the command.
Bonus Tips: How to Recover the Lost Data After Formatting USB Drive
When formatting the USB drive, you must be careful. The most frequent problem arising from formatting the USB drive should be data loss. Sometimes you may accidentally format a USB drive or format it without any backup. Data loss can result in immeasurable economic loss. For some people, they can’t afford to lose it.
In this case, the best choice for you is to use a data recovery tool. ONERECOVERY is a professional Mac data recovery software that can handle over 1000+ data loss scenarios. It supports all popular file formats and storage devices and enables selective recovery. To recover data from formatted USB drive on Mac, you can follow these steps:
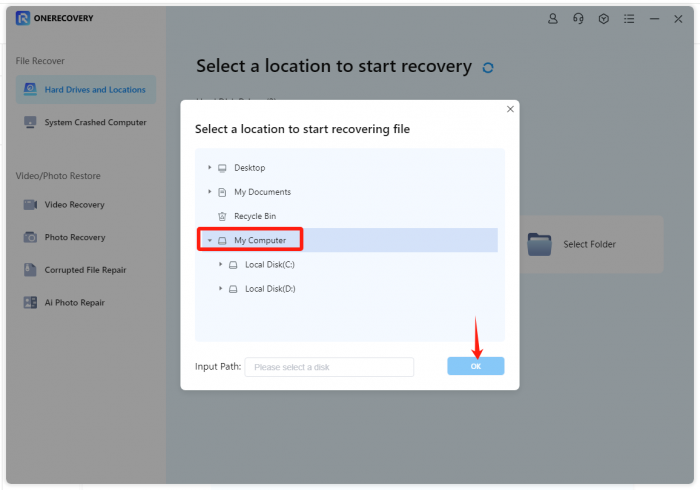
Step 1. Connect the flash drive to your Mac computer and launch ONERECOVERY

Step 2. Select the formatted USB drive to scan. You can pause the process at any time.

Step 3. Once the scanning process is complete, all recoverable files will be displayed. Preview and choose what to recover by clicking on the “Recover” button
FAQ about Formatted USB
- What is the best format for a USB drive on Mac?
The preferred format is ExFAT if you want to format a USB drive on Mac. You can use it on both Windows and Mac operating systems and it doesn’t have the 4G file size limit.
- Can Mac read NTFS USB?
Yes, Mac computer can read and display the content in NTFS formatted USB drives or external hard drives. However, you can not do anything to the formatted drive except for reading on Mac.
Conclusion
If you want to use the USB drive on Mac computers smoothly, you are advised to format it. Before that, you should back up the data you need in case you lose them. With handy and easy tools like disk utility or Terminal, you can format the USB drive on a Mac with ease. During the process of formatting, you should pay attention to the format you choose.
I am a content writer specializing in the technology and data fields. With over 5 years of writing expertise, I have produced clear, engaging content to communicate complex information to a variety of audiences. I am skilled at translating technical concepts about the latest software, AI systems, data recovery, file and video repair, and digital trends into easily understandable language for the average reader. My articles and copy bring clarity to murky tech topics through the use of metaphors, analogies, and strategic explanations.