My Account
 Sign Out

Windows supports three various file systems to store data on a storage device, namely NTFS, FAT32, and exFAT. Each file system has its use and strength. There is no doubt that the most popular file formats are NTFS and exFAT. In some cases, we need to convert the file system from exFAT to NTFS on Windows 11 when compatibility errors, file size limitations, or security issues occur.
In this article, we will explore some efficient methods to convert the file system from exFAT to NTFS effortlessly while preserving your files and folders. Let’s dive it into!
Essential Insights on Converting exFAT to NTFS
In this section, we will explore the features of those two file systems, understand the reason for converting exFAT to NTFS, and know the preparation before converting exFAT.
Overview of the exFAT and NTFS File System
NT File System (NTFS) is a file system launched by Microsoft. It is a tool for storing and restoring files from hard disk drives and solid-state drives.
Extensible File Allocation Table (exFAT) is a file system introduced by Microsoft and optimized for flash memory such as USB flash drives and SD cards, which is the most preferred format for removable media.
Here is a comparison of NTFS and exFAT, you can read on to discover the differences:
| NTFS | exFAT | |
| Compatibility | Compatible with Windows as well as Linus and BSD operating systems | Compatible with Windows, MacOS, and Linus operating systems |
| Max Volume Size | 16TB | 128 PB, 512 TB recommended |
| Max File Size | 16TB | 128 PB (theoretical 16 EB – 1 byte) |
| Compression | Yes | No |
| Performance | Low on small volumes High on Large | High |
| Best for | Internal storage/system drives on Windows | External drives, memory cards, and USB drives |
| Pros | 1. Supports lots of file sizes. 2. No limitation on partition size. 3. Provides file permissions and encryption. 4. Allows disc space management. | 1. High efficient memory management. 2. No limitation on partition size and file size. 3. Compatible with operating systems. 4. Best for external storage devices. |
| Cons | 1. High space overhead. 2. No floppy disk formatting. 3. File naming limitations. 4. Operating system incompatibility. | 1. Unlike the NTFS file system, it lacks journaling ability. 2. The exFAT file system doesn’t offer advanced features like NTFS. 3. You can’t store files of petite sizes. 4. exFAT format provides no consistency checks. |
Further Reading: >> NTFS vs. APFS: What are the Differences
Preparation for Converting exFAT to NTFS Safely
Before converting your exfat file system to NTFS, it is important to take a few preparatory steps to ensure a streamless conversion. To protect your data, here are some tips for you to follow.
- 1️⃣ Back up your data before starting the conversion.
- 2️⃣ Ensure sufficient storage space for the conversion process.
- 3️⃣ Disable any disk encryption or third-party application that may interfere.
- 4️⃣ Checking disk health and file system errors.
Best 3 Ways to Convert exFAT to NTFS Without Losing Data
Now that you’ve figured out the differences between these file systems, it’s time to know how to convert exFAT to NTFS. It’s worth noting that your necessary data should be backed up before the conversion unless the files will be deleted when formatting the drive to NTFS.
Method 1. Convert exFAT to NTFS Using CMD
CMD (Command Prompt) is a built-in utility on Windows that allows users to deal with various work related to their computer and device system.
Here is the guide on how to convert exFAT to NTFS using the command prompt:
It’s noted that if you use the convert command to convert exFAT to NTFS, such as convert E: /FS: NTFS, you’ll receive the error, “CONVERT is not available for EXFAT drives.” That’s because the convert command only works with FAT32-formatted drives or partitions.
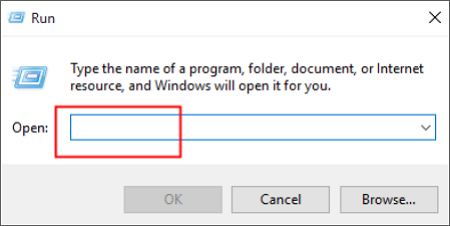
Step 1. Press the Windows + R simultaneously to open the Run dialogue.
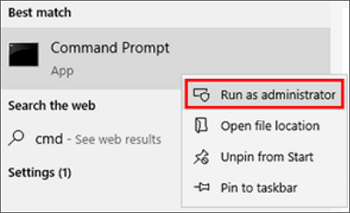
Step 2. Input the CMD command in the dialogue box, then press the Enter key.
Step 3. Right-click the Command Prompt and select “Run as administrator.”
Step 4. Input the following command: format E: /FS: NTFS and press Enter key.
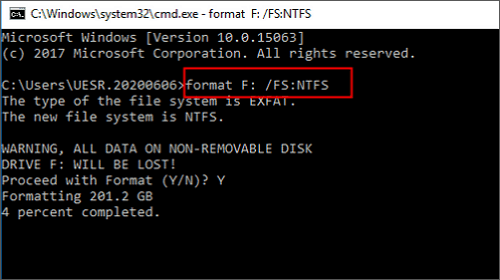
💡 Note: replace E: with your drive letter.
Step 5. Wait for the conversion to complete.
Step 6. Move files from your backup to the NTFS drive.
Method 2. Convert exFAT to NTFS Using Disk Management
Disk Management is a built-in tool in Windows that provides a comprehensive solution for you to manage your hard drive. Therefore, you can try to make the conversion on a drive or partition.
Here is the guide on how to convert exFAT to NTFS using the Disk Management:
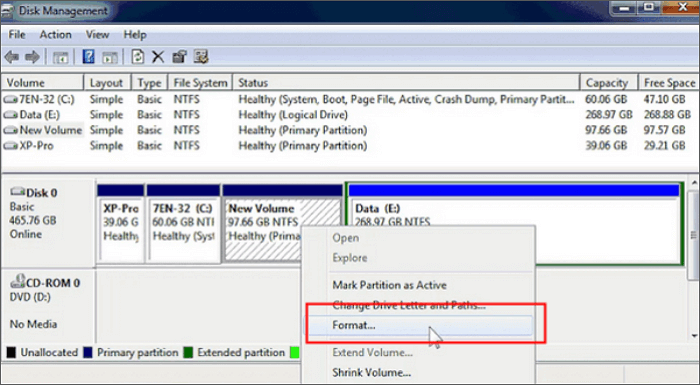
Step 1. Press Windows + X simultaneously to open the menu and then choose Disk Management to open it.
Step 2. Now you need to find the drive you intend to switch from exFAT to NTFS.
Step 3. Right-click the drive and select “Format“.
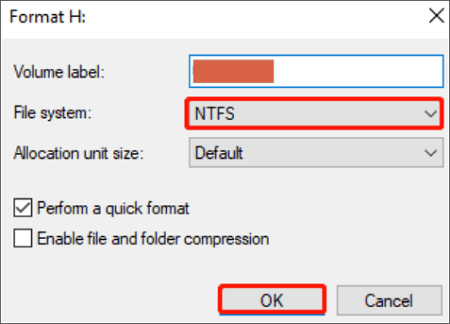
Step 4. On the File System drop-down menu, select NTFS, and then tick the “Quick Format” option. Confirm this formatting by clicking the “OK” button.
Step 5. After the conversion is completed, you can move data from your backup to the NTFS drive.
Method 3. Convert exFAT to NTFS Using File Explorer
File Explorer is also an available way to convert exFAT to NTFS without losing data, follow the steps to do it!
Here is the guide on how to convert exFAT to NTFS using File Explorer:
Step 1. Press the Win + E to open File Explorer.
Step 2. Locate the exFAT drive you want to convert.
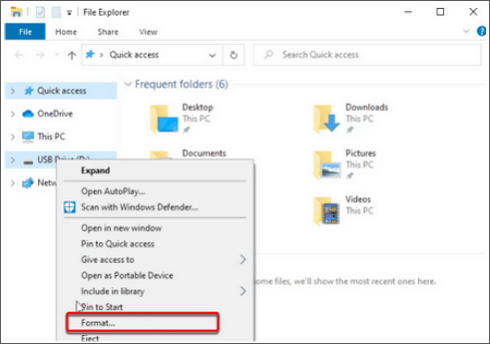
Step 3. Right-click on it and select “Format”.
Step 4. In the File System drop-down menu, choose “NTFS” and leave the “Quick Format” option checked.
Step 5. Wait for the conversion to complete.
Step 6. Move the essential files you saved in the backup to the NTFS drive.
Bonus Tip: What if You Forget to Back Up Data Before Conversion
The ideal solution is to back up your data before formatting, as you can easily restore it afterward. However, if you forget to back up data before converting the file system, don’t worry. Here we recommend you try an effective data recovery program.
ONERECOVERY is a comprehensive and professional tool to get your lost files back with ease. This tool is capable of both Windows and Mac data recovery, with the click of a button, you can restore lost and deleted files, videos, and audio files easily.

Spotlight of ONERECOVERY:
- ✅ Recovering data from laptops, desktop PCs, USB flash drives, digital cameras, SD cards, and many other storage devices.
- ✅ Supports common video and audio formats including AVI, FLA, FLV, M4V, MOV, MP4, WMV, AAC, AIFF, ALAC, FLAC, MP3, OGG, PCM, WAV, WMA, etc.
- ✅ Restores deleted files without damaging their original quality.
- ✅ 95% success recovery rate.
- ✅ It is convenient for you to perform recovery by yourself and save turnaround time.

Steps to Recover Files using ONERECOVERY on Windows PC:
Step 1. Download, install, and launch ONERECOVERY software on your system.
Step 2. Choose the location where you lost files and then ONERECOVERY will start to look for your lost data and files from the disk.
Step 3. Once the scanning ends, select the files you want to recover and click on the “Recover” button.
Step 4. Finally, choose another location to save all the recovered files.
If you need the tutorial on recovering data using ONERECOVERY on Mac, click to read this post: >> How to Recover Deleted Files on Mac
Conclusion
Hopefully, after reading this article, you know several ways to convert your external hard drive or flash drive from exFAT to the NTFS file system. By following a simple command prompt, disk management, and file explorer, you can seamlessly switch to NTFS.
Additionally, if you forget to back up data before converting the file system, you can turn to the professional data recovery tool to get back the deleted and lost data.
Vanessa is a professional editor with a strong foundation in computer information technology. Since graduating, she has dedicated her career to create content in IT fields. In the past three year, she has accumulated sufficient knowledge in data recovery, computer problems troubleshooting and application of multimedia software.
She has been trying her best to bridge the gap between complex technical concepts and accessible, reader-friendly content.