


 My Account
 Sign Out

Have you ever struck in pixelated or grainy videos? Many users complained that it was a frustrating and irritating experience. Fortunately, this article will discuss the reasons behind this issue and delve into several ways to fix grainy or pixelated videos with & without Adobe Premiere Pro. Let’s get into the details to learn more about it!
What Causes Grainy or Pixelated Videos?
Before explaining how to fix this issue, let’s try to explore and understand what accounts for grainy or pixelated videos. Here are the 6 most common reasons.
- Improper camera settings.
- Video files get corrupted or damaged.
- The videos were shot in dark-light conditions or low resolution.
- Video data may lose its quality when compressing video files to reduce the size.
- Shoot the videos with lower aperture and higher ISO.
- If streaming videos online, your video might be pixelated or blurry due to a poor internet connection.
How to Fix Pixelated Videos in Adobe Premiere Pro
Adobe Premiere Pro is one of the best video editing software, which allows you to make and edit videos. In the Premiere Pro, you can employ its tools to restore video’s visual clarity, such as sharpening, upscaling, and noise reduction. Here, we will discuss 3 effective ways to remove pixelation from videos.
Using Sharpening Effects
Sharpening is a crucial step if you want to remove pixelation from videos. By increasing the contrast between adjacent pixels, the sharpening effect can highlight and define the detail of a video.
Here is how you can use this tool to fix your videos.
Step 1: Open the Premiere Pro.
Step 2: Create a Premiere project and import the pixelated video that needs sharpening, and then drag it onto the timeline.
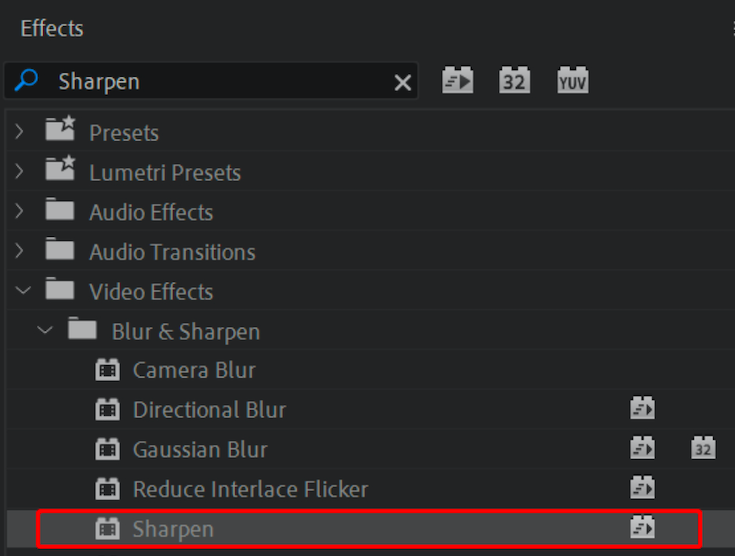
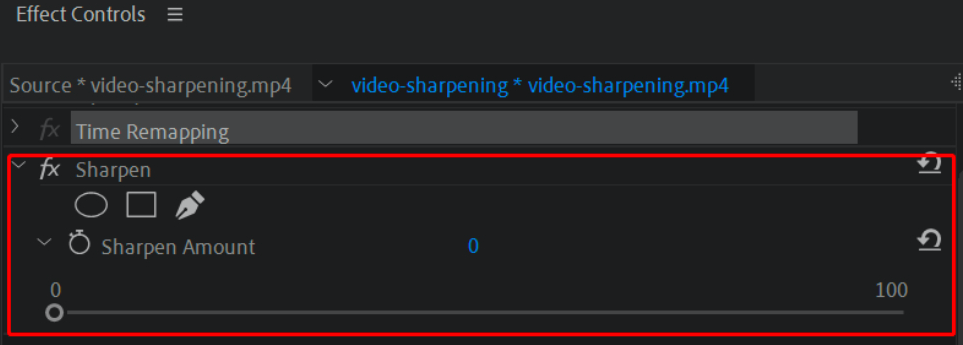
Step 3: In the Effects panel, find the “Sharpen” option. Choose a proper sharpening effect, such as Unsharp Mask or Sharpen Edges. Then you can apply that effect to the pixelated video.
Step 4: Preview the sharpened video and adjust the parameters to fine-tune your video.
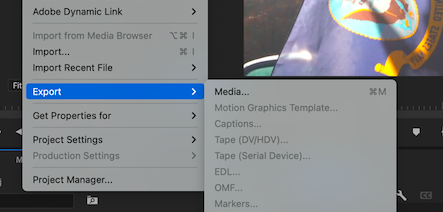
Step 5: To export a video in Premiere Pro, go to File > Export > Media.
Using Upscaling Tool
Upscaling is also an important step when you want to enhance the video resolution. However, it is pretty challenging for a beginner if you do not have plenty of in-demand skills. Here we introduce the “sequence settings” method and simplify the process into a detailed guide.
Here is how you can use this tool to fix your videos.
Step 1: Launch the Premiere Pro.
Step 2: Create a Premiere project and import the pixelated video that needs upscaling.
Step 3: In the Project panel, choose “New Item” and click on the “Sequence” option.

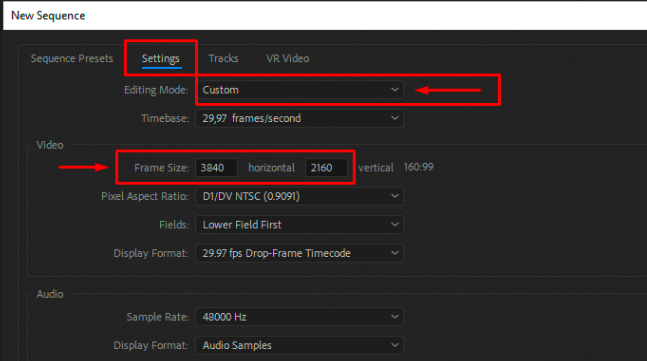
Step 4: In the New Sequence panel, click on the “Setting” tab. Then select “Custom” in the editing mode.
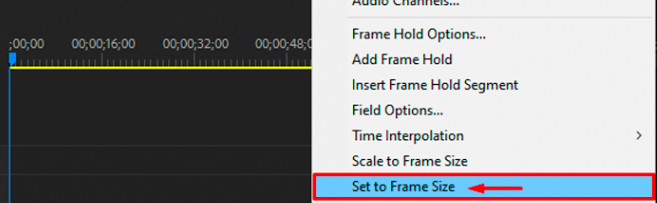
Step 5: Now, simply set the desired value in the “Frame size”. (usually 3840×2160)
Step 6: After the sequence is created, you can add the video clip to the sequence. Now, right-click the video clip on your timeline and select the “Set to Frame Size” option.
Step 7: To export a video, go to File > Export > Media.
Using Noise Reduction Tool
Video noise will be a problem for all users, but Premiere Pro has a way to assist you in reducing noise in your video projects. Using noise reduction plugins helps you to fix pixelated or grainy videos. Let’s go through the steps.
Here is how you can use this tool to fix your videos.
Step 1: Launch the Premiere Pro.
Step 2: Create a Premiere project and import the pixelated video that needs to minimize noise.
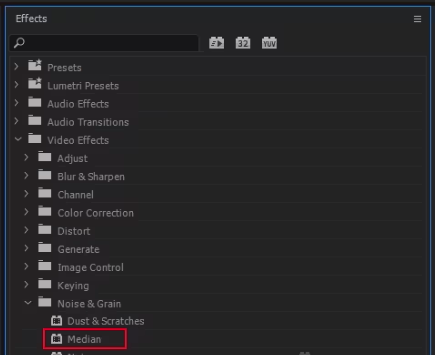
Step 3: Go to Effects > Video Effects > Noise & Grain > Median. Then drag the Median effect onto the timeline for your video.
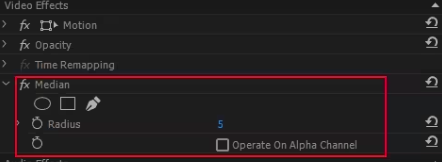
Step 4: Adjust the Radius parameter under the Median menu and preview the noise-reduced video.
Step 5: To export a video in Premiere Pro, go to File > Export > Media.
How to Fix Pixelated Videos without Premiere Pro
Adobe Premiere Pro can assist users in fixing pixelated videos professionally, however, if you want an easier way to quickly repair your footage, here we provide some alternatives for you to choose from, you can take one according to your actual need.
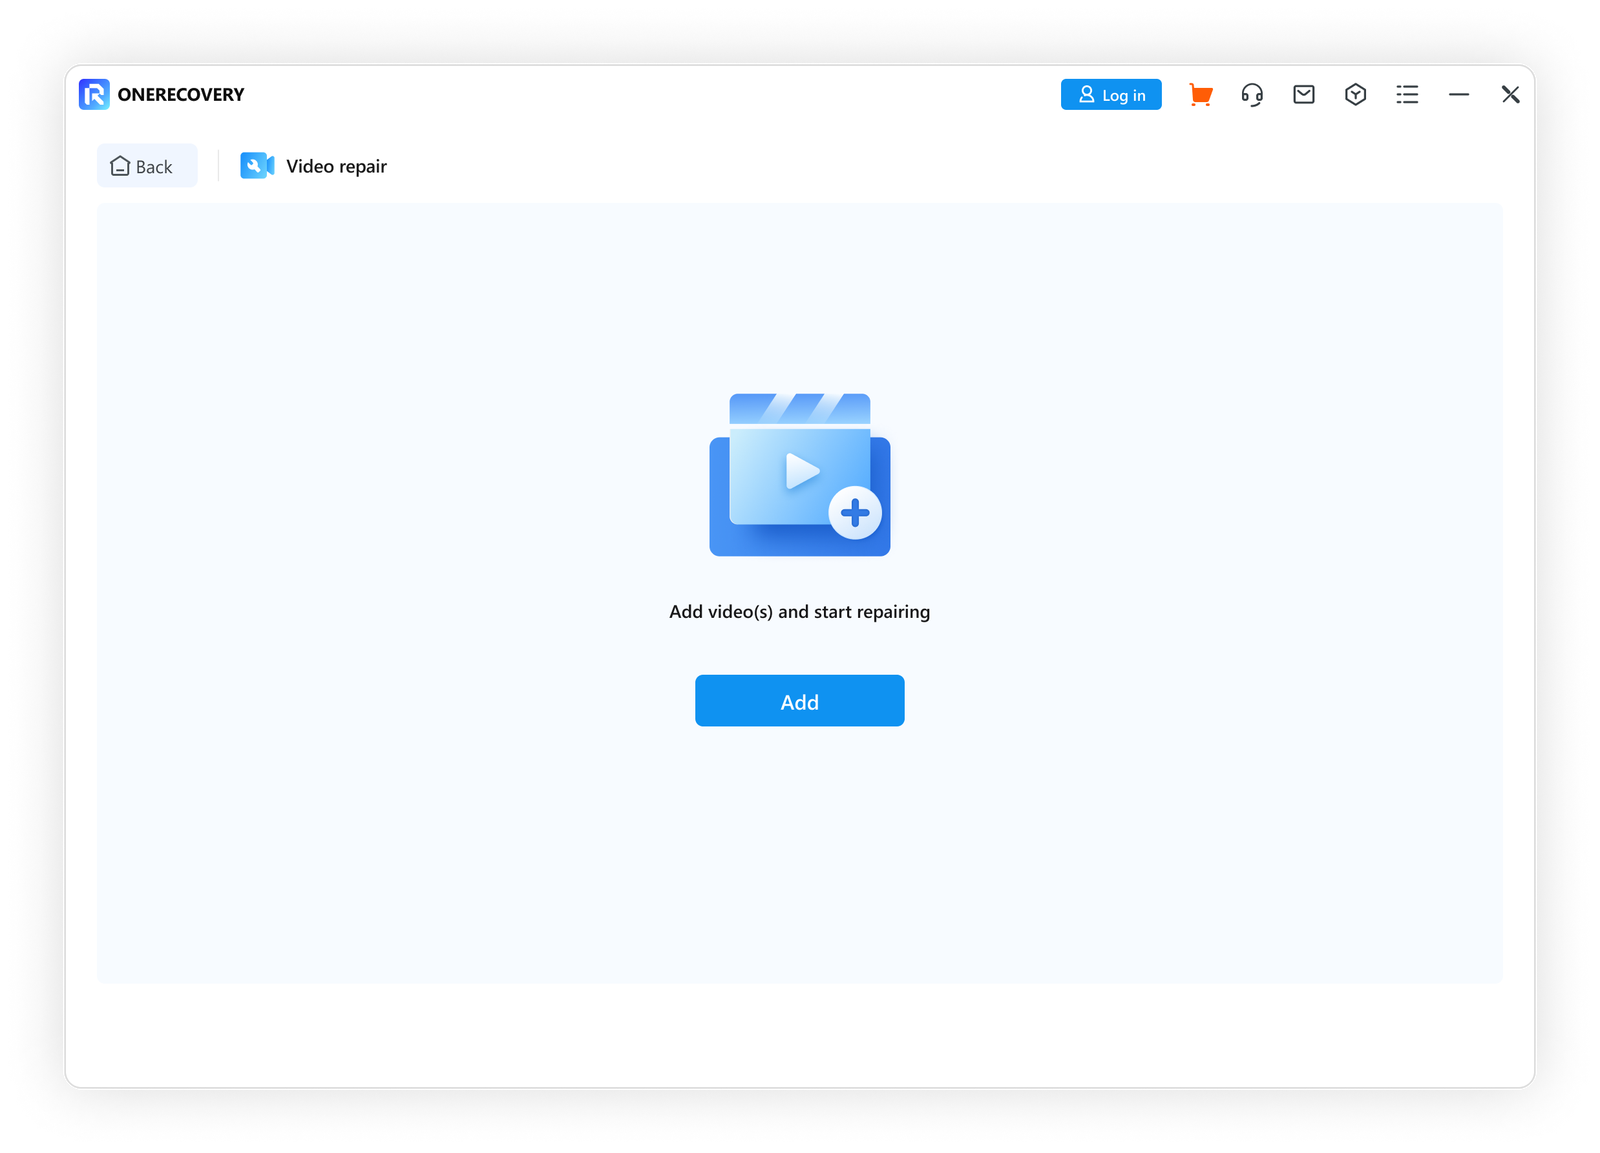
Using OneRecovery to Fix Pixelated Videos
OneRecovery is mainly a popular professional video repair software. With AI technology, it can automatically fix your pixelated or grainy videos in multiple formats such as MOV, MP4, M2TS, MKV, MTS, 3GP, AVI, and FLV. It can work seamlessly on Windows and Mac devices. This video fixer is ideal for anyone who wants to fix jerky, flickering, blurry, choppy, or broken videos with ease. Only with 3 steps, you can get your valuable videos.
Spotlight of OneRecovery
- It can repair videos that are broken, damaged, choppy, jerky, grainy, or distorted.
- It supports the repair of diverse formats of video, including MP4, MOV, MKV, M4V, and 3GP.
- It supports batch repair of up to 10.
- It supports previewing the video before repairing.
- It restores corrupted videos without damaging the original quality.
Step to use OneRecovery
Step 1: Install and launch ONERECOVERY on your PC or Mac.
Step 2: Click on the “Corrupted File Repair” on the left side.
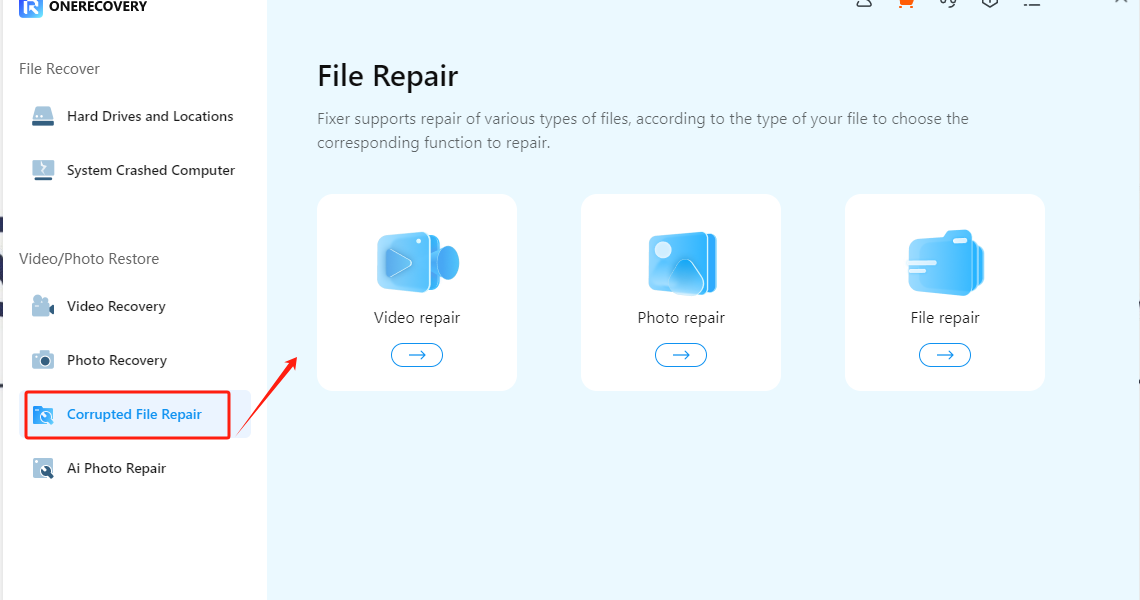
Step 3: Choose the “Video repair” option for repairing your corrupted video.
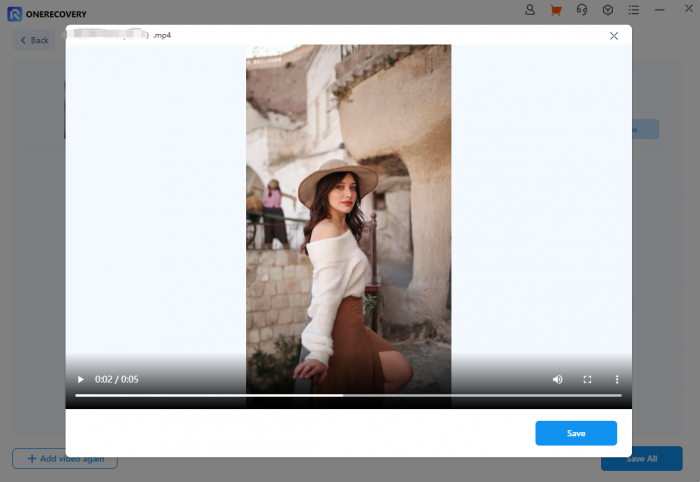
Step 4: Then upload your damaged video to the ONERECOVERY, and this fixer will use advanced AI algorithms to automatically repair video pixelation.
Step 5: After the repairing process is completed, you can preview all videos per your needs. Then select your repaired video by clicking the “Repair” button.
Step 6: Your videos will be successfully repaired.
Using Original Video Files to Fix Pixelated Videos
If the cause of pixelation is excessive compression, it is recommended to shift back to the original size and quality of the video. Just need to dump the pixelated video in the trash and save the original video file with a lower compression ratio. If this method is not valid, try another solution.
Step 1: Firstly, check the original video file is accessible. If it is accessible, you can discard the pixelated video in the trash.
Step 2: Make a new copy of the original video file with a lower compression and save it.
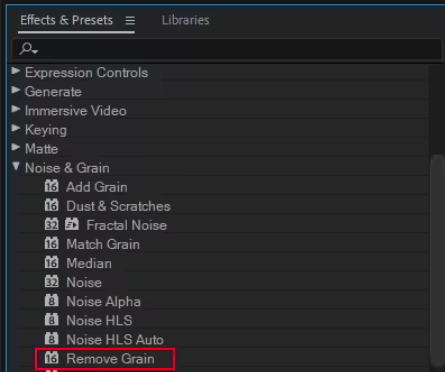
Using Adobe After Effects to Fix Pixelated Videos
Another useful way to fix grainy or pixelated videos is using Adobe After Effects. Nowadays, After Effects is one of the most professional editing tools because of its “Remove Grain” effect. With this powerful feature, you can effortlessly eliminate pixelation from your videos.
Spotlight of After Effects
- The “Remove Grain” effect can be directly used in the video.
- Multiple effects can be assigned to the videos and animations of movie clips.
Steps to use After Effects
Step 1: Download After Effects and open it on your computer.
Step 2: Create a new project.
Step 3: Next, import the pixelated video and drag it to the timeline.
Step 4: Go to the Effects & Preset panel, find the Remove Grain effect, and drag it to the video. Then you can see the preview result and make some adjustments.
Step 5: For the best result, you can adjust the values of Noise reduction so that you can make it more natural.
Step 6: To export a video in After Effects, go to File > Export > Add to Render Queue.
Using VLC Media Player to Fix Pixelated Videos
If you want to fix your pixelated videos for free, the VLC media player is your best choice! VLC Media Player is a popular multimedia player, which has several powerful features, such as converting audio and video files into other formats, recording on the desktop, and fixing video issues.
Spotlight of VLC Media Player
- It can play almost all types of files.
- Free to download.
- It can play corrupted and damaged videos.
- It has a built-in repair function.
- User-friendly interface.
Steps to use VLC Media Player
Step 1: Install and Launch VLC Media Player.
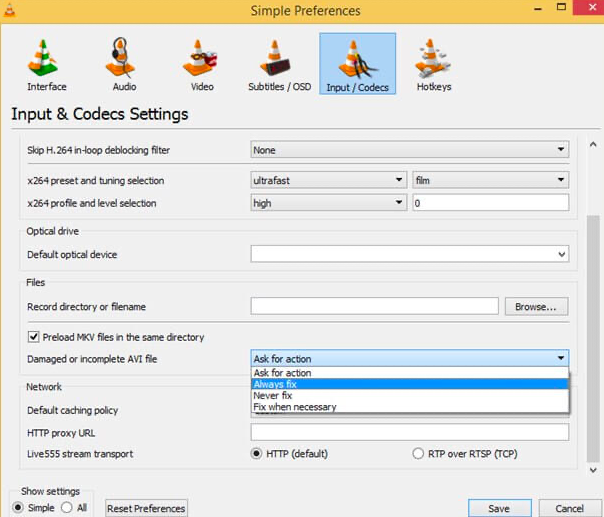
Step 2: Click on the “Tools” option and choose “Preferences.”
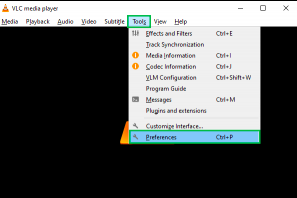
Step 3: In the “Simple Preference” wizard, choose the “Inputs/Codecs” category and select “Always fix.” Then click on the Save button.
Step 4: Click Media > Open File to load the video.
Open Videos with Compatible Video Player
Generally, it is recommended to try playing with a different media player since there is a high possibility that the videos are not compatible with the video player. This happens because some video players use unique algorithms that don’t support playing some video formats. Thus, choosing a suitable video player is also a good way to solve this problem.
Comparison Table to Fix Pixelated & Grainy Video
We listed 8 available repaired ways in this article, like anything else, different ways have their strengths and weaknesses. Let’s take a closer look at some comparisons and help you choose a method that is right for you.
| Items | Key Features | Ease of use | Preview Function | Batch Repair | Compatibility | Pricing |
| Adobe Premiere Pro | Professional video editing software | A bit complex for the new user | Supported | Supported | Windows and MacOS | ● $ 20.99 monthly for individuals ● $ 33.99 monthly per license for teams |
| OneRecovery | Powerful video fixer with advanced AI technology | User-friendly | Supported | Supported | Windows and MacOS | ● Free |
| Adobe After Effects | Multiple effects can be assigned to the videos and animations of movie clips | Needs professional techniques | Supported | Supported | Windows and MacOS | ● $ 20.99 monthly for individuals ● $ 33.99 monthly per license for teams |
| VLC Media Player | Supports repaired capabilities | User-friendly | Supports converting multiple video files in a short time | Not Supported | Windows and MacOS | ● Free |
| Compatible Video Player | Allows for the playback of video | Convenient and user-friendly | Not supported | Not supported | Windows and MacOS | ● Prices are different |
Tips to Avoid Pixelated Videos
If you want to prevent grainy, blurry or pixelated video, here are a few tips that you can follow.
- Good lighting conditions- Shooting videos in ideal lighting conditions is a vital step to avoid grainy videos, such as natural daylight for outdoors, and artificial lighting for indoors.
- Using proper camera settings- A correct setting would help you avoid many problems.
- Keeping lower ISO settings- Lower ISO settings are generally better for video quality.
- Wide aperture -In a low light condition, shoot the videos with a wide aperture.
Frequently Asked Questions
Q1: How to fix pixelated video on Android and iPhone?
A1: Several ways are available for you to fix video pixelation issues. Try to use either solution freely until the error has been fixed.
1) Convert the video to a higher resolution.
2) Try an alternative media player.
3) Download a professional video tool to repair the pixelated video.
Q2: Can I fix my pixelated stream?
A2: Yes. To fix a pixelated stream, you can try optimizing lighting and camera settings, checking your bandwidth, lowering bitrate to reduce pixelation, or upgrading your computer hardware effectively.
Q3: Which is the best format for saving video to avoid pixelation?
A3: MP4, AVI, MOV, and FLV are generally considered to be the best format for saving video.
Conclusion
After reading this article, several ways are available for you to fix video pixelation issues. Try to use either method freely until the error has been fixed. Moreover, we note that pixelated video is usually caused by shooting in a low resolution. Thus, the precaution tips described in this article should be followed seriously. Additionally, if you are a beginner and want to fix grainy or pixelated videos quickly, we recommend using professional video repair software such as ONERECOVERY. All of your damaged or corrupted video files can be easily recovered by using advanced AI technology.
I am a content writer specializing in the technology and data fields. With over 5 years of writing expertise, I have produced clear, engaging content to communicate complex information to a variety of audiences. I am skilled at translating technical concepts about the latest software, AI systems, data recovery, file and video repair, and digital trends into easily understandable language for the average reader. My articles and copy bring clarity to murky tech topics through the use of metaphors, analogies, and strategic explanations.

