My Account
 Sign Out

No hard drive can work forever. Checking your hard drive’s health regularly is crucial to maintain its function and avoid unnecessary data loss as HDDs are dune to decrease in lifespan with constant reading and writing. This article will introduce simple but effective solutions to check the health of a hard drive on Windows, Mac and Linux.
How to Check Hard Drive Health on Windows 10/11
Method 1: the CHKDSK Command
The CHKDSK Command, short for ‘check disk’, is a built-in Windows toolbox that can scan your hard disk to find system errors and bad sectors. Additionally, it can be used to check hard drive health by showing you any errors and fixing problems if possible.
💡 Here are the steps to initiate CHKDSK Command on Windows 10/11:
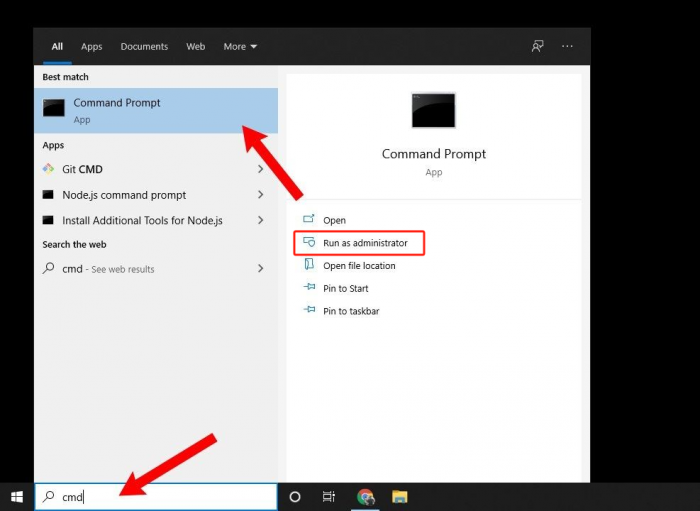
Step 1. Open the “Start” menu search for “cmd” or “Command Prompt“. Right-click to select the “Run as Administrator” option.
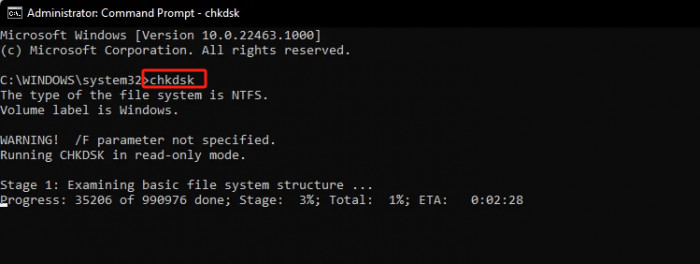
Step 2. Type “chkdsk” in the Command Prompt window and press the “Enter” button. Then the program will run a basic scan.
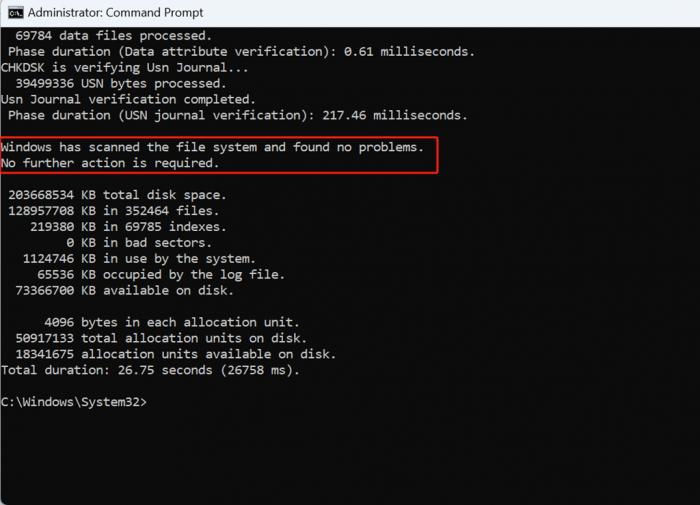
Step 3. Wait for the process to be finished. It normally takes about 1-2 minutes. If everything is okay, you will see the following message:
✍ “Windows has scanned the file system and found no problems. No further action is required.”
However, if you find any bad sectors, you can use the command, “chkdsk /f /r”, to scan and repair the damaged drives. Besides, if you would like to dismount the drive first, please use the command “chkdsk LETTER_OF_DEVICE / f / r / x“. The full list of commands can be viewed on the Microsoft CHKDSK page.
We have listed some commonly used parameters:
| Command Parameter | Result |
| /f | This command fixes any hard drive errors. |
| /scan | This command runs an online scan on the hard drive (without repairing it). |
| /r | Find any bad sectors and recover readable data in the locked disk. This command contains the function of /f. |
| /x | Force the volume to dismount first. This command also contains the function of /f. |
| /perf | Uses more system resources to scan the disk as fast as possible. This command is available in NTFS only. |
| /spotfix | Use with NTFS only. Runs spot fixing on the volume. |
| /? | Provide help related to chkdsk Command |
Method 2: the WMIC and the S.M.A.R.T. Tool
In the Command Prompt window, there is another command to check your hard drive health: WMIC. As a quick built-in feature of Windows, WMIC is a command-line interface that allows you to perform many different administrative tasks, including checking hard disk health. It will use the S.M.A.R.T. (Self-Monitoring, Analysis and Reporting Technology) feature of hard drives to confirm their status and draw a simple conclusion.
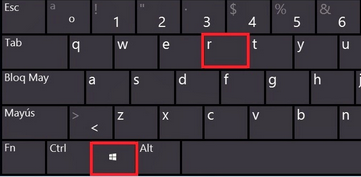
Step 1. Start by entering the Command Prompt window. You can open it by the way mentioned in Method One, or by pressing the “Windows” and “R” buttons to open the “Run” window.
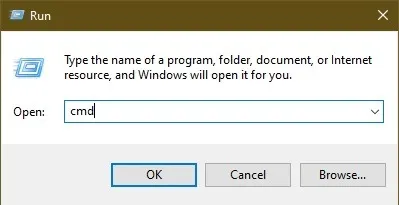
Step 2. Type in “cmd” and click “OK” in the “Run” window.
Step 3. When you are at the Command Prompt screen, type in “wmic diskdrive get status” and then press Enter.
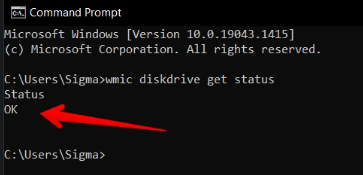
✅ You will see the status of your hard drive after a few minutes. If it shows “OK, “ your hard disk is in good condition.
❌ But if you receive “bad“, “unknown“, or “caution“, there is probably something wrong with your hard drive and you should adopt other methods to fix it, such as using specialized software.
However, it should be noted that those messages may be an error if the WMIC is having trouble getting the status of the hard disk health. To make a confirmation, you will have to type a new command.
Method 3: the HDD Manufacturer’s Tools
Most major hard drive manufacturers offer free tools to monitor and check your hard disk health and performance, providing you with the most accurate information. But before using these tools, you should confirm the manufacturer of your HDD.
Step 1. Go to the “Start” menu and open “Device Manager”.
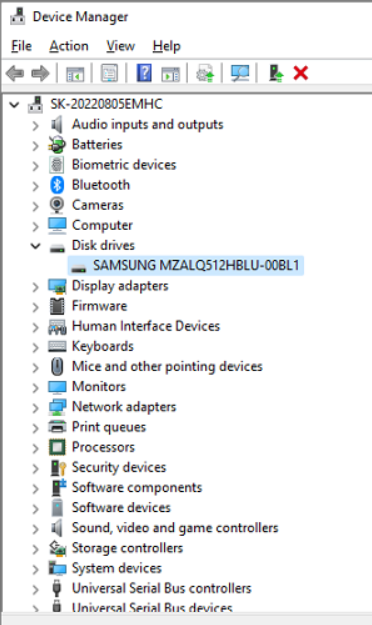
Step 2. In the Device Manager window, click “Disk Drives” to see the list of your storage devices.
Step 3. Select the drive for which you plan to download the tool, and copy its model number to Google to get the manufacturer’s name.
Step 4. Download and install the manufacturer’s tool to analyze your drive’s status. Then go to the manufacturer’s support page and search for its hard drive utility. Below are some of the well-known hard drive brands:
🔸 SeaTools | Support Seagate US
🔸 Download Software, Firmware and Drivers for WD Products
🔸 Support Home | Official Samsung Support US
Method 4: the BIOS Tool
In general, every computer has a program named BIOS that enables the operating system to connect with the computer’s firmware. You can perform tests on hard drive health in the BIOS, preventing any interference from the operating system. So this method is preferred when the computer does not boot into Windows or cannot access the hard drive.
Step 1. Reboot your computer and after it is switched off and on again several times, press the “Delete”, “F2”, and “F12” buttons, or whichever buttons that the boot screen informs you of being able to enter the BIOS. Different motherboards have different buttons to take you to your BIOS. You can set your Windows to boot directly into the BIOS as well.
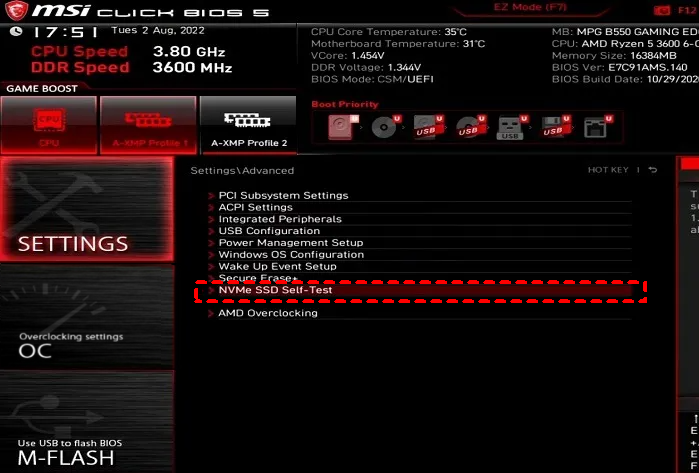
Step 2. When you are in the BIOS, you must find out the test itself. For most BIOS versions, press “Settings” first and then click “Advanced”. After that, select “NVME self-test” to test the health of NVME drives. Note that the extract instruction depends on what motherboard you are using. The option in many HP and Dell computers can be found in Diagnostics instead.
Method 5: Defrag and Optimize
Windows provides a program called disk defragmenter that can detect the fragmentation level on the hard disk and help reorganize fragmented data. Using this tool will enhance disk health and improve overall computer performance.
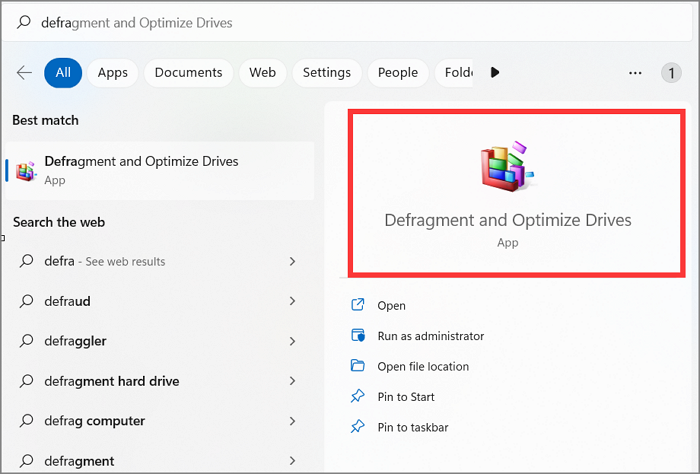
Step 1. Type “defrag” in the search box of the “Start” menu, and open “Defragment and Optimize Driver“.
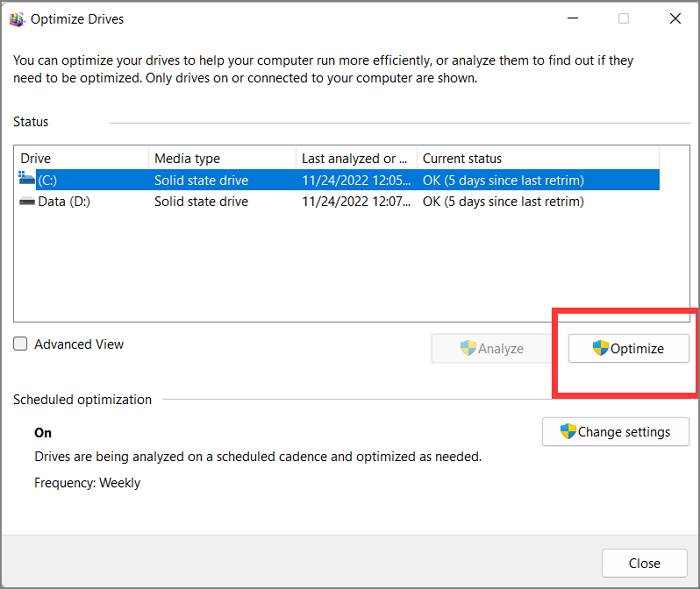
Step 2. Select your drive and click “Optimize” to scan fragmented files and optimize the drive for better performance.
💡 If you are using an SSD, this method is not recommended because it may result in wear and tear on the drive.
Method 6: the Error-Checking Tool
The in-built Windows file explorer is also can be employed to check hard drive health. Although it fails to give you a detailed analysis, it can provide a quick result with simple steps.
Step 1. Open the “Windows File Explorer“, right-click on the drive you’d like to test and choose “Properties“.
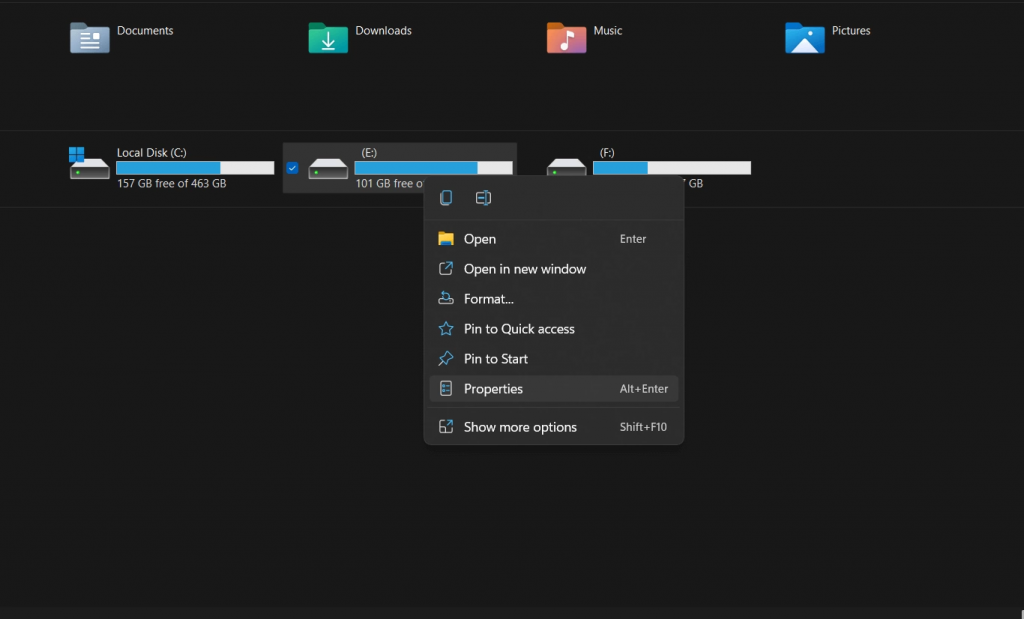
Step 2. Select the “Tools” tab and click the “Check” option.
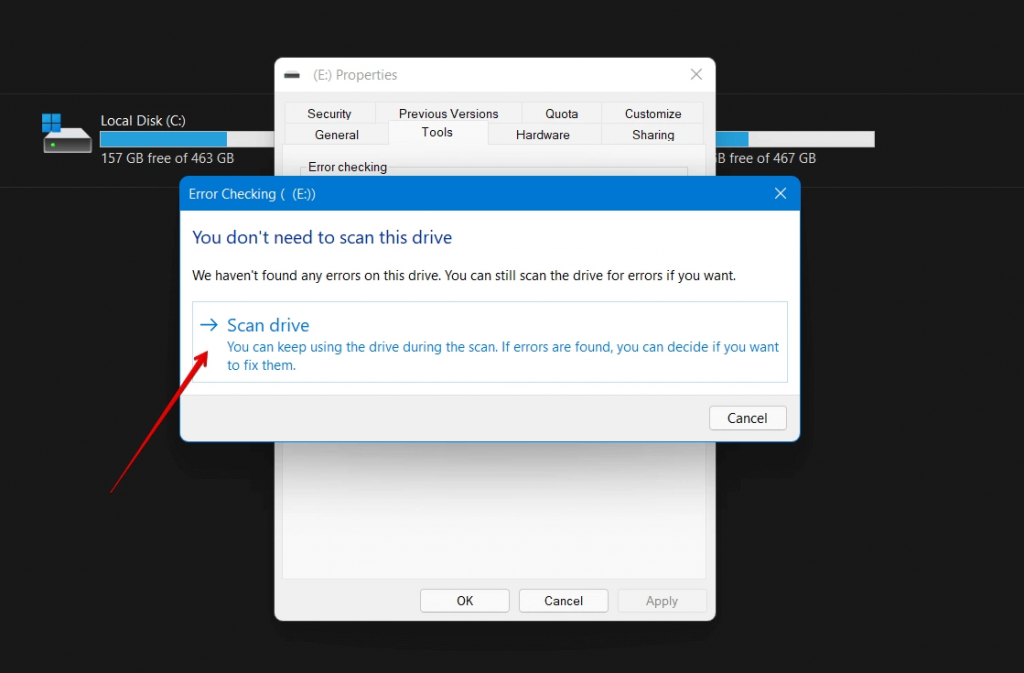
Step 3. Click on “Scan Drive” and a quick scan will start on your selected drive.
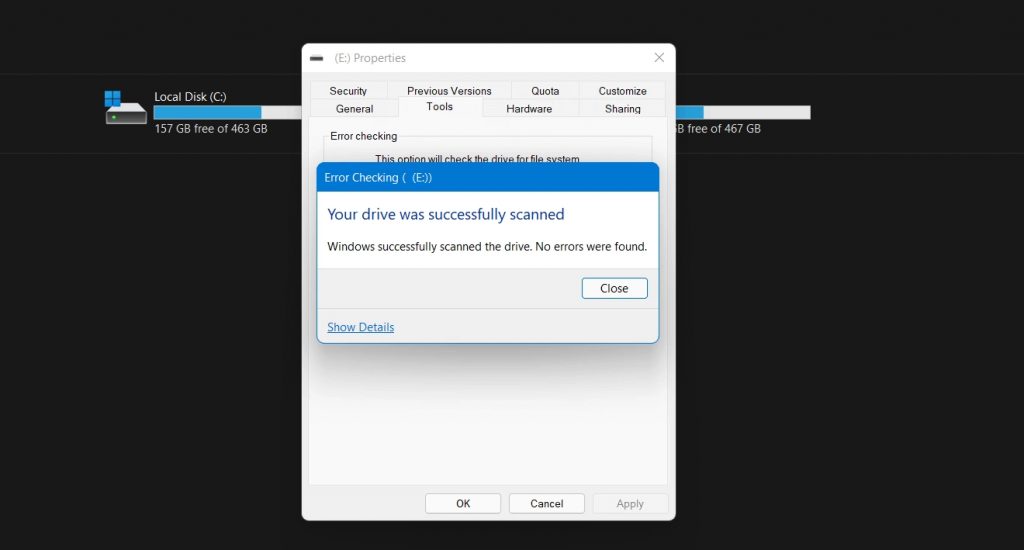
Step 4. As the scan finishes, you will receive a pop-up that suggests your hard drive’s health.
How to Check Hard Drive Health on MacOS
Checking hard drive health on Mac computer can be easy if you use Apple’s built-in application, Disk Utility. Here’re the steps on how to scan and check for hard drive health and errors:
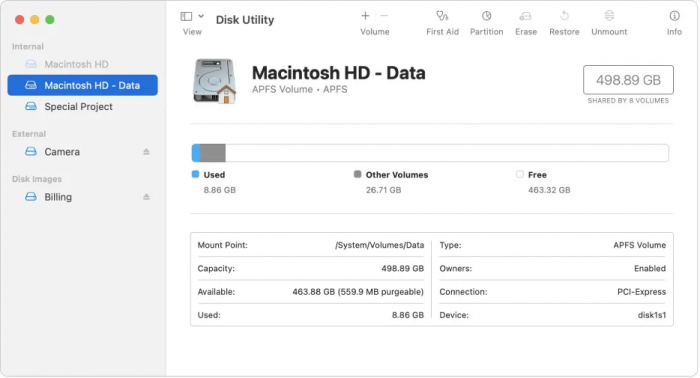
Step 1. Launch Finder > Applications > Utilities > Disk Utility.
Step 2. Choose the disk that you want to check with on the left side.
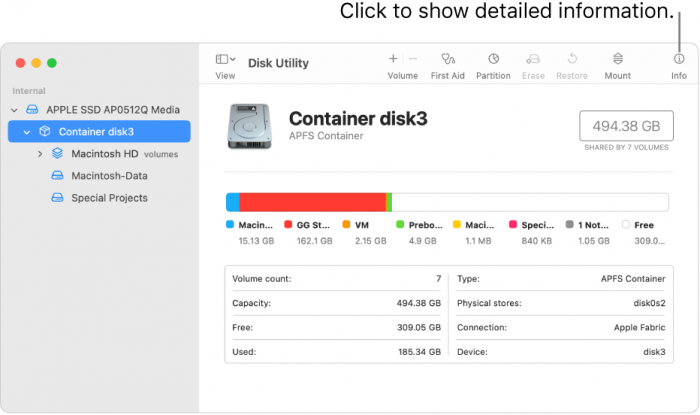
Step 3. Hit the “Info” on the top right corner for detailed information on the disk.
Step 4. Check the detailed info and see if there are any errors highlighted in red.
How to Check Hard Drive Health on Linux
Checking hard drive health on Linux can be similar to the steps on Windows. Here’s how:

Step 1. Launch Terminal on your computer.
Step 2. Install Smartmontools for your system by following the corresponding instructions with your Linux system.
| Linux | Command |
| Ubuntu | sudo apt install smartmontools |
| Debian | sudo apt-get install smartmontools |
| Arch Linux | sudo pacman -S smartmontools |
| Fedora | sudo dnf install smartmontools |
| OpenSUSE | sudo zypper install smartmontools |
Step 3. Now launch the Terminal again and input “su” or “sudo-s“.
Step 4. Input “lsblk” to list the hard drives. Note that /dev/sdX is the device label while /dev/sdX# stands for the partition number.
Step 5. Browse the list of hard drives and mark down the one that you’d like to check health with.
Step 6. Within the terminal, employ the smartctl command to display the S.M.A.R.T. status of your device, ensuring you replace “X” with your drive’s designated label.
👉 smartctl -a /dev/sdX
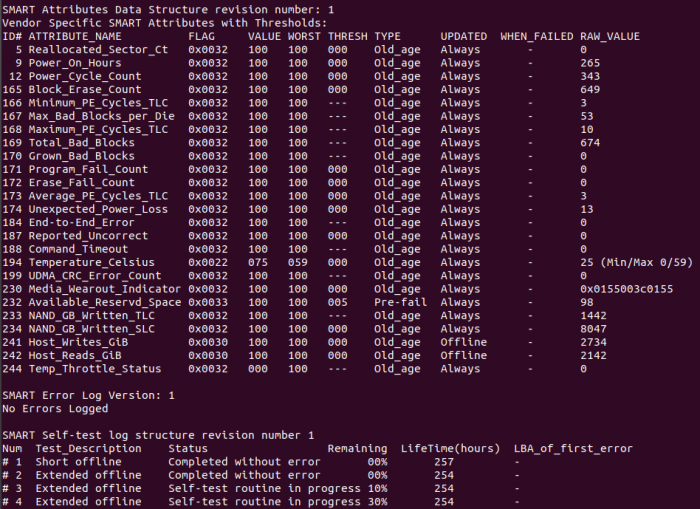
Step 7. Check the result and also the health of the hard drive. If you need to look through various hard drives, you need to repeat this process.
💡 If you want to download the report to your OS, use the below command to easily save the report:
👉 smartctl -a /dev/sdX >> /home/username/Documents/drive-report.txt
Check out the below video for a visual guide:
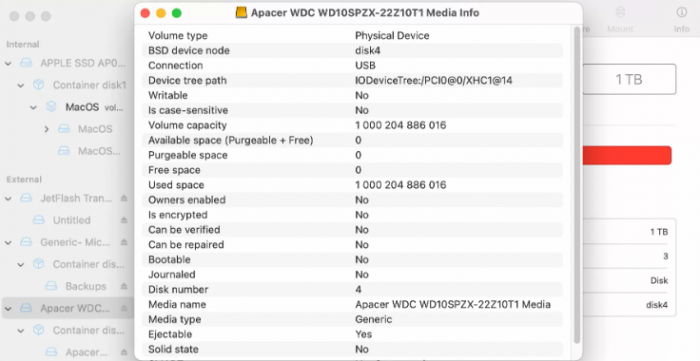
Bonus Tip: How to Check External Hard Drive Health
Checking the health of external hard drives can be similar to the steps of the built-in hard drives of Windows. However, before initiating any commands, simply try to physically examine the hard drive. This involves inspecting for any visible damage, unusual noises, or signs of wear and tear on the external casing. Taking a moment for this visual inspection can provide valuable insights into the overall condition of the external hard drive before proceeding with diagnostic commands or software checks.
If everything is okay, you may conduct the CHKDSK Command to check the external hard drive.
FAQ
❓ Does CHKDSK fix an external hard drive?
Yes, it’s possible. Open CMD on your computer and input any of the commands based on your needs:
- chkdsk /f – Fix any hard drive errors.
- chkdsk /r – Find any bad sectors and recover readable data in the locked disk. This command contains the function of /f.
- chkdsk /x – Disconnect the hard drive to scan and fix it.
- chkdsk /f /r /x – Scans the file system and its sectors, and fixes any errors found.
❓ Is it possible to fix a failed hard drive?
Absolutely! Simply read this guide on how to fix a failed hard drive step by step.
Conclusion
Checking on the hard drive’s health regularly is essential to maintain it in good health. The above are the effective methods recognized by many people in checking hard drive health on Windows, Mac and Linux., and you can make a choice according to what you like. Remember, proactive maintenance and timely checks can significantly preserve your hard drive’s health and prevent potential data loss or system disruptions.
I’m thrilled to be part of the OneRecovery team as a writer. I’m passionate about simplifying the complex world of data recovery and making it easy for everyone to understand. My focus? Well, I love diving into tutorials on hard drive recovery, crash computer data retrieval, photo repair, and many more. But that’s not all—I’m all about exploring the creative side too, so expect plenty of engaging and imaginative posts on various aspects of data recovery software. Join me on this journey as I share insights, tips, and tricks that make data recovery a breeze!