My Account
 Sign Out

When it comes to computer RAM (random-access memory), have you ever noticed that a certain app causes some RAM usage even after you no longer use it? This is what we call a memory leak.
In this article, we will discuss some basic information on this issue. For example, you will know the definition as well as the common causes of memory leaks. Then, several helpful solutions will be provided for readers who want to know how to fix a memory leak.
What is a Memory Leak
In normal situations, a program will apply for some RAM and occupy it during the program’s running. At the end of the program’s run, it releases the RAM it occupies so that another program can access the available memory.
However, due to some reason, the program may not release the occupied RAM. In this situation, the memory cannot be allocated to a new program and be used (that is just like the program borrowed some RAM and did not return it.) And we call this issue a memory leak.
What Causes Memory Leaks
After learning about what is a memory leak, you may wonder about the primary causes of this problem. This will help you quickly identify the problem you are facing and figure out the most practical solutions.
▷ Unreleased Memory
If the programmers forget to free the dynamically allocated memory using functions like ‘free()’ in languages like C or ‘delete’ in C++. Errors like this will make the memory become inaccessible but remain reserved and eventually cause memory leaks.
▷ Circular References
The garbage collector, a part of the automatic memory management system, relies on reference counting to identify which objects are used. But if the objects reference each other and create a cycle, the garbage collector won’t be able to figure out which objects are no longer needed. Thus, the memory cannot be deallocated.
▷ Inefficient Data Structures
In some situations, the data structure of a program may be poorly designed or inefficient. This problem will lead to objects not being removed even if they are not needed anymore. As a result, the unnecessary memory will be retained.
How to Fix a Memory Leak on a Windows PC
To help you fix the memory leak on your computer and improve the device’s performance, this part will introduce 4 practical solutions. Now, follow the steps to free up the essential system resources.
Method 1. Restart Your Computer
Many people consider restarting the computer as the simplest way to fix memory leaks. In terms of user experience, the running speed of your computer can indeed improve for a short period after restarting. That is because all running processes will be terminated when you restart the device, thus the memory occupied by the programs will be released.
However, simply restarting your PC won’t fix the underlying causes of memory leaks. Once you launch the applications again, the memory leak may still occur.
Despite these limits, it’s a quick fix when you need to speed up the computer as soon as possible. The following tutorial will tell you how to fix memory leaks by restarting the device.
Step 1. Go to the Start Menu > choose the power icon.
Step 2. Restart the PC by hitting the Restart icon.

Besides the most straightforward operations above, there is a built-in tool on your Windows PC that can help you check the errors on the device and restart to solve them.
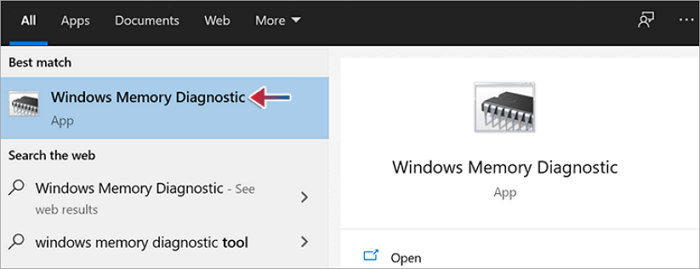
Windows Memory Diagnostic is a very practical, useful built-in Windows tool that scans and fixes the computer’s RAM issues. The following tutorial will teach you to restart your computer and check for memory problems.
Step 1. Type “Windows Memory Diagnostic” in the search bar in the start menu. Then, click on it.
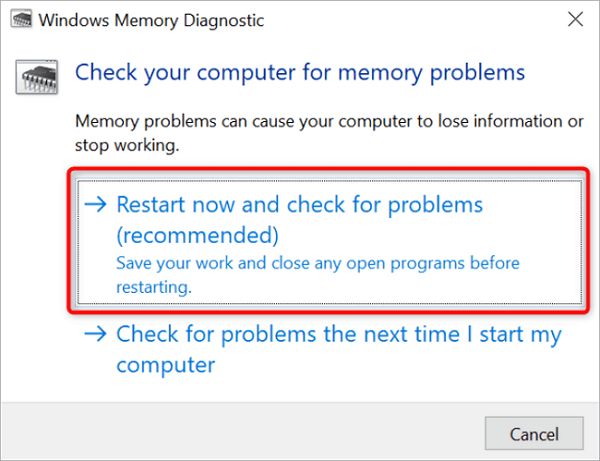
Step 2. Select “Restart now and check for problems”.
Step 3. The computer will reboot into a screen like a picture and begin to do a memory test.
Step 4. Check for errors after the testing process ends. Then, press Esc to quit the tool.
Method 2. Optimize Hard Drive
In addition to just restarting the computer, there is another available method that has a long-term beneficial impact on the overall system performance and ensures the system is stable. This approach is to optimize the hard drive.
The optimization of the hard drive can speed up data reading and writing. As a result, it will lead to faster loading times for programs and reduce the strain on system memory. That is why this method, to a large extent, can address the impact caused by memory leaks.
This tutorial will guide you through optimizing the hard drive on your PC:
Step 1. Open your File Explorer.
Step 2. Right-click the disk drive (e.g., C) and select Properties.
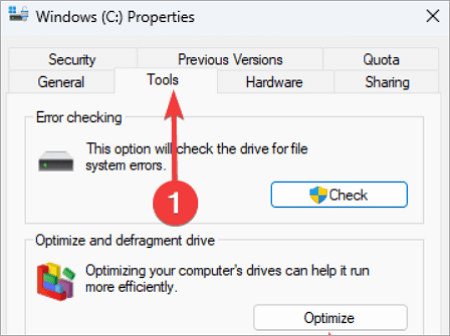
Step 3. Choose the Tools tab > click Optimize in the “Optimize and defragment drive” part.
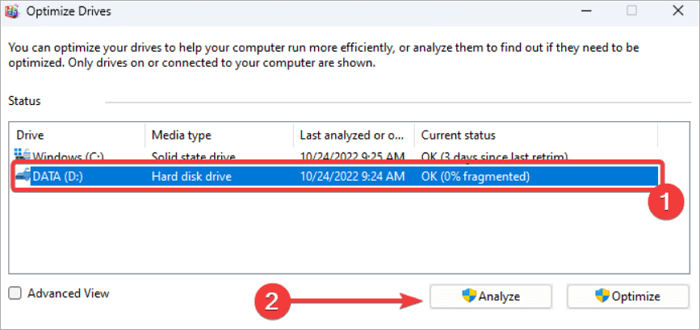
Step 4. Select the hard drive you want to defrag and click on the “Analyze” button to start the process.
Step 5. Wait for the process to end. Restart your computer.
💡 Notice: You can check the hard drive’s health after the process. And we recommend you defrag your drivers regularly, which is good for memory management.
Method 3. Update Device Drivers
One of the causes of memory leaks is an outdated or incompatible device driver. And there is an efficient solution to fix the problem, which is updating the drivers on your Windows PC.
This approach ensures that the computer hardware components work perfectly with the Windows system and avoid conflicts that may lead to memory leaks. Moreover, there may be some additional features and bug fixes after updating the driver. Generally speaking, these updates will improve the overall system efficiency and reduce the likelihood of memory-related problems.
Now, update the drivers step by step.
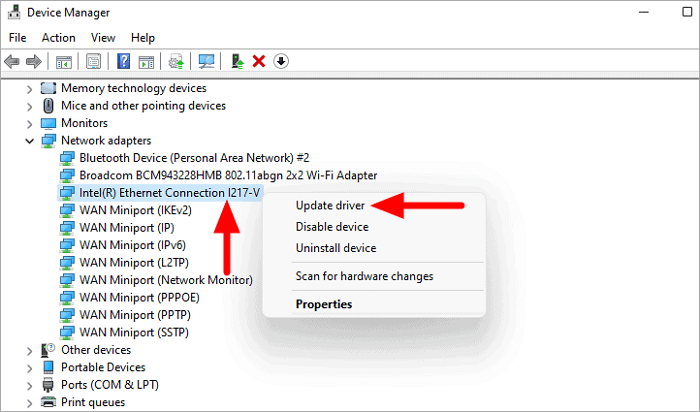
Step 1. Open Device Manager by searching in the Start menu and clicking it.
Step 2. Find the drive you need to update, usually, you need to update the graphics, network, and sound drivers.
Step 3. Right-click the device > select Update driver.
Step 4. Click on “Search automatically for drivers”.
Step 5. Restart the computer after the process is done.
Method 4. Disable Startup Programs
You can identify which specific program is causing the memory leak by disabling them one by one. Thus, the application that causes the problem can be uninstalled, and this issue can be addressed at its root.
Even if you fail to find the one that leads to memory leaks, it’s also recommended to disable some memory-intensive programs to provide temporary relief and free up system resources. That is why this method can be considered as a quick solution to system slowdowns and crashes.
This part will offer you efficient approaches to disabling the startup programs.
1️⃣ Disable Startup Programs in Task Manager
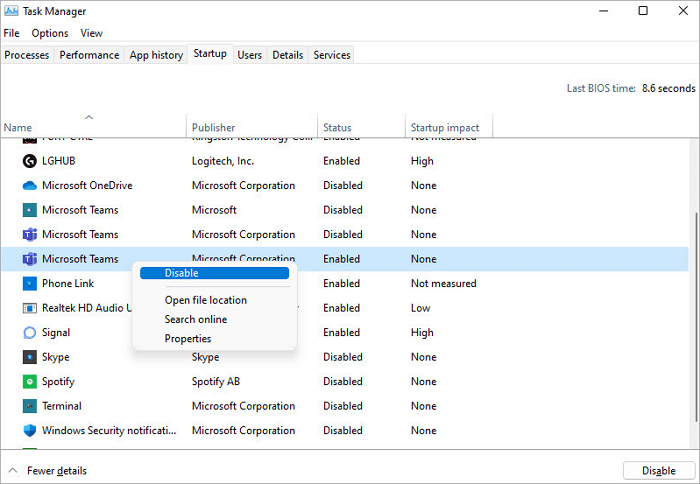
Step 1. Open the Task Manager by right-clicking the taskbar.
Step 2. Click the Startup tab > find the program you want to disable.
Step 3. Click the Disable icon.
2️⃣ Disable Startup programs via Computer Settings
Step 1. Go to the settings and select Apps.
Step 2. Select Startup in the left panel.
Step 3. Toggle to disable the app that does not need to launch when the computer starts.

Conclusion
Memory leaks are annoying and may bring you a bad experience. To prevent the decline in system performance, it’s necessary to fix the memory leaks.
This post introduces what is memory leak as well as the most common causes that may lead to this problem. Most importantly, it offers you answers to the question “how to fix memory leaks”. You can try a suitable approach to get your computer back to its best performance.
FAQs About Fixing a Memory Leak
Since memory leaks are very common, you may face this problem when playing video games or using some software. If the content offered above is not suitable for the actual situations, you can continue reading the following FAQs.
How do I know there is a memory leak in my computer?
The Resource Monitor in Windows can be used to check how much RAM is used by the system.
Step 1. Press Windows+R to open the Run dialog. Then, type “resmon” in the bar and click OK.
Step 2. Check the Memory tab after the Resource Monitor opens.
Step 3. Check the available memory and in-use memory. This shows whether the system RAM is running in low memory or is plenty of available RAM.
Step 4. Check for the memory used by the processes in the list > click Commit (KB), this will reorder the list to show the program or app that uses the most RAM at the beginning.
If you find that only a little memory is available, there perhaps is a memory leak on your PC.
How to Fix Baldur’s Gate 3 Memory Leak?
In most cases, the memory leaks will be solved when you update the game to the latest versions. But if there are no available updates, there are some methods that may help you fix Baldur’s Gate 3 memory leak. For example, updating graphics drivers and lowering the graphic settings will solve most of the performance issues, including memory leaks.
Also, you can verify the game files in Baldur’s Gate 3 Data Folder to determine if there is a problem with those files. Some gaming platforms, like Steam or GOG, support verifying the integrity of game files.
This solution is also available in fixing the memory leak of other applications, such as Starfield memory leak and Firefox memory leak.
Vanessa is a professional editor with a strong foundation in computer information technology. Since graduating, she has dedicated her career to create content in IT fields. In the past three year, she has accumulated sufficient knowledge in data recovery, computer problems troubleshooting and application of multimedia software.
She has been trying her best to bridge the gap between complex technical concepts and accessible, reader-friendly content.