My Account
 Sign Out

Last Updated Date: Jan 17, 2024
Ever deleted a significant picture by mistake? For instance, was it a picture of your business, close friends, happy memories from your youth, or your graduation? In our experience, many people may mistakenly delete their photos, and a long time later they realize what happened and they cannot find precious photos.
To make it simple for you to recover deleted photos on Windows, here we provide several helpful solutions to recover deleted or lost photos in Windows. If you follow the solutions and steps, you may retrieve most of your deleted photos.
Reasons for image loss in Windows
Windows 10 image recovery works in most cases, but not in all. It depends on the reason for photo deletion. Let’s take a look at some of the main reasons for photo loss.
| ❓Possible Reasons | 📋More Explanation | 🛠️Step-by-step troubleshooting |
| Accidental Deletion | Maybe it’s one of the most common causes of photo loss | ● Restore photos from the Recycle bin first ● Using the Backup and Restore feature |
| Corruption of procedure | Users may have formatted your hard disk without a backup | ● Restore deleted photos with File History ● Using a third-party image recovery tool |
| Formatting computers | Users may have formatted your hard disk without backup | ● Recover deleted images with professional photo recovery software |
💡👉Tips before Windows 10 image recovery
After realizing your image files missing or being deleted, refrain from performing any additional procedures. Your deleted photos can be recovered as long as it hasn’t been overwritten.
A photo that has been permanently removed from your computer’s hard drive won’t just vanish without a trace. In actuality, the storage space it used to occupy will be regarded as free. The old data will be readily erased in this scenario if you keep using your computer to create new data, making it impossible to recover the deleted pictures.
So, when we discover that our images have been permanently erased, the first thing we do is refrain from performing any additional procedures.
How to recover deleted photos in Windows 10
By understanding different reasons that cause photos to be lost, we can take corresponding solutions to the problem.
Restore deleted photos from the Recycle Bin
Actually, this is the quickest and most convenient way to restore deleted photos from the Recycle bin as long as you have not permanently deleted your photos by using the “Shift+Delete” key when erasing them. In most circumstances, deleted images may be kept in the Recycle bin for 60 days. So check your recycle bin first before trying other image recovery solutions.
🛠️Steps to recover lost images from the Recycle bin
Step 1: Open your recycle bin on the desktop.
Step 2: Find and click the photo you want to recover. (You can also select multiple photos by pressing the “Ctrl” button and clicking more photos.)
Step 3: Check the photos’ location before recovering them as they will be saved to the same location after recovery.
Step 4: Click the “Restore” button, and wait for like 3 sec, your images will be recovered successfully.
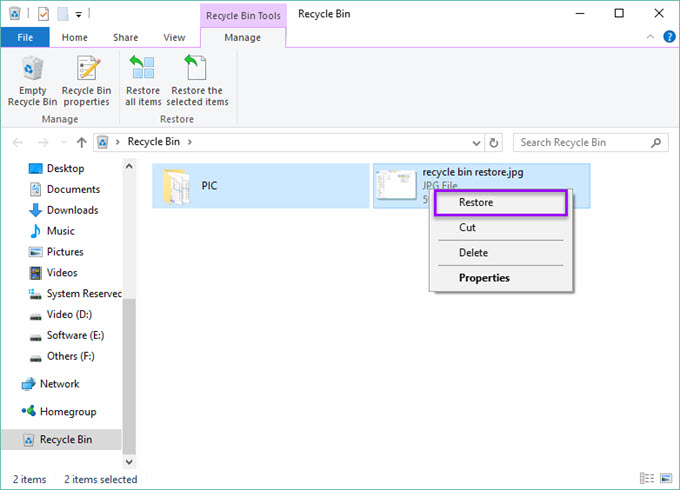
❗❗Note: If your image files have been deleted in the way of pressing the “Shift+Delete” key, then your deleted photos were permanently deleted and will not be shown in the Recycle bin, so turn to the next solution.
Restore deleted photos by using the Backup and Restore feature
The possibility that you can locate your photos in the previous backup version is high if you have practice of using Windows Backup to back up your data. Here’s how to use the Backup and Restore features to recover your deleted photos.
Step 1: Click “Start” and type “Control Panel” in the search box, and click it.
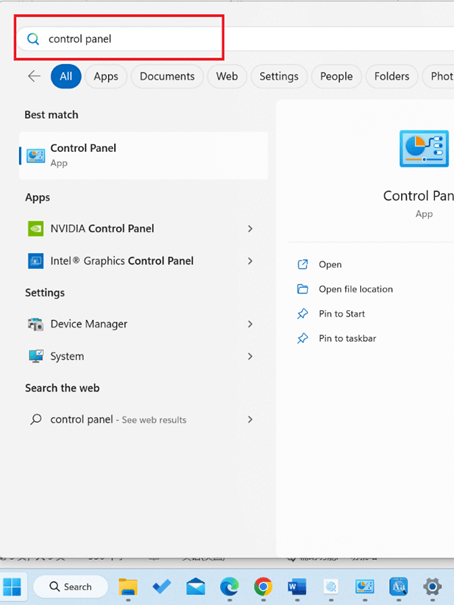
Step 2: After that, the page will jump to the system settings. Then type recovery in the search box. You can see there’s a “Backup and Restore” option.

Step 3: You can type the “Restore my files” button or the “Restore all users’ files” button and look for the photos you have deleted by browsing for folders.
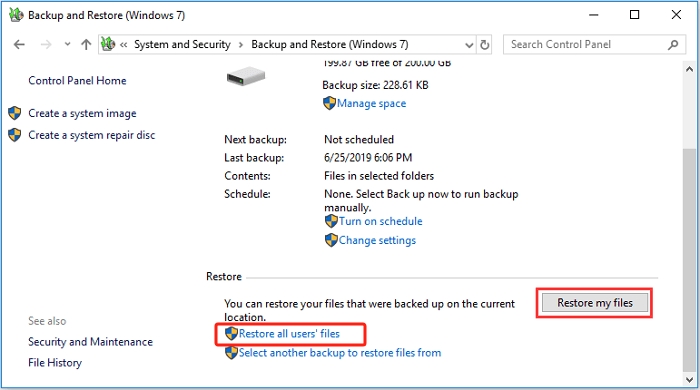
Step 4: Get your deleted photos back by selecting them.
💡Tips: If you regularly back up your Windows, you may see a list of the most recent backups. You can select the most recent backup to restore the deleted data and photos.
Restore my deleted photo with File History
This solution can also be thought of as recovering deleted photos from the previous versions as recovering deleted photos from previous versions typically involves using the built-in features of your operating system, such as Windows File History or Mac Time Machine.
When File History is turned on in Windows, all data, including pictures, documents, and videos, are automatically backed up.
Attention: File History only saves copies of the files in your desktop folder, OneDrive files that are accessible offline on your PC to music, photographs, and videos. You may put files in these folders to back up such items elsewhere.
Step 1: Click the “Restore your files with File History” button after typing “restore files” in the search box.
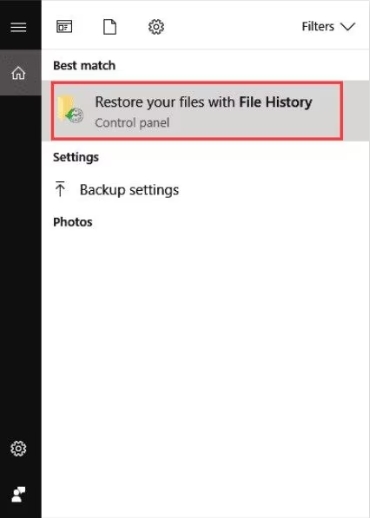
Step 2: Use the arrows to view all the versions of the file you’re looking for after finding it.
Step 3: Select Restore to save the desired version in its original place after you’ve located it. Right-click Restore, choose Restore to, and then select a new location to save it in.

❗❗Note: As File History is a great feature equipped with Windows 8 and Windows 10, you may hardly find this feature if you’re using another Windows system. You can try an image recovery tool to recover deleted photos.
Restore your photos using a third-party image recovery software
As mentioned above, photo recovery software is suitable for everyone and compatible with many Windows systems like Windows 8/10/11, so no worry about Windows compatibility issues. ONERECOVERY is a versatile image recovery software for those who have not made a backup or have deleted their photos permanently.

Your accidentally deleted photos can be retrieved in easy 4 steps. And the whole process is user-friendly and intuitive.
Step 1: Download and install ONERECOVERY. The installation process is very simple, just follow the prompts without any extra complications.
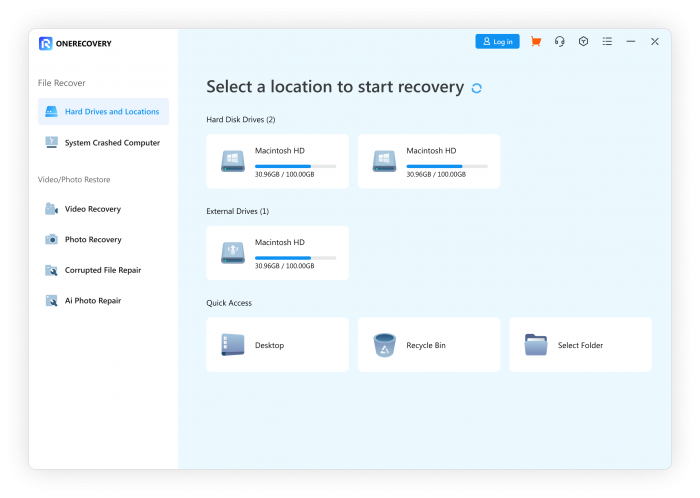
Step 2: Decide where to begin your search. Choose the location where your photos get lost, like a C drive.
Step 3: Scan to find the missing photos. This process is going to take several minutes as ONERECOVERY will apply its dual scan mode(Deep Scan and Quick Scan) to scan your device thoroughly.

Step 4: Preview photos and recover them. When the scanning process is still on the go, you can preview any photos that have been scanned. If they’re what you’ve deleted, click the recover button to bring them all back.

🏹Key benefits:
- 95% Success Recovery Rate
Utilizing advanced device scan and recognition technology, ONERECOVERY ensures the best success rate in the industry for data recovery, recovering data from more than 500 different scenarios and sparing you the agony of data loss.
- Cost-effective Choice
As it’s a newly-released product, now you can have it for only $4.99 for a lifetime plan, which is much more cost-effective than most other software in the data recovery market.

Conclusion
Most of the time, deleted photos can be recovered. So no need to be panic. Just follow the most dependable techniques that are listed in this article. When other options, like Back and Restore, aren’t an option, you can attempt to utilize a recovery tool to try to recover deleted images. In the end, always remember to back up your important data. It’s always better to take precautions before action.
I’m a tech enthusiast specializing in computer repair and data processing. Outside of fixing gadgets, I love penning articles on computer science. Currently, I’m diving deep into AI and data recovery tech. I’m all about staying on top of the latest in these fields. Excited to bring my passion and skills to the table and collaborate on cool projects!