


 My Account
 Sign Out

Are you a Mac user who’s been caught off guard by the sudden loss, damage, or inadvertent formatting of your cherished photos? Whether you’re a professional photographer, an ardent hobbyist, or simply an individual who values their memories, losing these photos can be distressing.
On macOS, such loss may occur due to accidental deletion, formatting, or system damage. However, the good news is that retrieving these photos is entirely possible in most cases. This blog will offer you an efficient solution on how to recover permanently deleted photos on Mac, as well as discuss preventative measures to avoid such losses.
How to Recover Deleted Photos on Macbook with Built-in Tools
In this section, we’ll delve deep into the various methods Mac users can employ to rescue their invaluable snapshots and reclaim memories that may have seemed irretrievably lost.
Use Recently Deleted Folder in Photos App
This folder is your first line of defense. When photos are deleted, they aren’t immediately removed from your system; instead, they’re moved to the Recently Deleted album, where they stay for 30 days, allowing users an ample window to recover deleted pictures.
Here’s how you can restore photos from the Recently Deleted folder:
Step 1. Launch the Photos app.
Step 2. Navigate to the Recently Deleted album on the sidebar.
Step 3. Select the photos you wish to restore.
Step 4. Click on the Recover button.

Limitations: Recovery through the Recently Deleted folder is not a theory-of-everything bill. It is only effective for photos deleted within the past 30 days. After that period, they are permanently removed from the system.
Retrieval from Mac Trash
One of the initial spots to check after you’ve unintentionally removed photos or files is the Mac’s Trash. Acting as a buffer, the Trash holds onto deleted items, giving users an opportunity to reverse their decisions before the files are permanently wiped.
There is the tutorial on Recycle Bin recovery on Mac:
Step 1. Click on the Trash icon to open it.
Step 2. Find the photos you accidentally deleted.
Step 3. Right-click on the desired file.
Step 4. Select “Put Back” from the menu to restore it to its prior location.
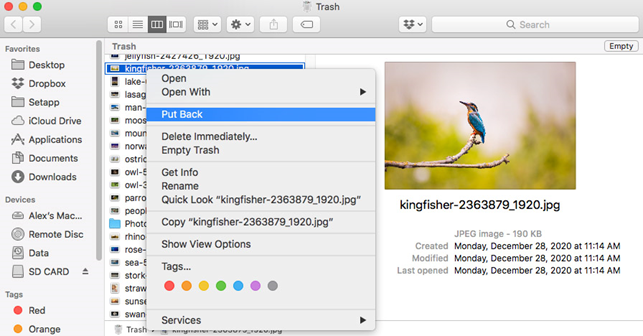
Limitations: Items remain in the Trash only for 30 days or until you empty the Trash. If you use secure empty trash or third-party cleaner apps, they might bypass or speed up the permanent deletion process. Moreover, Files deleted from external drives or shared networks might not always end up in the Mac Trash.
💡 Related Post: How to Recover Files Deleted from Recycle Bin
Resort to Time Machine Backups
Time Machine is one of Mac’s signature utilities, facilitating easy and periodic backups of your entire system. Once set up with an external storage device, Time Machine will consistently back up your files at regular intervals. If you’ve lost photos, you can navigate to a point in time before the loss and restore your files from there. Here’s how you can do it:
Step 1. Connect your USB drive or other storage devices that contain your photo backup.
Step 2. Open a Finder window and navigate to where your photos were last located.
Step 3. Click on the Time Machine icon in the menu bar and select “Enter Time Machine”.

Step 4. Use the timeline or arrows to locate the version of the folder or file before deletion.
Step 5. Press the “Restore” button to restore the selected file/folder.

Limitations: This method hinges on having previously set up Time Machine backups. If no backup was made before the photo loss, retrieval via this method isn’t possible.
Restore Photos from iCloud
iCloud, Apple’s cloud storage system, not only backs up your photos but also provides a contingency for accidental deletions. If you’ve synced your photos with iCloud, you can access them and retrieve any that were unintentionally removed, up to a month after their deletion, in the following steps:
Step 1. Navigate to iCloud.com.
Step 2. Sign in using your Apple ID credentials.
Step 3. Select the “Photos” option.
Step 4. Open the “Recently Deleted” album within the sidebar.
Step 5. Choose the photos you wish to restore and click on the “Recover” button.
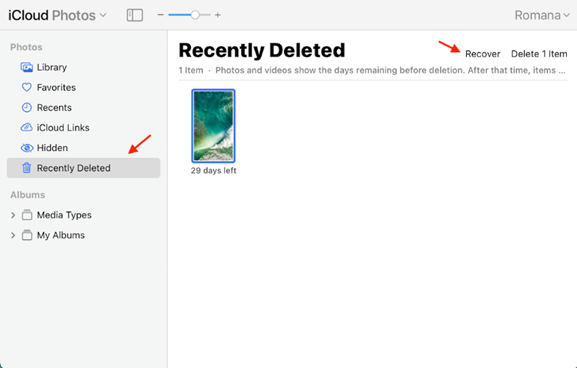
Limitations: You can only recover photos through iCloud within 30 days after deletion, otherwise the photos will be permanently erased. Besides, this method is dependent on your previous photo sync. If you didn’t have this set up before the photo loss, retrieval via iCloud won’t be possible.
How to Recover Deleted Pictures on Mac Using Third-Party Software
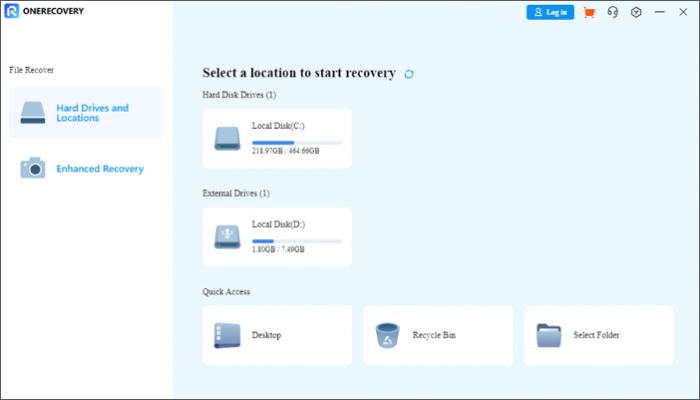
As all the built-in tools mentioned above have their limitations, sometimes it’s an optimal choice to retrieve your pictures on Mac using powerful third-party software. Among all the options on the market, ONERECOVERY is the recommendable one.
As it provides all-around data recovery for Mac, you can use it to retrieve your deleted photos in various formats, including JPEG, BMP, PNG, etc. Besides the pictures, ONERECOVERY also supports the recovery of videos, audio, documents, etc. As this software is designed for every Mac user, its interface is so user-friendly that even a novice can utilize it without any effort.
How to Recover Deleted Photos on Macbook Using ONERECOVERY:
Step 1. Launch this software on your Mac. Then, you need to choose the location where the deleted pictures were saved.
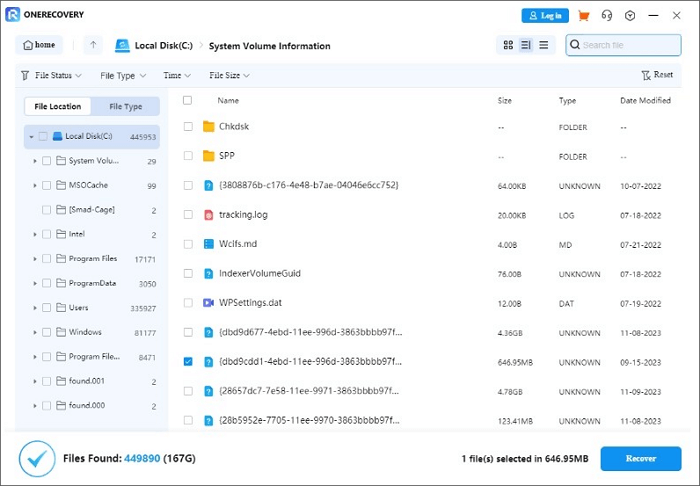
Step 2. ONERECOVERY offers you 2 types of scan modes, i.e. Deep Scan and Quick Scan, you can choose from them according to the actual situation.

Step 3. Choose the pictures you want to recover from the scan result. After selecting the suitable destination folder, you can click on the “Recover” button and download the pictures to your device.
How to Recover Photos on Mac with Professional Data Recovery Services
For cases where software solutions don’t suffice or when dealing with physical damage, professional services are the go-to. You can visit the Genius Bar, the technical support station inside an Apple Store, to ask for help. They will assist with basic troubleshooting and recovery methods, especially if the issue is software-related.
However, for intricate recovery tasks, they often refer customers to third-party data recovery specialists.
Bonus Tip: How do I Protect Photos on My Mac?
With the right precautions, your cherished memories can remain safe and sound.
Regular Backups Via Time Machine and iCloud
One of Mac’s most commendable features, Time Machine, allows for automatic backups of your files at periodic intervals. By connecting an external hard drive, Time Machine will save snapshots of your data, making recovery straightforward.
In addition to that, regularly delves into iCloud settings to ensure synchronization remains active, and consider investing in extra storage if needed.
Update Software
Regularly updating your macOS and any photo-related applications can drastically reduce the risk of software glitches leading to data loss. Updates frequently come with bug fixes, enhancements, and security improvements that fortify your system against unexpected crashes or vulnerabilities.
Regular System Check-ups
Like an annual health check-up, your Mac benefits from periodic inspections. A myriad of tools on the market can scan your Mac’s storage for potential errors, fixing them before they escalate. Additionally, consider third-party software that can monitor the health of your hard drive, alerting you to any imminent failures.
Conclusion
In conclusion, a photo recovery Mac is achievable as long as you choose a suitable tool and use it in the correct way. This post recommends some efficient built-in tools on macOS and offers you detailed tutorials on how to recover permanently deleted photos on Mac.
If you are in need of powerful software for data recovery on Mac, ONERECOVERY is the go-to choice. This all-in-one recovery software supports the recovery of photos, videos, audio, and document files. Its high success rate ensures that you will your pictures back securely.
Frequently Asked Questions About Photo Recovery on Mac
If you are still not very clear about photo recovery Mac, these FAQs below may solve your problems.
Not exactly. Even after deletion, they continue to reside on the hard drive until they’re replaced by new data. Thus, if you aim to retrieve these photos on your Mac, it’s imperative to act swiftly, lest they get irretrievably overwritten.
To shield your data from unexpected pitfalls, a multi-pronged strategy is essential. Consistently back up your files, and consider using iCloud for an additional cloud-based safety layer. Ensure your software and system are always up-to-date to fix potential vulnerabilities.
Stay vigilant against suspicious downloads to avoid malware risks. Physically, take precautions to prevent device damage. Periodically, employ system diagnostics to preempt potential issues.
Also Read:
👉 How to Recover Permanently Deleted Files on Mac
👉 How to Recover Deleted Files from USB on Mac
👉 How to Recover Data from a Hard Drive on a Mac
Vanessa is a professional editor with a strong foundation in computer information technology. Since graduating, she has dedicated her career to create content in IT fields. In the past three year, she has accumulated sufficient knowledge in data recovery, computer problems troubleshooting and application of multimedia software.
She has been trying her best to bridge the gap between complex technical concepts and accessible, reader-friendly content.

