My Account
 Sign Out

If you are a Procreate user, you may sometimes find that your drawings look pixelated or blurry. The common reasons for this include having an incorrect canvas size and using the wrong type of brushes. Thankfully, Procreate is a digital drawing app and thus you are allowed to fix this issue. In this post, we are going to provide comprehensive guidance on how to make Procreate less pixelated efficiently. If you are worried about the fuzzy lines on Procreate, let’s move forward to find the solutions!
How to Make Procreate Less Pixelated
Making Procreate less pixelated is not a quite difficult job. In this section, we would like to introduce different methods to help you repair pixelated images and create much clearer and smoother drawings on the application. You can simply try them one by one until you gain a satisfying outcome.
Method 1: Increase the Canvas Size
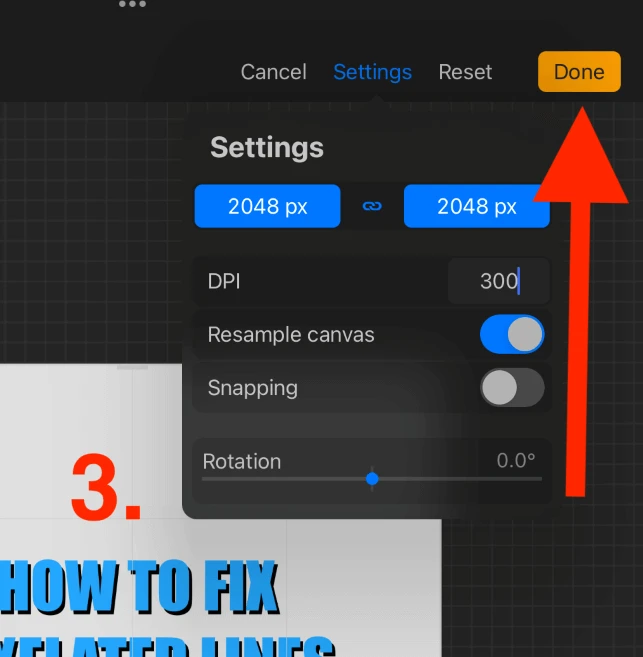
If you find that your canvas is indeed too small, then increasing its size can be an effective way to address the pixel problem. Here is how to do it the right way:
- Tap on the Actions button (a spanner icon) on the left side of the toolbar.
- Choose the “Canvas” tab.
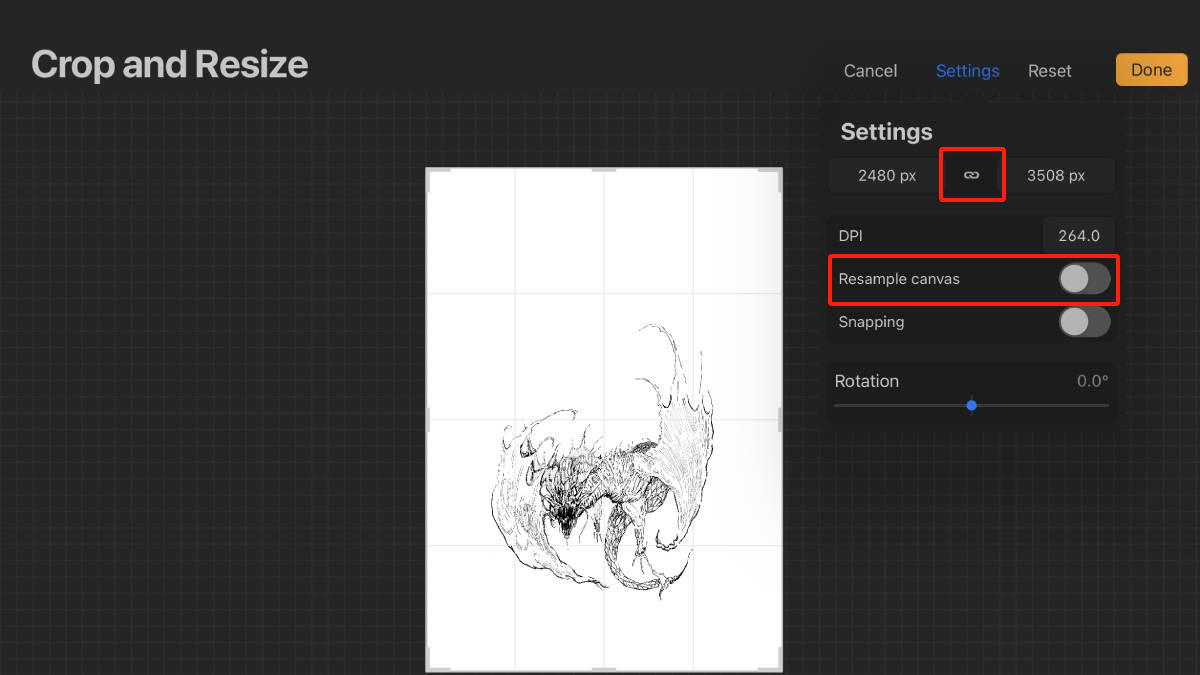
- Click on the “Crop & Resize” option from the menu.
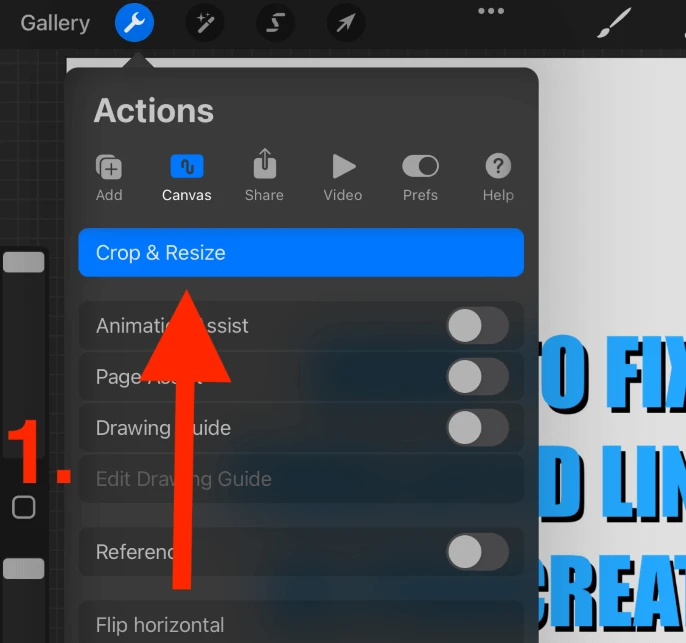
- Now press the “Settings” button in the top right corner of the screen.
- Next change the values of the canvas size and the “DPI” box to what you desire and switch on the “Resample Canvas” toggle to prevent your drawing dimensions from changing.
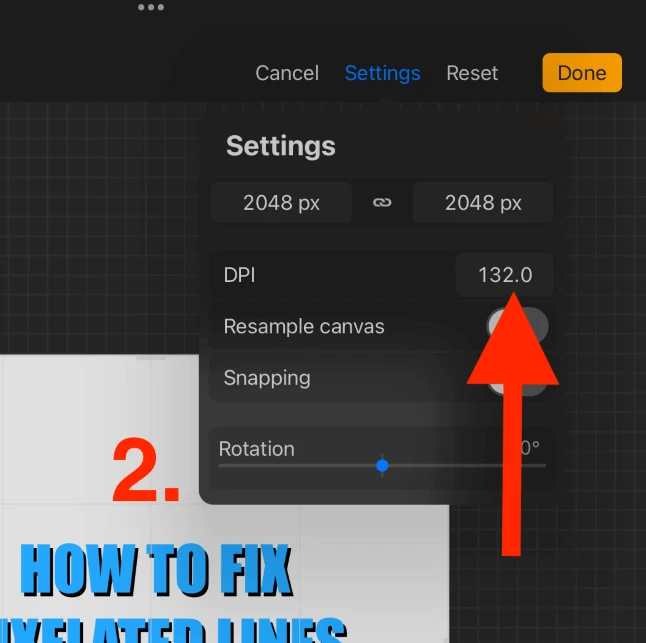
- When you check everything is ready, click the “Done“ button for confirmation.
Method 2: Employ Suitable and High-Quality Brushes
An inappropriate brush can also have a negative impact on the edges of your Procreate drawings. Each brush has its unique set of flow, spacing, shape and other features. Therefore, it is essential to choose a brush that really fits your drawing.
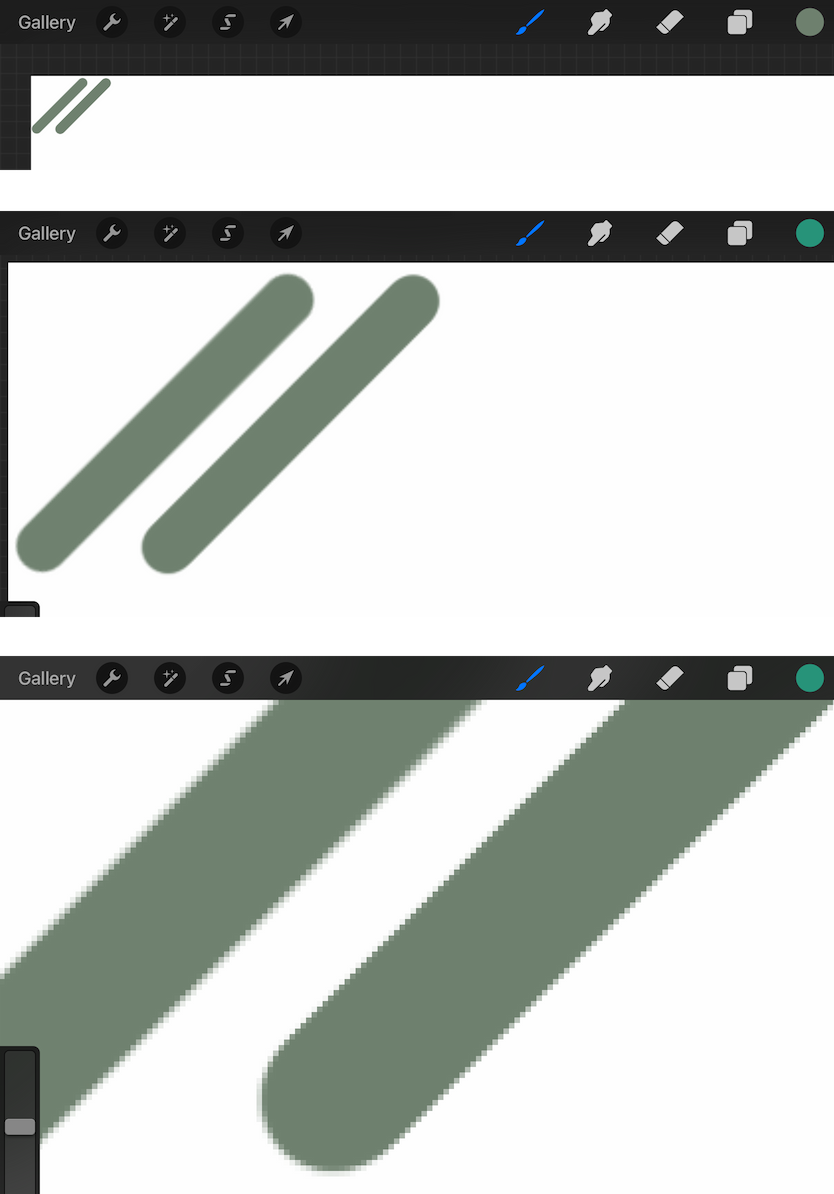
To find the best brush choice, you can make brush strokes and zoom in to compare various brush edges. Simply as shown below, by zooming in, you can clearly see the left brushstroke’s edges have more pixels than the right one, making it look rather blurrier.
In addition, in the process of drawing, a good brush can play a role in helping you fix blurry lines. It can be used to trace and redraw or erase the pixelated edges in your artwork. The former will make your drawing slightly larger while the latter will make it a bit smaller.
Method 3: Avoid Transforming Your Drawing
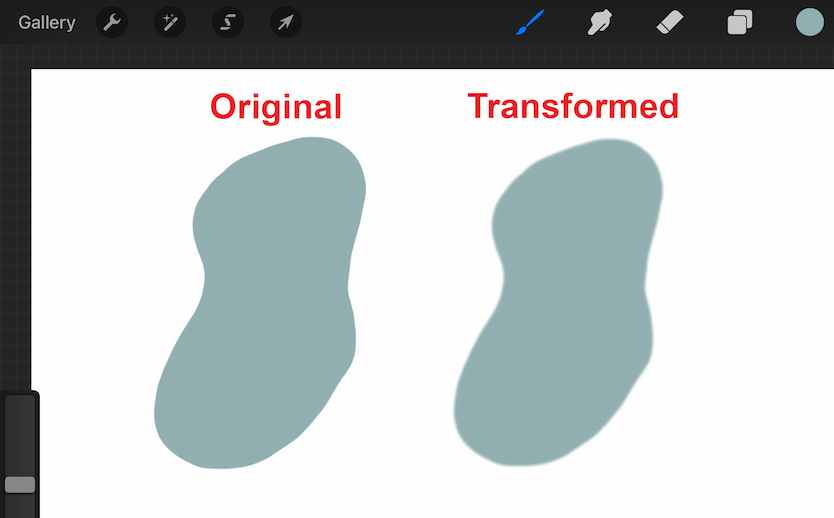
When a drawing is transformed, like stretched, upscaled, rotated and so on, it tends to be worsened in quality. Specifically, it usually has much fuzzier edges than before because transforming can increase the visibility of its pixels, especially when you scale it up. Also, you should stop drawing while zooming in, which easily leads to your picture looking pixelated. However, it is true that an artwork with a too-large canvas may be able to reduce its visible pixelation by scaling it down.
Besides, the times of transformation can have a great influence on the pixelation of your artwork. As shown in the following image, the right object is obviously blurry than the left one after being transformed several times. Thus you need to the number of times your drawing is transformed.
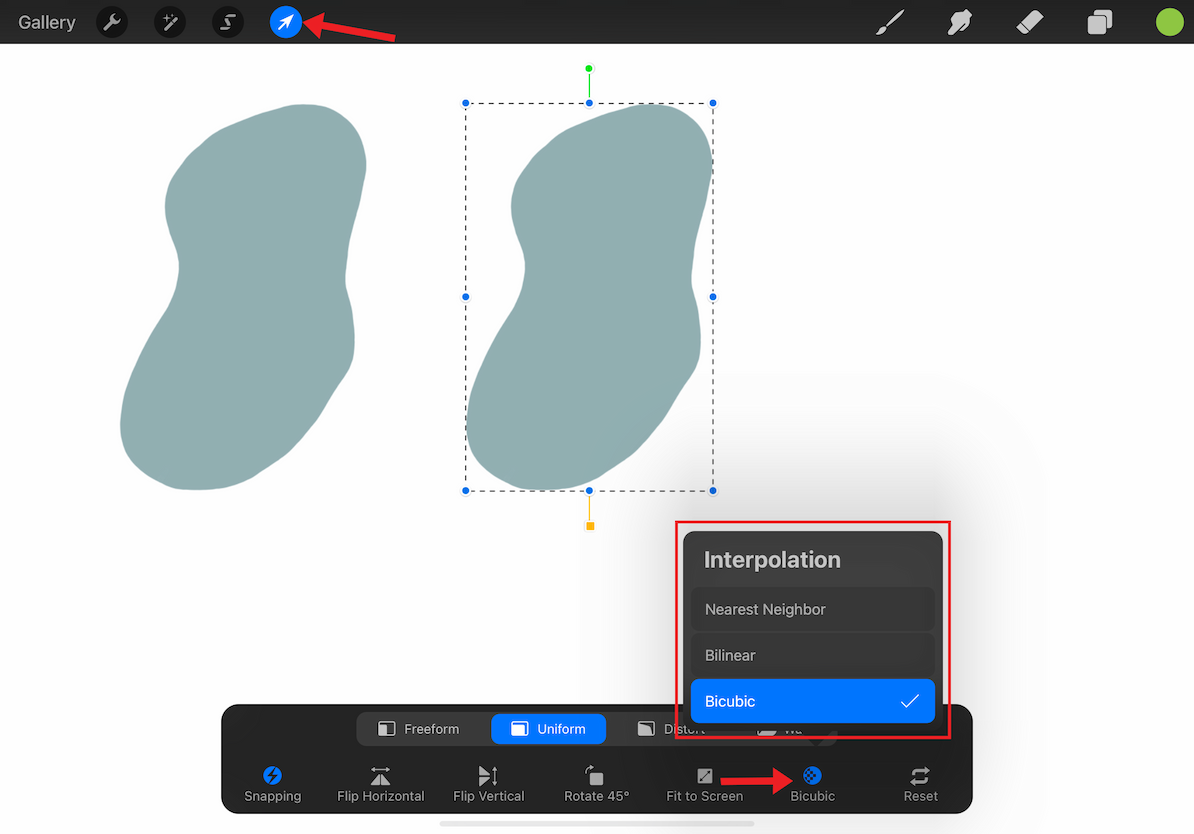
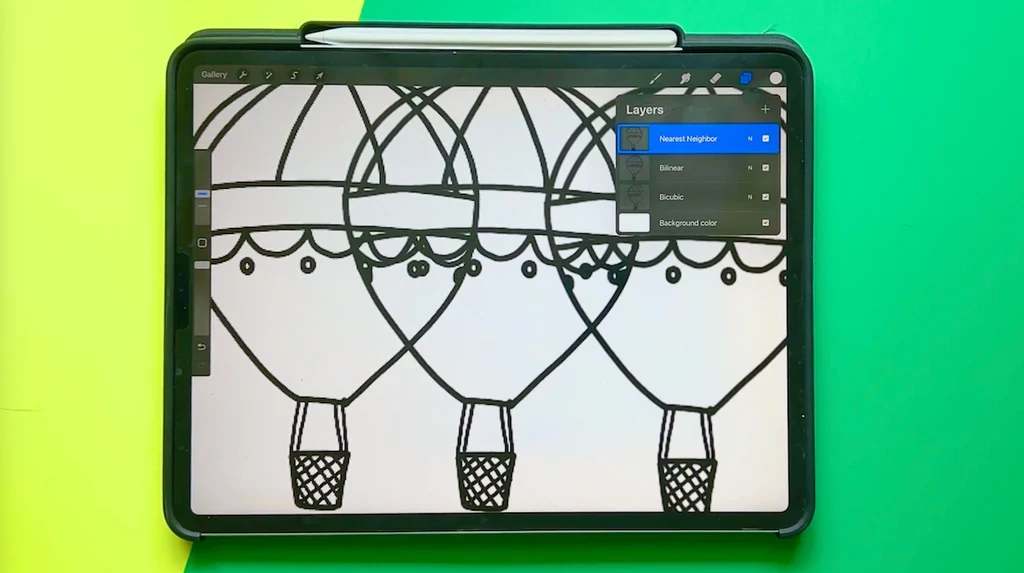
Method 4: Adjust Your Interpolation Method
Similar to transforming, your interpolation settings on Procreate can affect your images in terms of quality as well. Interpolation refers to the way the software arranges, adjusts, adds, or removes pixels at the edges of a drawing or between two different colors. Normally, the default setting is “Nearest Neighbor”, offering the quickest service. However, in some cases, it is likely to damage the pixelation and you will have to adjust the settings to make your images clearer. Below are the detailed steps:
- Start by tapping on the “Transform” icon that looks like an arrow on the left side of the top toolbar.
- Click on the “Interpolation” tab in the bottom bar.
- Select either “Bilinear” or “Bicubic” from the context menu.
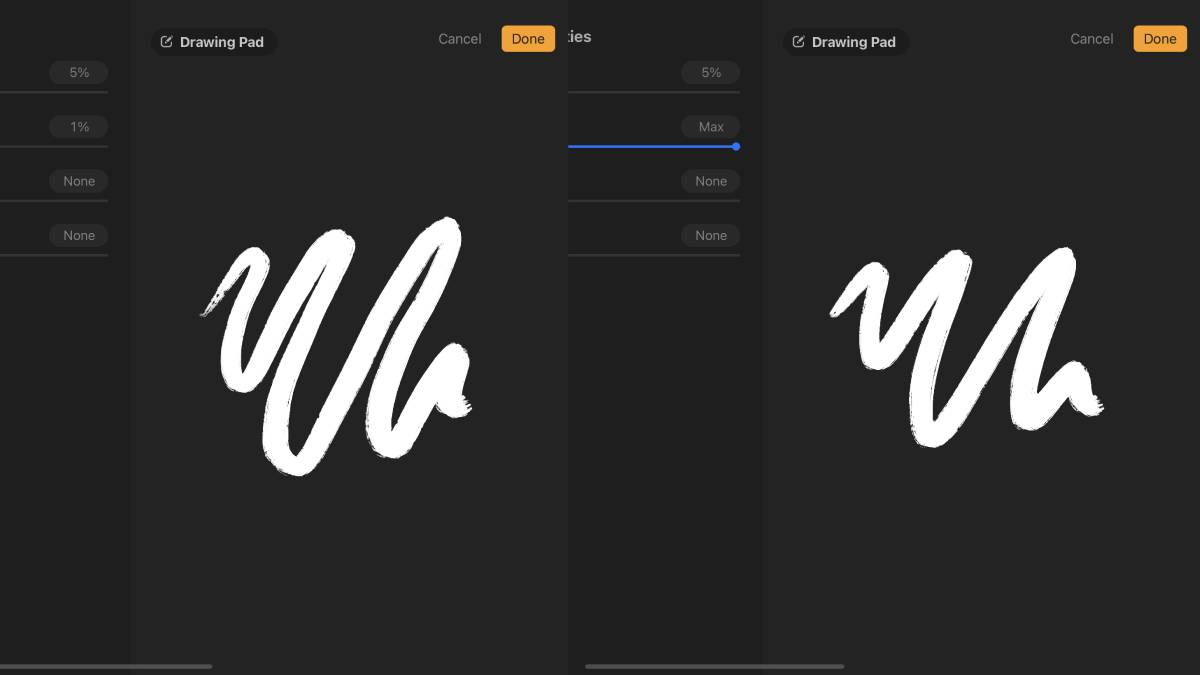
Method 5: Utilize the Streamline Stroke Settings
The “Streamline” option under the “Stroke” section is also a good tool for fixing the pixelated drawing problem as you can use it to make adjustments on the edge smoothness. In the below image, the first drawing is set to None whereas the second is set to 100%. There is a clear difference in the smoothness of the lines between the two pictures. So you can adjust the Streamline settings to find a desired level to reduce the chances of bluriness before you start creating your work.
Method 6: Export at the Highest Quality
When you finish your drawing and are planning to print it off, you must make sure it will be exported at the highest level, namely 300 DPI. Otherwise, the pixelation may be decreased after printing, giving you a piece of blurry artwork at the end. This point attaches great importance if you are going to print your image physically while you can pay less attention to it if you intend to print digitally.
How to Resize an Image in Procreate without Losing Quality
Assuming you must resize your drawing in Procreate, there are still two ways that you can try to keep its resolution. Please scroll down to see the details.
Way 1: Adjust Your Canvas Settings
If you do nothing on the canvas settings on Procreate, the dimensions of your drawing will change during you resize it and thus the resolution gets down, making it fuzzy and unclear. Therefore, when you are about to resize an image, you should lock the aspect ratio and enable the “Resample canvas” utility. Please see the instructions below:
- Click the Actions icon in the top toolbar.
- Select “Canvas” and then “Crop & Resize”.
- Tap on the “Settings” tab in the top right corner of your screen.
- Press the little key chain icon in the size box to lock the aspect ratio.
- Turn on the “Resample canvas” toggle underneath.
Way 2: Change Your Interpolation Settings
As mentioned above, the interpolation method exerts a significant effect on your image quality. Thus before resizing your picture, you should first change your interpolation settings if they are by default so that you can limit quality loss. Here are the steps to do it:
- Click the Transform tool (an arrow icon) in the left of the top menu.
- Select the Transform mode you want.
- Then tap on the second button (i.e. Interpolation) in the right-to-left order under the mode settings.
- Choose either “Bilinear” or “Bicubic” from the list if it is set to.

- If you want to know which of the three options is the best for you, you can make a comparison. Firstly you need to create two more duplicates of your artwork.
- Change the interpolation option in each duplicate when you are resizing it. You can use the “fit to screen” utility to compare the three images accurately.
- Now check which one is your favorite outcome.
If you are not very clear about the above two methods, you can click the below link and watch the detailed video tutorial to check the specific steps:
Bonus Tips: Repair Pixelated Pictures with AI
You might not realize your image looks fuzzy and pixelated until it is finished and exported, which can be extremely frustrating and worrying. In this instance, you can consider getting help from AI technology for photo restoration to repair your blurry drawing, which costs less time and has a high success rate. With the progress of technology, there is more and more professional photo repair software using advanced AI technology in the market. You can simply a reliable one to help you fix the pixelation issue. Here we will take ONERECOVERY as an example to show you how to use these applications.
- Download the software from its official website and launch it.
- Go to “Photo repair” in the primary interface.
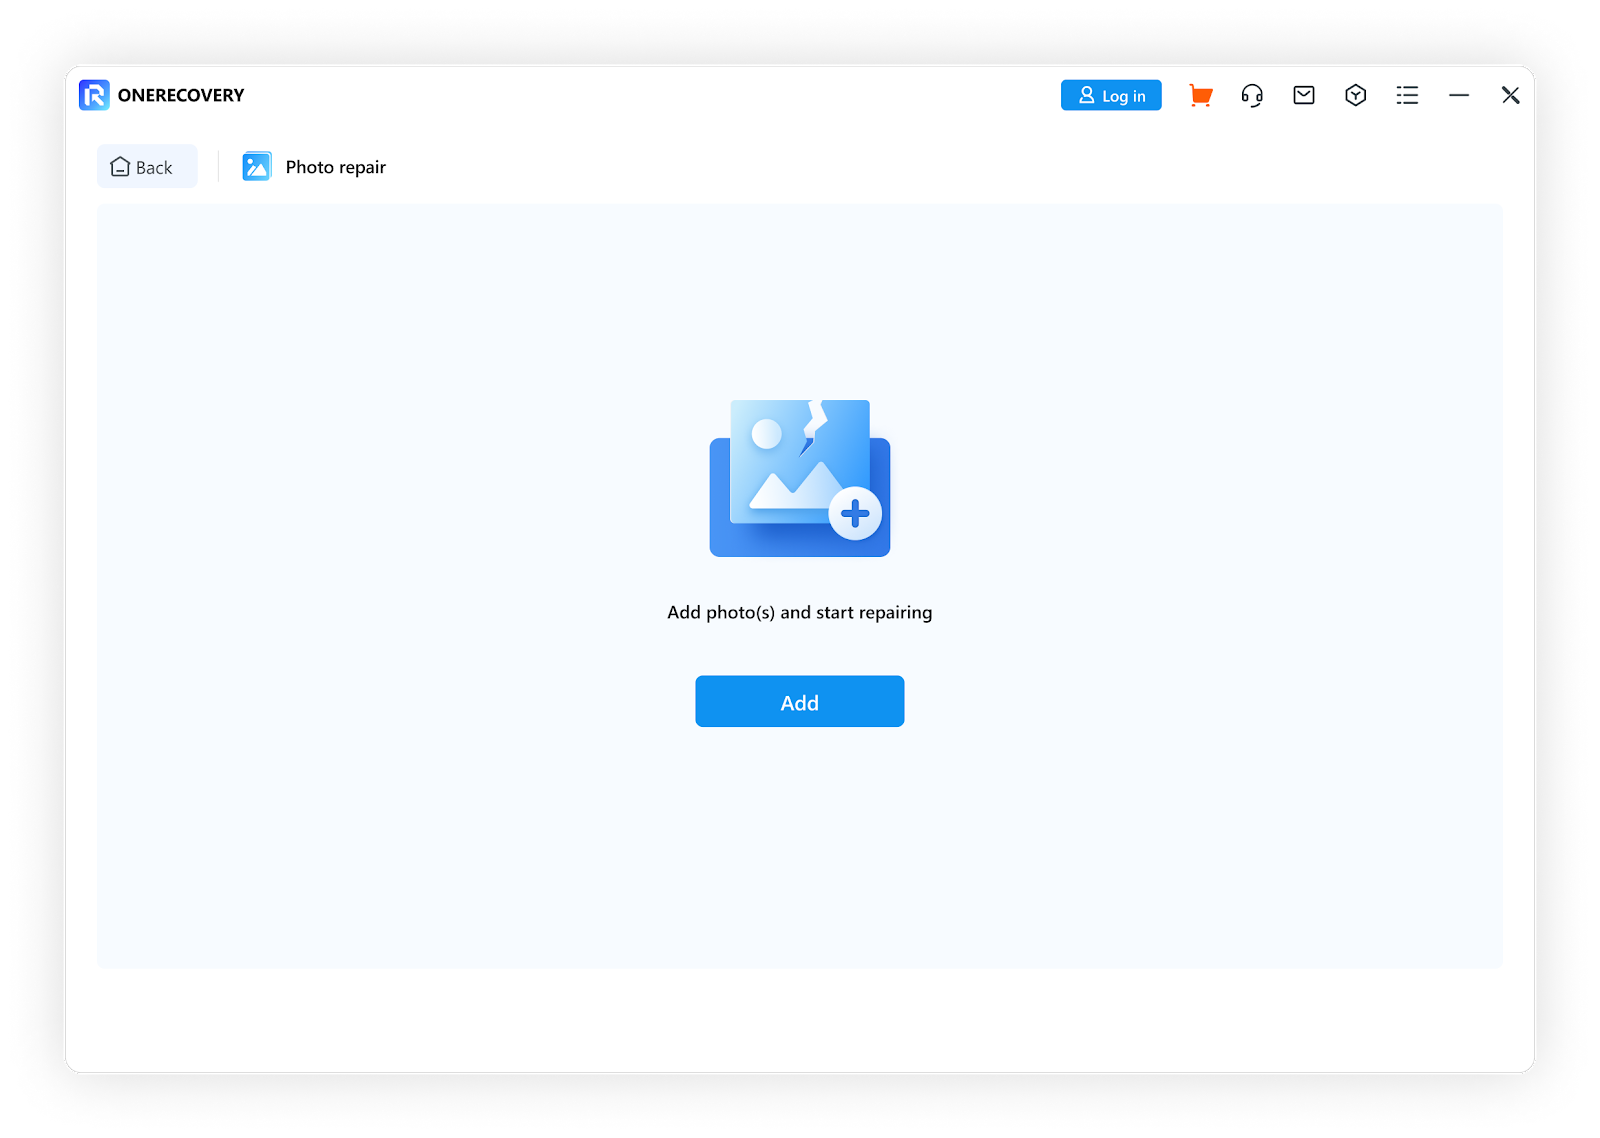
- Click the “Add” button to upload the picture you wish to restore from a list of your images. You are allowed to select more than one image for repair.
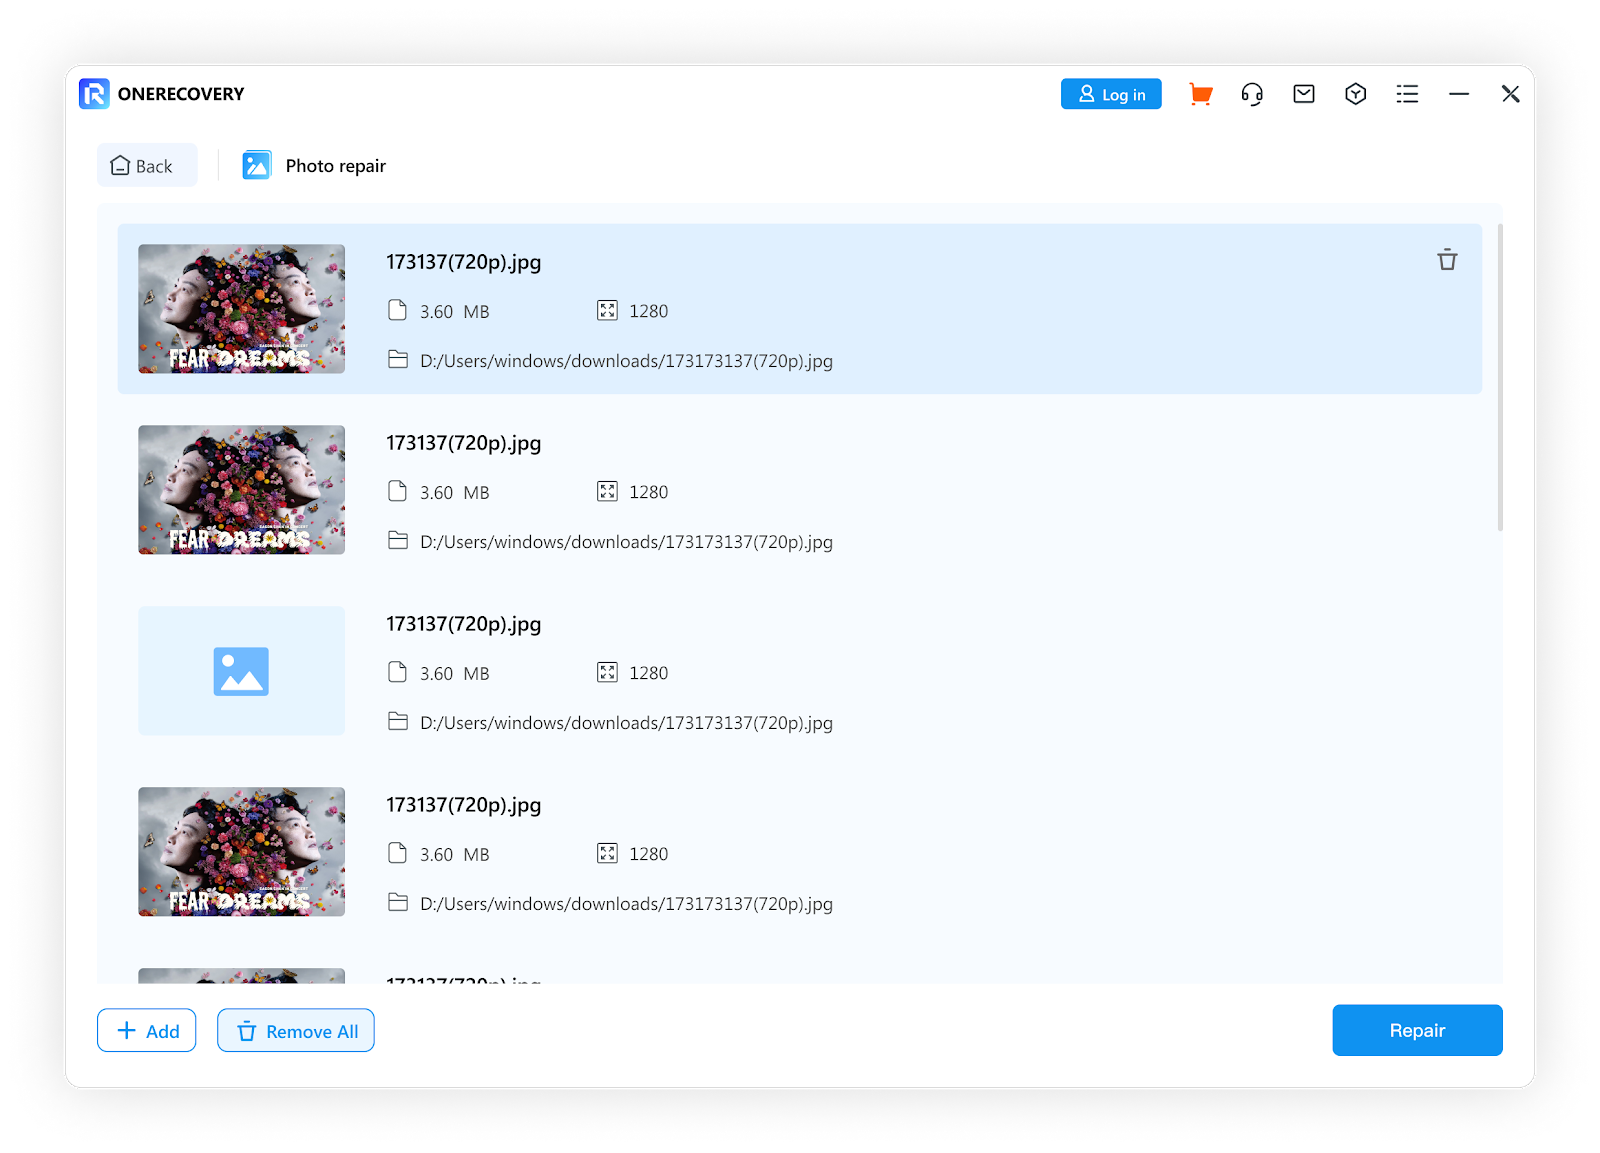
- Then choose the “Repair” button and the AI photo restoration will be initiated.
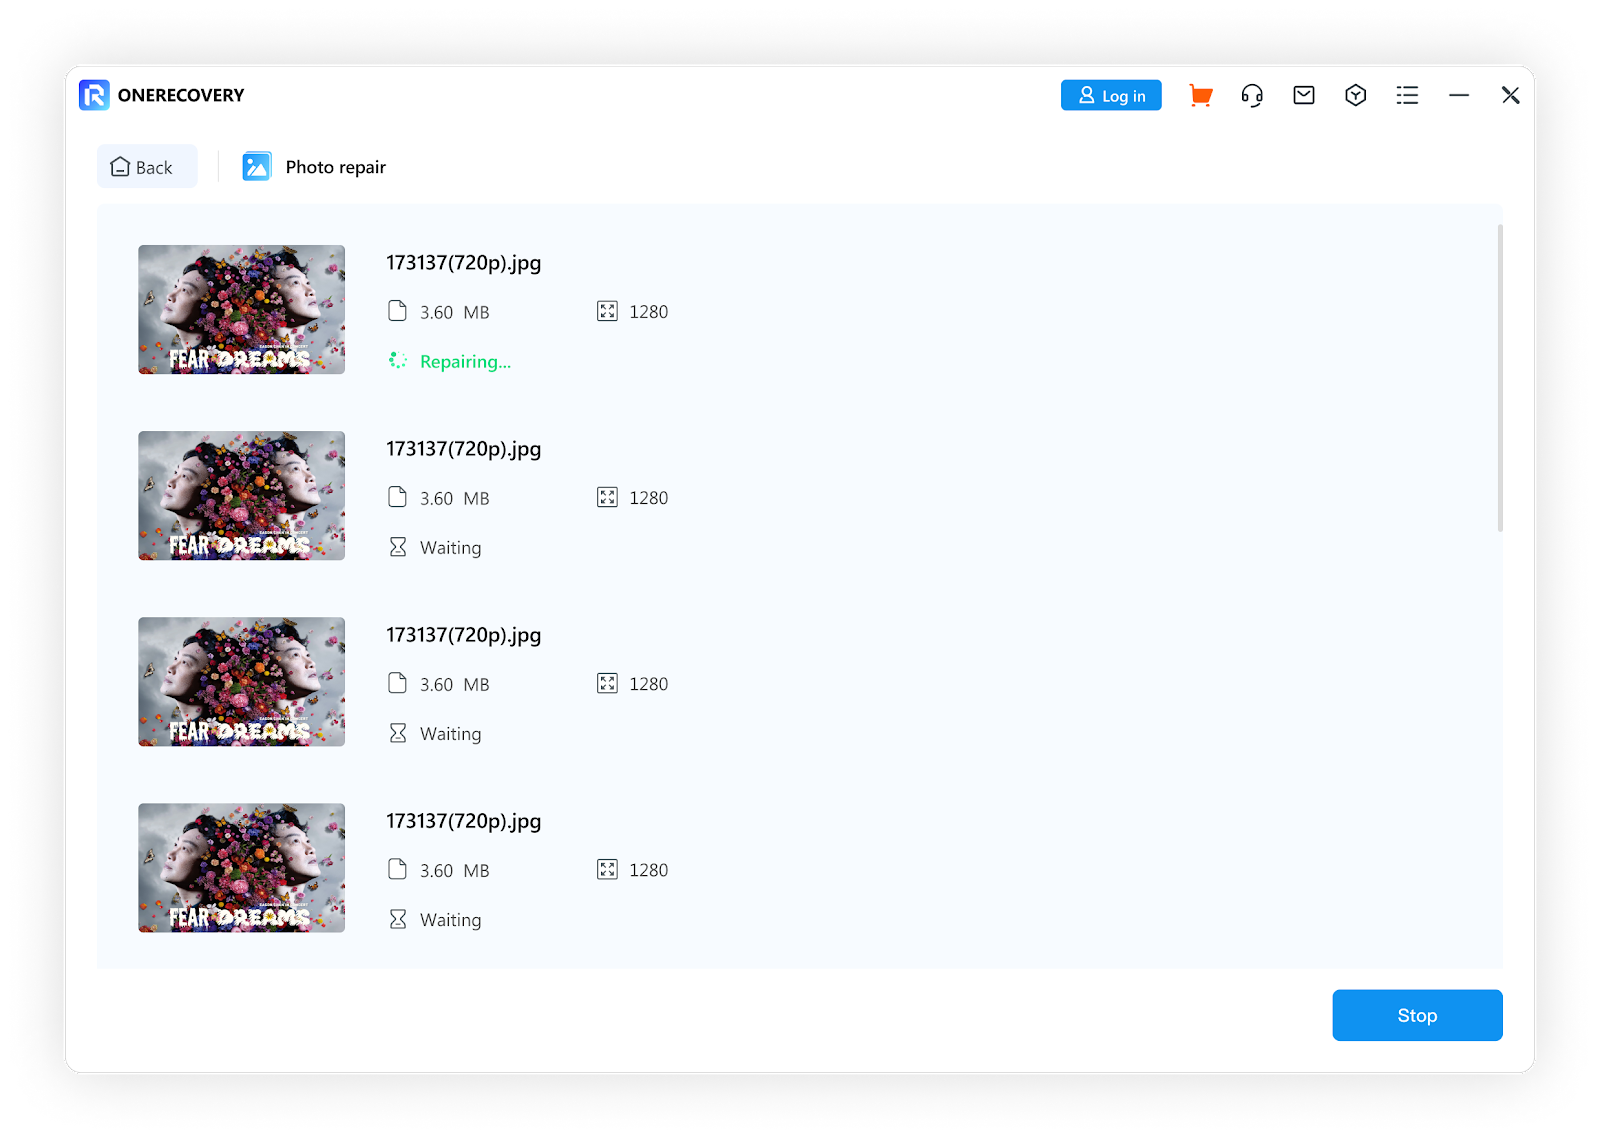
- When the restoring process is done, the item will show a “Successful” prompt. Now you can preview the repaired picture by clicking the “Preview” option.

- If everything is OK, click on the “Save” button to save the fixed drawing on your device.
FAQs
💡 Does Procreate lose quality?
Yes, Procreate will lose quality. This is because Procreate is a raster-based application and it uses pixels or tiny squares to create lines and images. So when you scale up or down your drawings, they will lose quality and become more pixelated, even if in the process of creation rather than after they are saved.
💡 What is the highest-quality image format in Procreate?
If you would like to have your Procreate artwork in the highest quality image format, you should make sure your canvas size is large enough and set to 300 DPI. After your drawing is complete, you need to export it as a PNG file for the highest resolution image. Now you will obtain an image with the highest quality format.
💡 How to get better lines in Procreate?
If you want to get better lines in Procreate, you need to make some changes to improve the stabilization of your brush. Please follow the steps shown below to achieve:
- Go to the Brush Studio of the brush you are using right now.
- In the Brush Studio, choose the “Stabilization” tab.
- Raise the value of “Motion Filtering”, which will help stabilize your brush and enable you to have stronger and clearer lines in the process of creating your design.
💡 How to get crisp lines in Procreate?
To get crisp lines in the Procreate app, the main point is that you should use the right brush to help you finish your art. You can try a variety of brushes available in the Studio Pen to how crisp the lines they create and then decide which one is best for your design. Meanwhile, if required, you can also enable the Quick Shape tool in Procreate. Here are the instructions for this tool:
- Use your finger or stylus to draw a line or shape on the canvas.
- Hold down the line or shape for about one to two seconds and release it. You should see it appears a symmetrical shape, indicating the tool is activated successfully.
- Next, tap on the “Edit Shape” tab showing up in the top center of your screen and then you will see your shape options list at the top of the canvas.
- Now you can utilize the options to create sharper and crisper lines for your picture.
Conclusion
It is one of the most important problems for Procreate users to make their designs on the application less pixelated, which produces a great effect on image quality. Considering this issue can be caused by variouos factors, this post seeks to provide comprehensive guidelines and shares a myriad of different methods to help you avoid and repair blurry pictures, including the in-built features of Procreate and third-party photo restoration software. Hopefully, you will find your own way to fix the blurriness problem after trying the aforementioned means. If you have any other puzzles or better solutions for this matter, please feel free to leave a comment and we will try to give you a reply as soon as possible.
I’m thrilled to be part of the OneRecovery team as a writer. I’m passionate about simplifying the complex world of data recovery and making it easy for everyone to understand. My focus? Well, I love diving into tutorials on hard drive recovery, crash computer data retrieval, photo repair, and many more. But that’s not all—I’m all about exploring the creative side too, so expect plenty of engaging and imaginative posts on various aspects of data recovery software. Join me on this journey as I share insights, tips, and tricks that make data recovery a breeze!