My Account
 Sign Out

A partition is a way to slice up your solid-state drive (SSD) into multiple pieces. Do I have to create partitions? How can I partition my SSD? Is it good for my computer or laptop? Many people may have such questions when it comes to partitioning. This article provides a rather comprehensive guidance of everything concerning partitioning an SSD. If you are one of them, the post is what you need and please don’t miss it!
Should I Partition My SSD?
Modern operating systems like Windows, Mac, and Linux all automatically have three partitions upon installation so there is no need for standard users to further partition their SSDs. Partitions will not offer any boost or improvement to the performance of your system. Though it is not necessary for everyone, it can be required in some special scenarios, especially when the capacity of the SSD is much larger than before now. Here are several benefits of making some partitions on your SSD:
- Dual-Booting
Partition is an essential requirement for dual booting as it means running two completely different operating systems on one single device. By splitting your device into different partitions, you are able to use various operating systems on each partition for different purposes.
- Better Data Organization and Separation
Partitioning allows users to create separate drives on their SSDs. You can use one part to store the data and files for your work and keep your personal files on another partition, thus making a more flexible organization.
- Data Backup
As there are multiple partitions on your device, you can store important data on one section as backups, which occupies less storage space and prevents catastrophic failure effectively.
How to Partition An SSD on Windows 10 & 11?
Generally speaking, you can only see the C drive (C:) under “Devices and Drives” on your Windows because partitions are not done after an SSD is installed on the desktop. When you need to have more drives, you can use an external SSD or create partitions on the current one. Below are two helpful methods for you to partition an SSD on Windows 10 & 11:
Method 1: Use the Disk Management
Disk Management is a built-in utility on Windows, enabling you to explore advanced storage settings. Thus it can be used to partition your internal or external SSD in a simple manner. Follow the below steps to create partitions by this program:
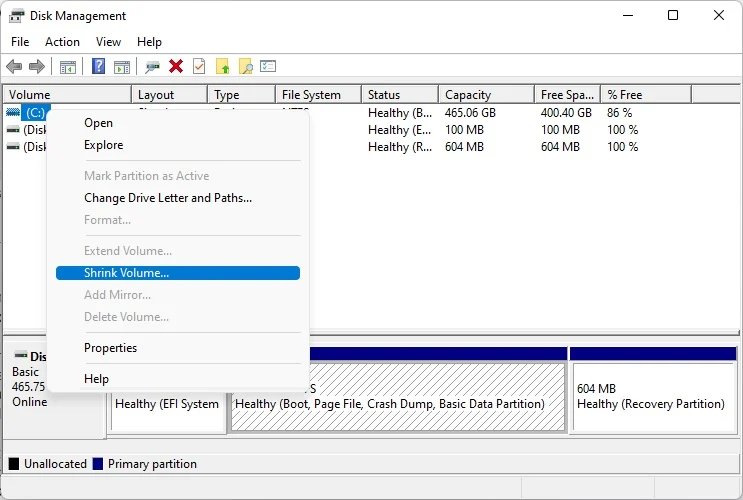
- Hit the Windows and X keys (Win + X) on your keyboard and select “Disk Management” from the menu.
- Right-click on the drive and choose the “Shrink Volume” option. Then you will see a dialogue box pop up.
- Check the available shrinking space and enter the value less or equal to it (in MB). Here we take 197058 as an example.
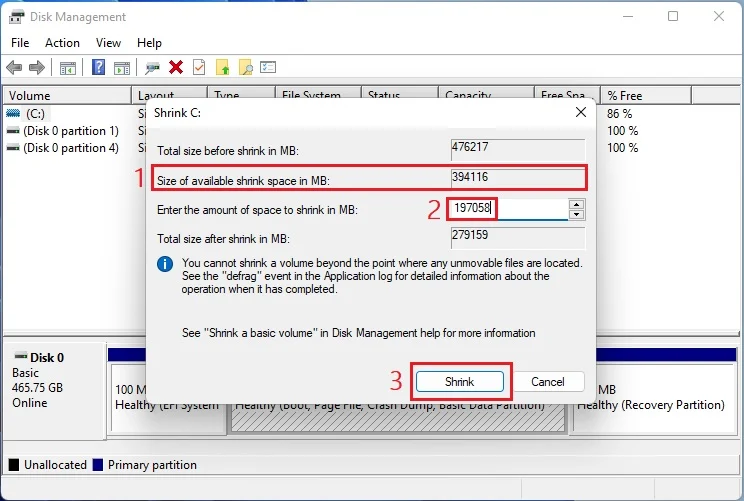
- Click on “Shrink” to create a new unallocated partition. Note that it has not been usable yet at present.
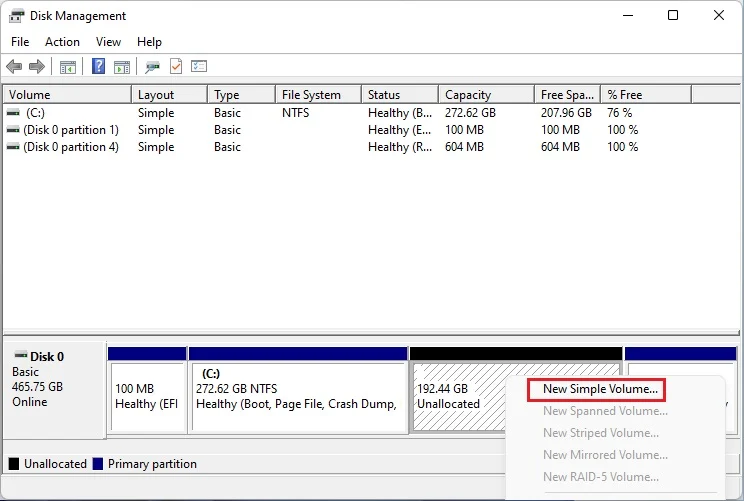
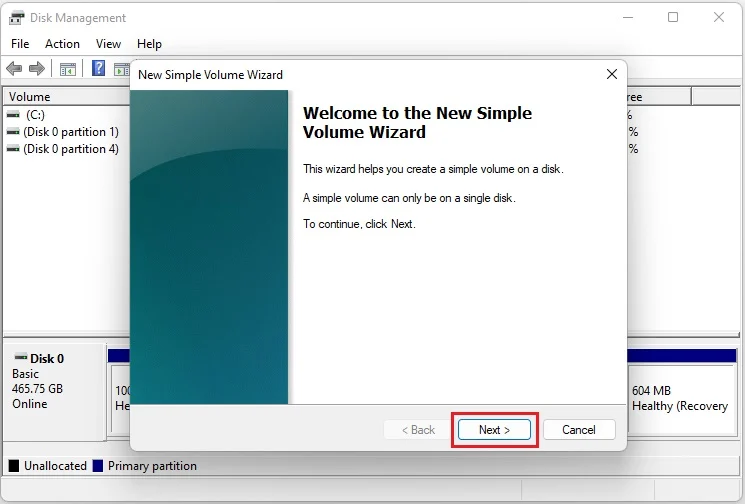
- Right-click on the unallocated space and select “New Simple Volume” from the dropdown menu.
- Press the “Next” button on the New Simple Volume Wizard.
- Input the value of the size you want for your partition in the “Simple volume size in MB” and click on the “Next” button.

- Expand the drop-down and choose an accessible drive letter to set the drive. Then press the “Next” button.

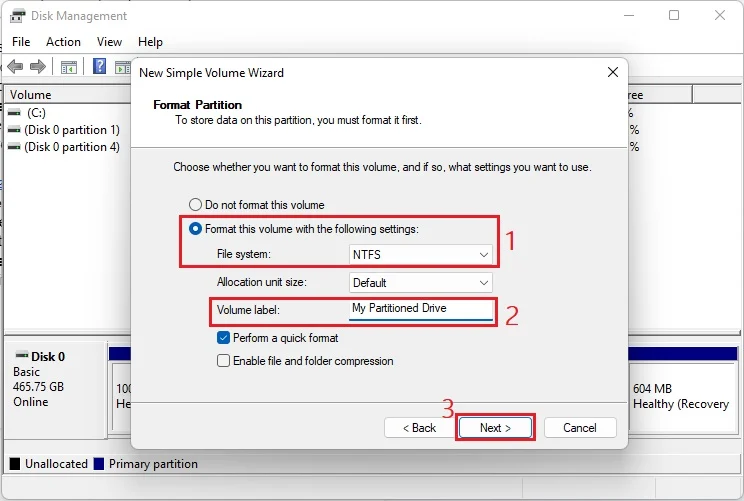
- Select the option “Format this volume with the following settings” under the Format Partition section. After that, select “NTFS” for the File system and “Default” for the Allocation unit size.
- Now you should give the volume a label to name the drive and then continue to click “Next”.
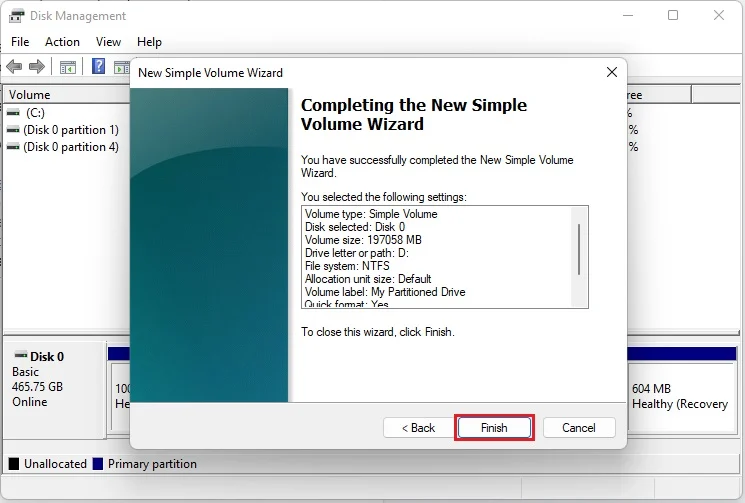
- Press the “Finish” button at last to apply the above settings. The interface of Disk Management will show the icon and name of your new partitions when you successfully create them.
Method 2: Use the Command Prompt
In addition to the Disk Management, the Command Prompt can also be employed to create two or more partitions on your SSD. With accurate command lines, you are able to obtain new partitions quickly. Here’s how to do it the right way:
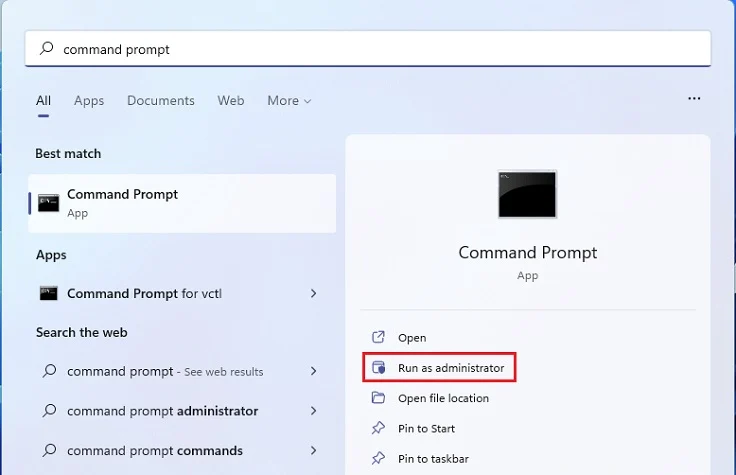
- Find the Command Prompt by searching it on the Start Menu.
- Select “Run as administrator” from the right side.
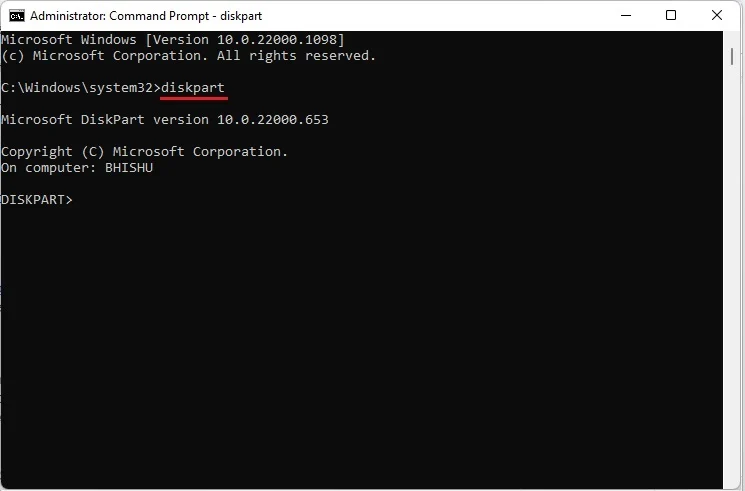
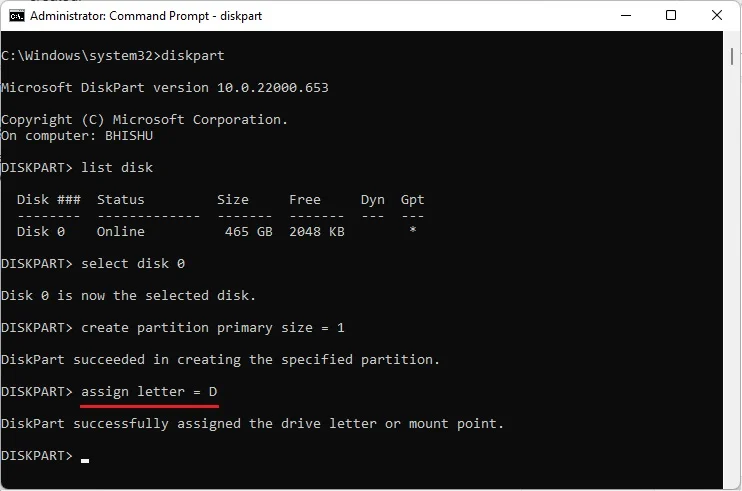
- When you are in the Command Prompt window, enter “diskpart” to start partitioning your SSD.
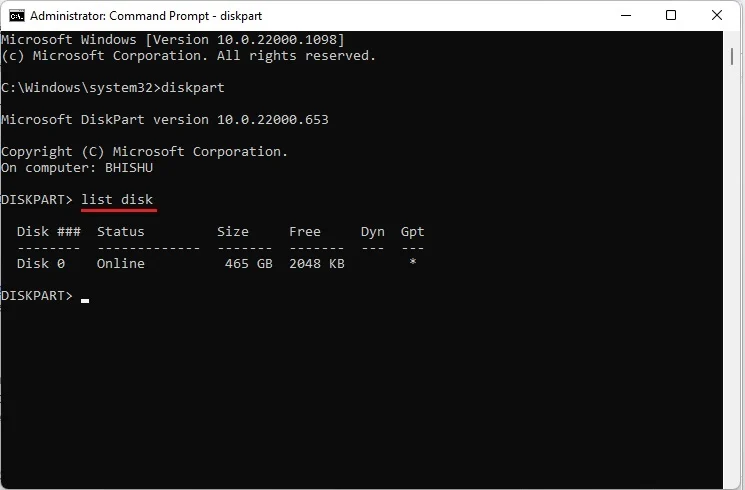
- Then type in “list disk” to check all the available disks and their information like size and status.
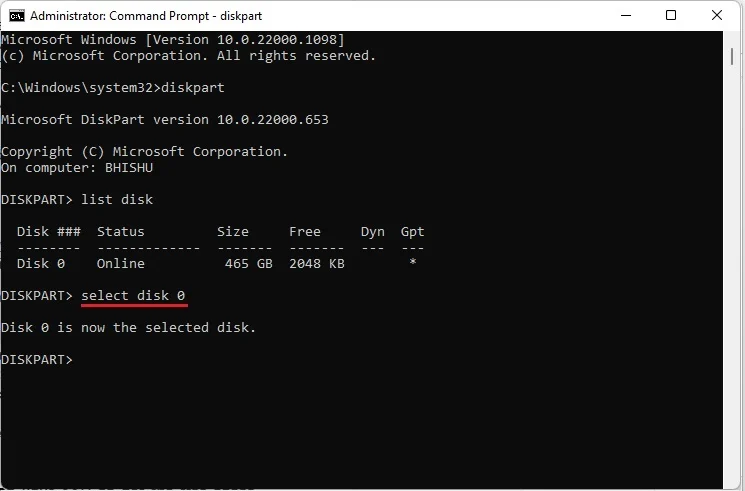
- Choose your desired SSD by inputting “select disk LETTER_OF_DISK”. In the example, we run “select disk 0” as this is the only one available here.
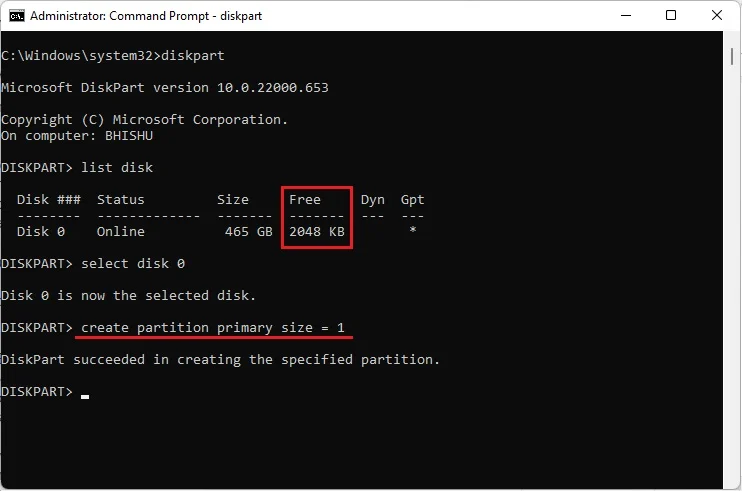
- Next, enter “create partition primary” to partition your SSD based on the available free space. Alternatively, you can also define a custom size, but you should leave at least 1 MB of space to store the partition table. For instance, as we only have 2048 KB of free space here, we can just create a partition with a total storage of 1 MB (1024 KB), as shown in the second picture.

- Input “assign letter = LETTER_OF_DRIVE” to name your partitioned drive. Here the drive is named “D”.
- Now type in “exit” to quit the Disk Partition utility. After that, you can go to Disk Management to check whether you succeeded in partitioning the SSD or not.
How to Partition An SSD on a Mac?
If you are a Mac user, it is easy to make new partitions on your SSD as well. There is a built-in application called Disk Utility on Mac, which is capable of repairing and partitioning disk drive spaces. These are the steps to create a simple partition on Mac with the Disk Utility:
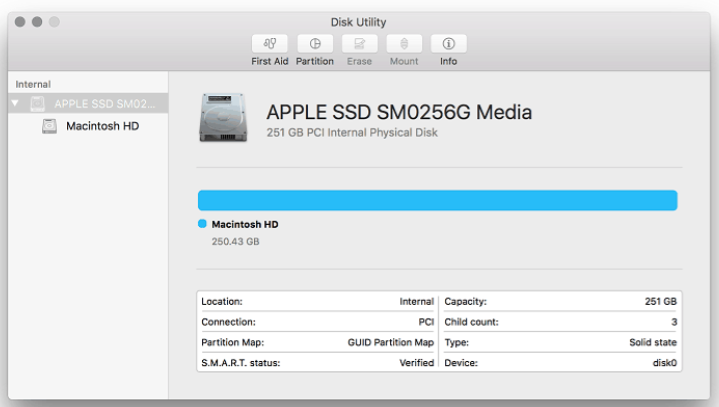
- Go to the Disk Utility in the Utilities folder.
- Select the volume that you would like to divide in the sidebar.
- Click on the “Partition” option in the toolbar.
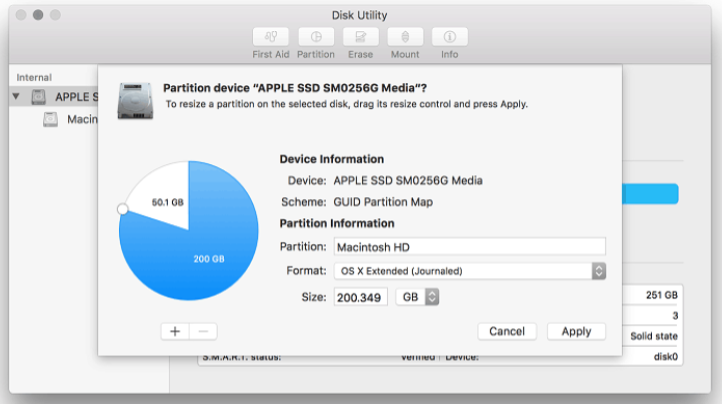
- Click on the add icon (+) below the pie chart to create a new partition.
- Check the information in the dialog and then click on “Add Partition”.
- Give a name to this new volume in the Name field to make it easy to recognize.
- Drag the resize control of the pie chart to increase or decrease the size of the partition until the desired size is reached and press the “Apply” button for confirmation. You can also enter the size you want directly.
- Wait for the changes to complete and check the information in the Partition Device dialog. If everything is OK, then click on “Done” on the pop-up window.
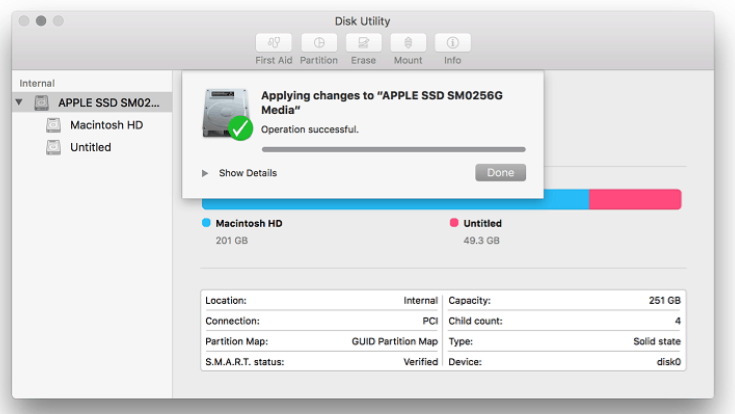
When you successfully partition a storage device, an icon for each volume will appear in the Disk Utility sidebar. If you need to change the size of the partition or delete it, you can achieve this through that program. Notice that the data should be backed up before you make any changes.
How to Partition An SSD on Linux?
Some Linux users may think that it is troublesome to partition an SSD, but actually preparing a new disk for use is a straightforward process on a Linux system. The fdisk utility is a useful tool for partitions. It is a text-based command-line utility in which you can view and manage disk partitions on Linux. To create new partitions with this tool, follow the guidelines below step by step:
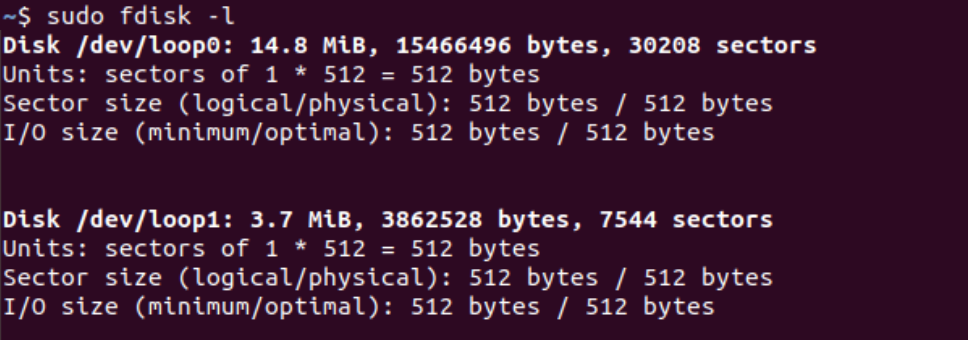
- Type in “sudo fdisk -l” to view all the existing partitions on your Linux system.
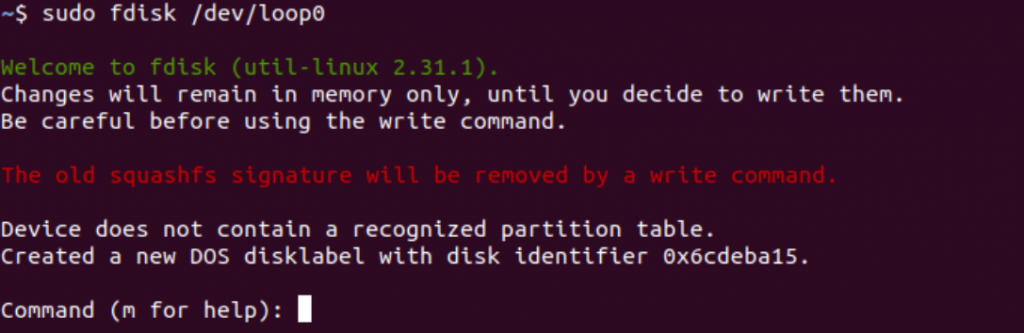
- Choose the disk you are going to partition from the list and enter the command mode by typing “sudo fdisk /dev/LETTER_OF_DISK”, as shown in the following figure.
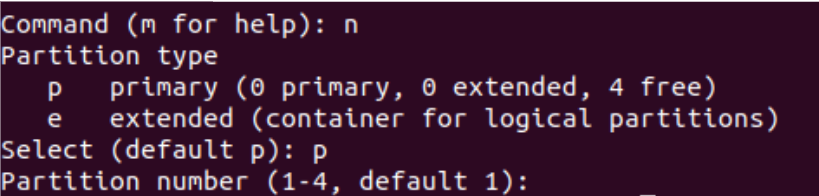
- After coming into the command mode, input “n” to select the partition type you are about to create. If you want a logical partition, then enter “e”. Instead, please enter “p” for a primary partition.
- Hit the Enter button to select the first available free sector on the system.
- Next, you need to choose the last sector. You can either press Enter again to use up all the remaining available space or input a specific size for your partition. In the example, we type “+10M” to define the size. Here the “M” is just a unit and you can use “G” too.
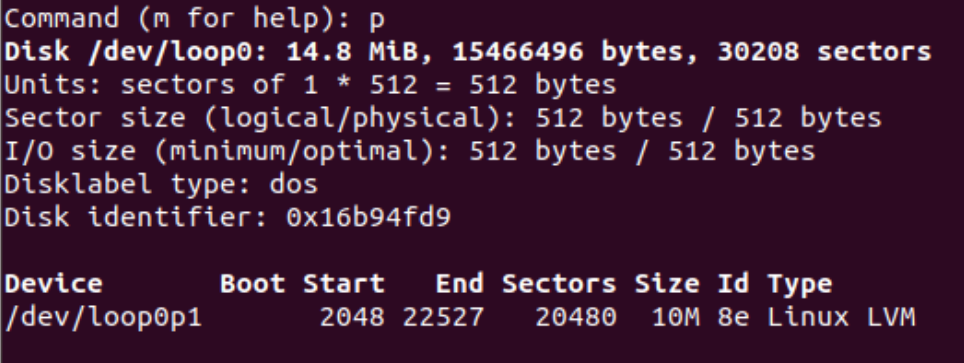
- Now although your system has created the partition, the changes have not been written on your disk. Before having the changes written, you should first type in “p” to check the detailed information of partitions for your current disk.
- If you confirm all the changes, run the w command (“w”) to write all of them on the disk. Now your new partition is accomplished.

How to Partition An SSD with Third-party Software
Apart from the aforementioned built-in programs, reliable third-party software is a good option for partitioning an SSD. To some extent, it helps you create new partitions more easily and quickly. Here we list some software for your reference and introduce how to use them to partition your SSD.
- EaseUS Partition Master
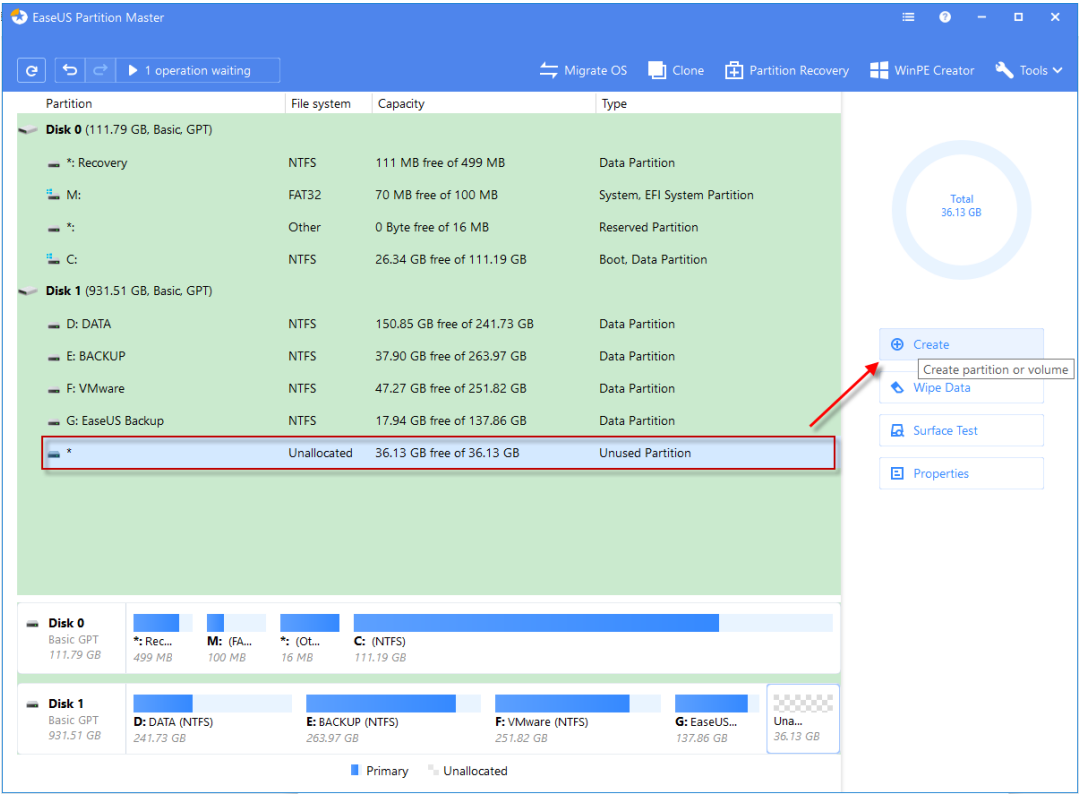
EaseUS Partition Master is well-known for its strong features in hard drive management. It provides smart and effective assistance to manage your partitions with a simplified interface and operations. To create two or more partitions, follow the steps below:
- Select the unallocated space on your hard drive and click “Create” from the list. Then select your desired partition type and add a disk to this volume.
- When a new window appears, enter a label for this partition and assign an available drive letter from the drop-down list.
- Select your desired File System and Cluster Size.
- Choose your partition type – whether Primary or Logical. Usually, it is recommended to create a primary partition if it is used for an operating system.
- Drag the border control of the light blue bar to determine the size and position of the partition. You can also directly fill in the dialogs.
- Make a final check and click “OK” if everything is ready.
- DiskGenius Partition Software
DiskGenius is another popular partition manager software that can optimize disk usage for Windows users. With the software, you can resize, extend, split, create, delete, format, hide, copy and erase partitions to maximize disk space use. Here’s the guidance on partitioning your SSD:
- Select the free space on your hard drive and click on “New Partition” from the toolbar.
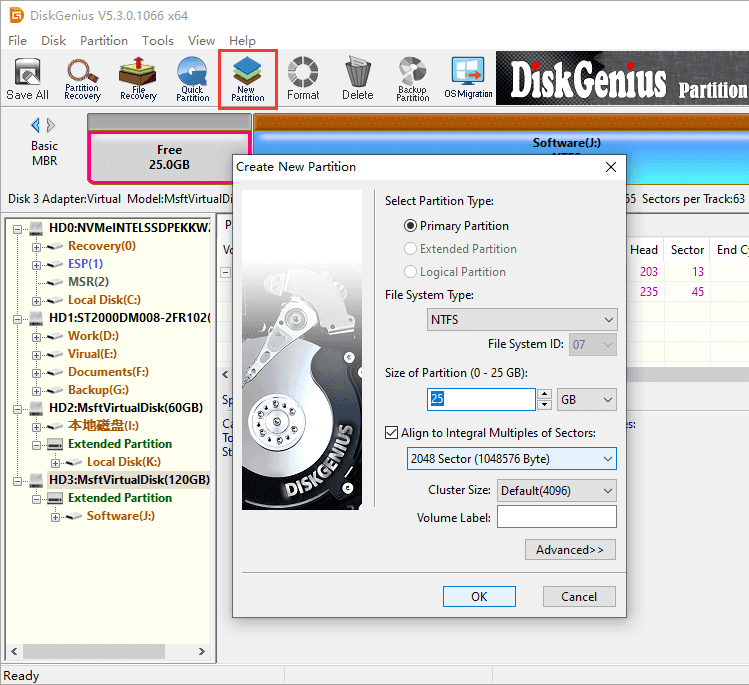
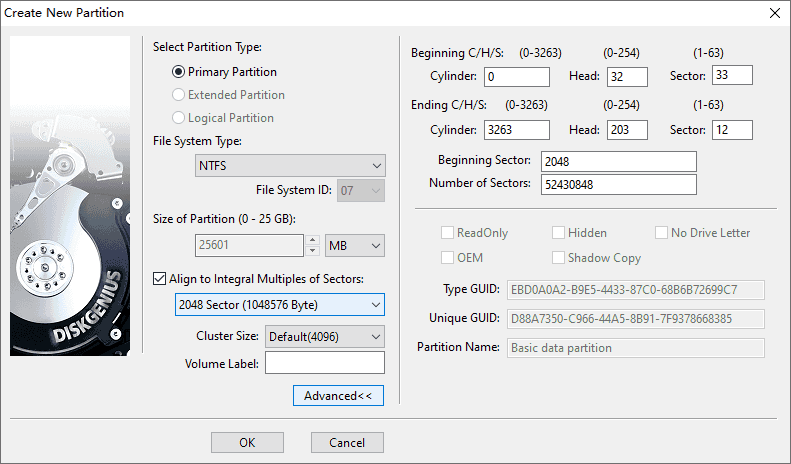
- In the Create New Partition window, select your desired partition type, file system, and partition type. You can also set beginning and ending cylinders, beginning sectors, sector numbers and so on if you want.
- Press the “OK” button when all the settings have been done.
- Click “Save All” to save the partition to the partition table and format the partition.
- Comparison between the Third-Party Software and the Buil-In Computer Programs
Knowing so many methods to partition your SSD, you may feel confused and do not know whether you should use the built-in programs or the third-party software. Below is a chart for comparison to help you choose the most suitable method.
| Comparison | Third-Party Software | Buil-In Computer Programs |
| Simplicity | Have certain requirements for users’ experience and skils in terms of PC and IT. | Have certain requirements for users’ experience and skills in terms of PC and IT. |
| Price | Some will charge a fee. | Free. |
| Time | Mostly quick. | Commonly need more time to wait for. |
FAQs
How many partitions should I create on my SSD?
It is recommended to make one to three partitions for an SSD. The reason is commonly we can find about 220 G of space to use for an SSD of 512 G. With 80 G allocated to the system C drive (C:), the left space is enough for one or two partitions.
What is the recommended partition size for an SSD?
It depends on your situation and requirements. For a typical setup, a 120 GB drive is a good value of space. However, if you have large libraries storing images or media files, you will tend to put that on another drive.
Does partitioning affect SSD performance?
Generally creating multiple partitions does not have a negative influence on the SSD performance. It will be more likely to result in an adverse impact on the performance when everything is put in one big partition. But at the same time, it should be noted that partitioning will not give the SSD better performance.
Is it possible to merge SSD partitions?
Of course yes. The Disk Management is able to merge partitions. Here’s how to do it:
- Launch the Disk Management, right-click on the disk, and select the “Convert to Dynamic Disk” option.
- Select the disks you plan to convert to dynamic disks. You can convert multiple ones at the same time.
- Click “Yes” when you see a warning box that shows you are going to convert the basic disks to dynamic disks.
- Right-click on one disk and choose “Delete Volume” so that unallocated space can be created.
- After you delete all the partitions on this disk, right-click on another disk and select “Extend Volume”.
- Choose the disk that has just been deleted all the internal partitions and press the “Add” button in the pop-up window.
- At last, click on the “Finish” button and the disks will be merged then.
How do I check the health of SSD partitions?
You can check the health of SSD partitions with the Command Prompt on Windows. In the Command Prompt window, type in “wmic diskdrive get model, status” and then hit the Enter key. After that, you will see a list of your drives along with their status, such as “OK” or “Pred Fail”.
If you are using a Mac device, you can check this by the Disk Utility tool. When you enter its interface, click on the partition you would like to check and its status will be shown in the “S.M.A.R.T status” section in the bottom-left part, either “Verified” or “Failing”.
I accidentally deleted a partition on my SSD. How to fix this?
To recover a deleted partition, it is recommended to employ a professional application or software for partition recovery because they often just need quick and simple operations to recover all the deleted or lost data. There are many such products in the market and here we take ONERECOVERY as an example to demonstrate the steps.
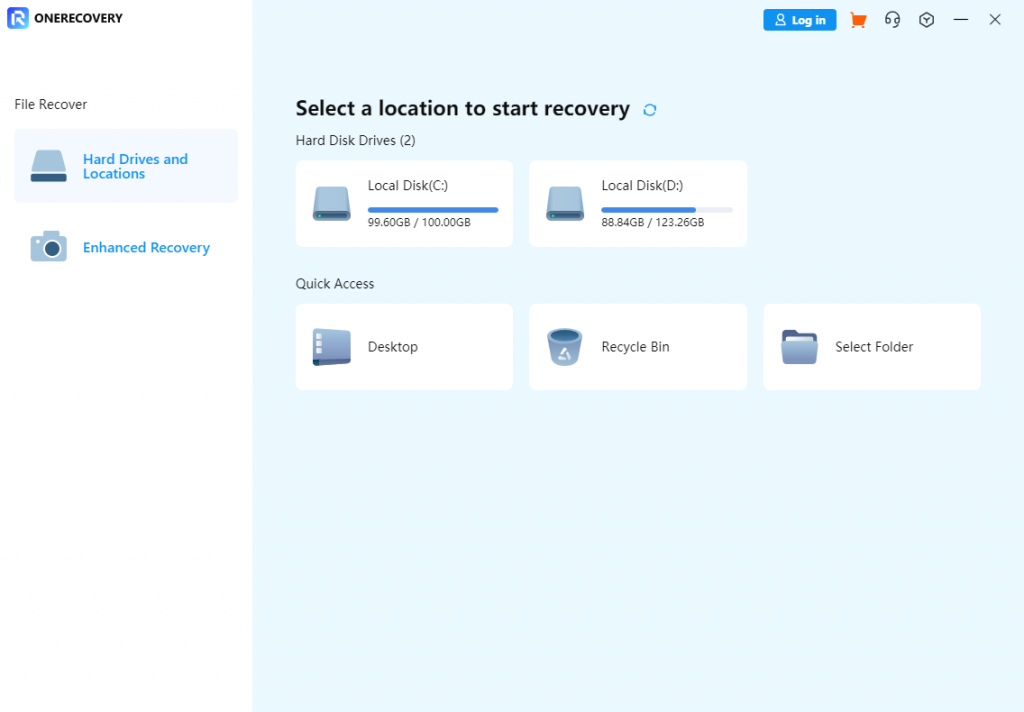
- Download the application from its official website and launch it.
- In the primary interface, choose the location where your partition was deleted.
- A deep scan will be automatically conducted on this partition to retrieve the lost data.
- Preview and select the desired recoverable files, and then save them in another location to finish the recovery.
Conclusion
Partitions are quite useful and even necessary in some cases. They can help you run two different operating systems in the meantime, better manage your multiple data and files, and easier to back up and restore the system. This guide provides information of value and detailed instructions on how to create partitions on three widely used systems – Windows, Mac, and Linux. Partitioning is actually not as complicated as most people think. As long as you follow the above guidance, you are able to easily partition your SSD. If you still have any questions, please leave a comment and we will give you an answer as soon as possible.
I’m thrilled to be part of the OneRecovery team as a writer. I’m passionate about simplifying the complex world of data recovery and making it easy for everyone to understand. My focus? Well, I love diving into tutorials on hard drive recovery, crash computer data retrieval, photo repair, and many more. But that’s not all—I’m all about exploring the creative side too, so expect plenty of engaging and imaginative posts on various aspects of data recovery software. Join me on this journey as I share insights, tips, and tricks that make data recovery a breeze!