My Account
 Sign Out

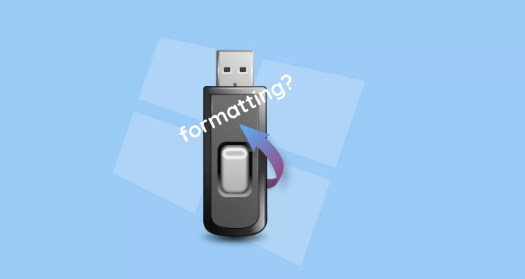
SSDs have become a common tool for data storage nowadays. Among so many types of SSDs, M.2 SSDs are increasingly popular due to their faster write and read speed as well as thinner and smaller appearance. As it is getting more widely used, it is important to learn about how to format an M.2 SSD, especially for beginners. So in this post, we are going to guide you through formatting your M.2 SSD in different ways. Let’s move on!
What Are SSDs and M.2 SSDs
Before diving into the methods to format an SSD or M.2 SSD, you should have a basic understanding of what they are essentially and then you can better understand why and how to format an M.2 SSD.
What Are SSDs
SSD is short for Solid-State Drive, referring to a kind of personal computer storage device without a constant power source. An SSD can read and write much faster than an HDD (Hard Disk Drive). Thus your computer will run more quickly if it is equipped with SSDs. In addition, this type of drive is small in size and shockproof with a wide operating temperature range of 0 to 70 degrees for commercial ones. Nowadays, SSDs have been used in a widespread way in a myriad of fields such as navigation equipment and network terminals.
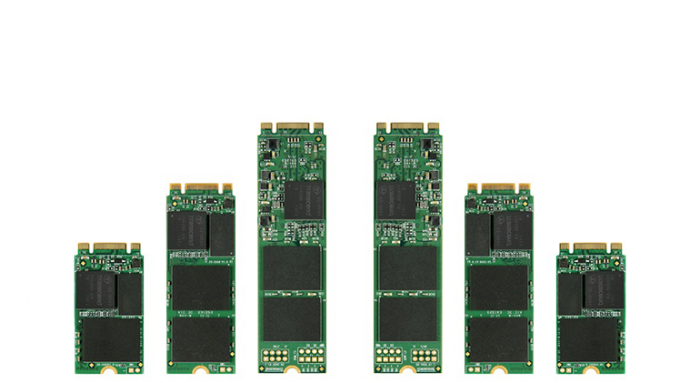
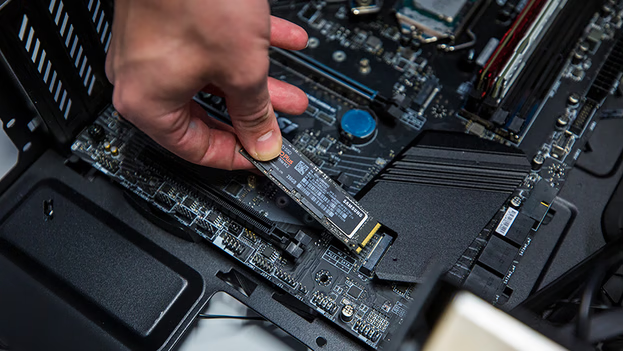
What Are M.2 SSDs
An M.2 SSD is a type of SSD, which is designed to be used in smaller devices including tablets and ultrabooks. M.2 SSDs are considerably smaller and thinner than traditional SSDs and can offer read and write speeds. Therefore, they can improve the overall system performance, particularly in occasions when you need to transfer a pretty large amount of data like playing games and editing videos. Meanwhile, an M.2 SSD is also less susceptible to mechanical failures resulting from shocks, vibrations, or accidental drops.
Do New M.2 SSDs Need to Be Formatted?
Formatting a new M.2 SSD is a necessary step before you use it in your computer system. Although the disk may be pre-formatted from the factory, below is a list of reasons why you should format it personally.
✅ Create a File System
You can create a suitable file system on your M.2 drive-through formatting. A file system serves as a framework to help your operating system manage and organize data on the drive. Different file systems have different advantages and disadvantages, and formatting your M.2 SSD allows you to select your desired file system that fits your specific and personal requirements.
✅ Ensure a Clean M.2 SSD
Formatting a new SSD M.2 drive can make sure that all the data on it have been wiped. While your drive is probably a new product, there is still a possibility that a few residual data or test files in the process of manufacturing remain in the device. Thus after formatting, you can ensure a brand-new, clean M.2 SSD without any potential conflicts or compatibility issues.
✅ Achieve Better Performance
Your M.2 SSD is able to obtain better performance by formatting. Some operating systems like Windows enable you to execute a full format. In some cases, this can help identify and fix any sectors with issues, so as to enhance the drive’s performance.
How to Format M.2 SSDs on Windows
Now that you have known why you should format your M.2 drive, let’s take a look at how to format it in practice. In this section, we are going to introduce four useful ways to format M.2 SSDs on Windows.
| Formatting Method | Ease of Use | Speed | Security | Additional Features | Price |
| Disk Management | Moderate | Moderate | Low | Built-in Windows utility | Free (included in Windows) |
| CMD | Moderate | Moderate | Moderate | Command-line interface | Free (included in Windows) |
| BIOS | Moderate | Variable | High | Secure Erase functionality | Free (BIOS functionality) |
| Third-Party Software | Easy | Variable | Variable | Additional features depending on software choice | Variable (Depends on software) |
Format M.2 SSDs with Disk Management
When you have to manage drives on your computer, Disk Management is an effective and commonly-used tool for you, which is a built-in utility on the Windows system. To employ it to format your M.2 drive, please follow the steps below:
Step 1. Right-click on the Windows icon in the taskbar and select “Disk Manager” from the menu to access the utility. Alternatively, you can type “Disk Manager” in the search box and choose the best match.
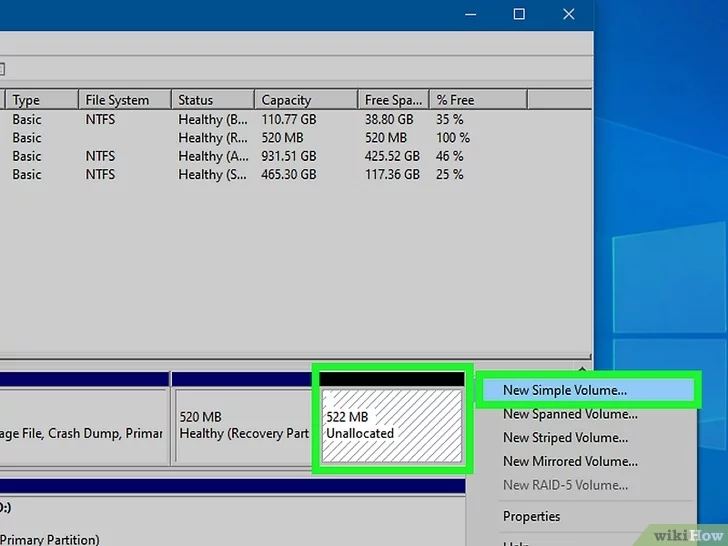
Step 2. Right-click on the unallocated area and select the “New Simple Volume” option from the drop-down menu.
Step 3. Click “Next” in the New Simple Volume Wizard.
Step 4. Set the volume size and click “Next” to proceed. Generally, the full amount of your drive space is selected by default, and you do not need to make a change to it unless you want to create a separate volume.

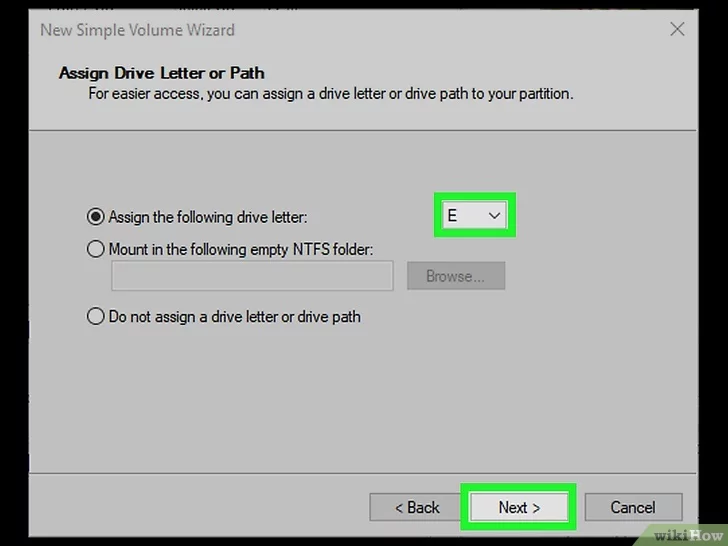
Step 5. Assign a drive letter and click “Next” to continue.
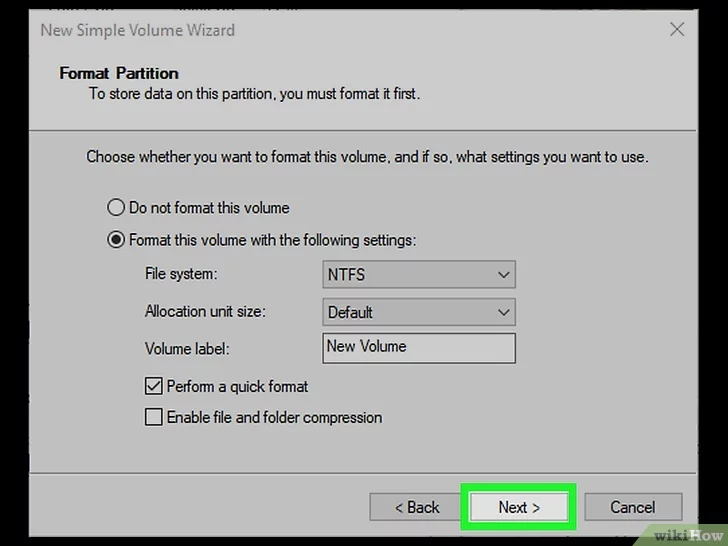
Step 6. Select the “Format this volume with the following settings” checkbox as shown in the below image. You can modify your volume label as you like.
Step 7. Then click “Next” to start formatting the drive.
Step 8. Once the formatting progress is done, a confirmation message will show up on the screen and click “Finish” to close the Disk Management window.

Format M.2 SSDs with CMD
As a command line interpreter application on the Windows system, Command Promopt, or CMD in abbreviation, can also be used to format an M.2 SSD. Here’s how to format M.2 SSDs with this program:
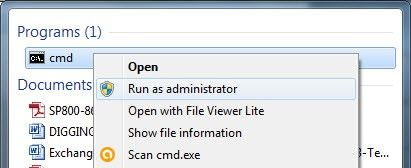
Step 1. Go to the Start menu and enter “cmd” in the search box to launch the Command Prompt and set it to be run as administrator.
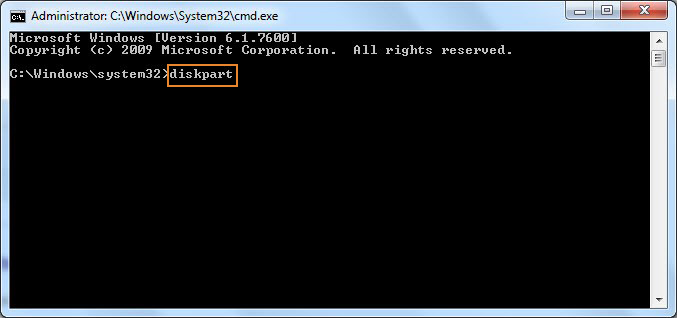
Step 3. In the Command Prompt window, type in “diskpart” and hit the Enter key to run the DiskPart utility.
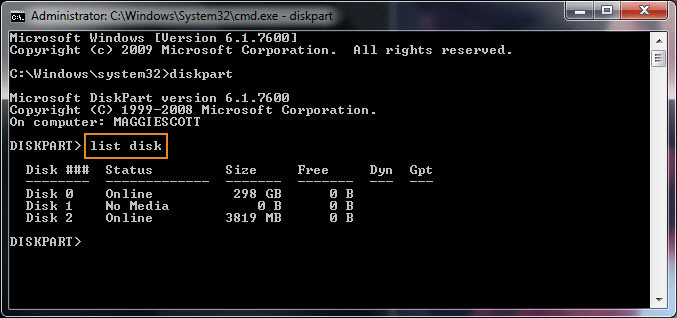
Step 3. Now input “list disk” and hit Enter. This allows you to see the full list of the disks connected to your system.
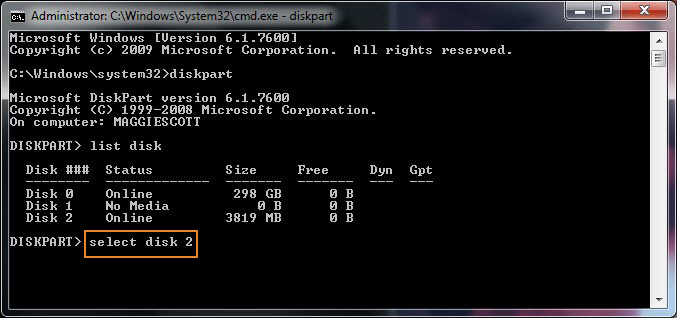
Step 4. Locate the M.2 SSD you would like to format from the list. Then type in “select disk X” and press Enter. “X” stands for the letter of your M.2 drive and in the example, it is “2”.
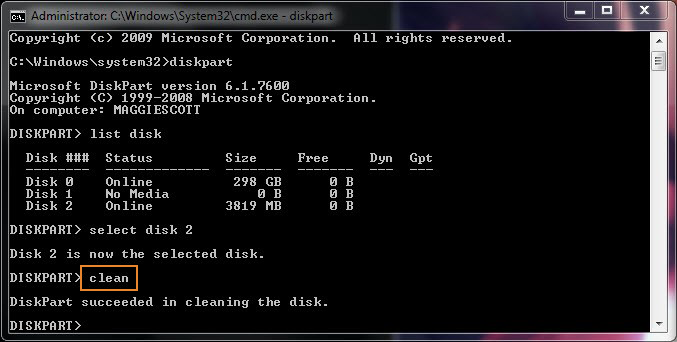
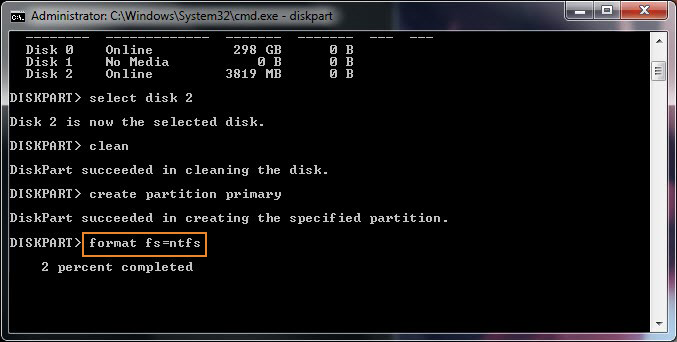
Step 5. Next type “clean” and press the Enter button to entirely wipe your drive.
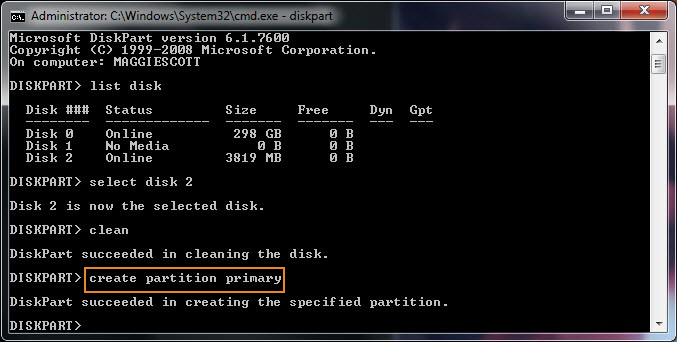
Step 6. After that, input “create partition primary” and hit Enter so that you can create a new partition on your SSD.
Step 7. Once done, type in “format fs=ntfs” or “format fs=fat32” and press the Enter key. The former command is for NTFS format and the latter is for FAT32 format.
Step 8. Finally, type “assign” and press Enter to assign a drive letter to this partition.
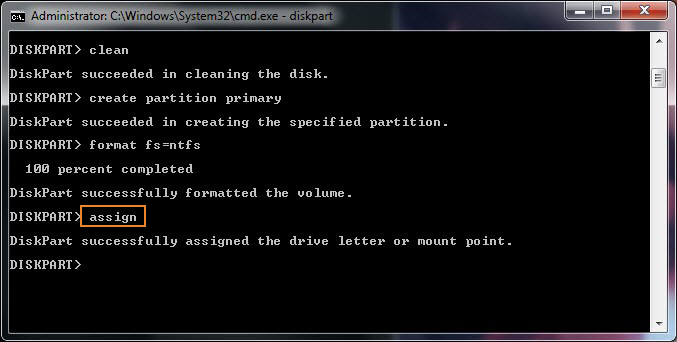
Step 9. When a message appears in the window to indicate that the formatting is complete, you can quit the CMD application and use your M.2 SSD.
Format M.2 SSDs with BIOS
Compared with the usual OS-based formatting tools, BIOS is a much more secure method to format your SSD M.2 drive because the BIOS-based formatting boasts a feature called Secure Erase, which is capable of making an SSD return to a wholly clean state. If you have security requirements, this is the perfect way for you. Now follow the below instructions to format your M.2 drive with BIOS:
Step 1. Restart your computer and press the BIOS Setup key shown on the screen. The key depends on your system and it can be F2, F10, or Del key on the keyboard. If they all do not work, please click here to check other ways to enter the BIOS.
Step 2. When you come into the BIOS Setup Utility windows, make sure you are in the Advanced Mode. If not, hit the F7 key or other hotkey labeled at the top or bottom of your screen to switch the mode.
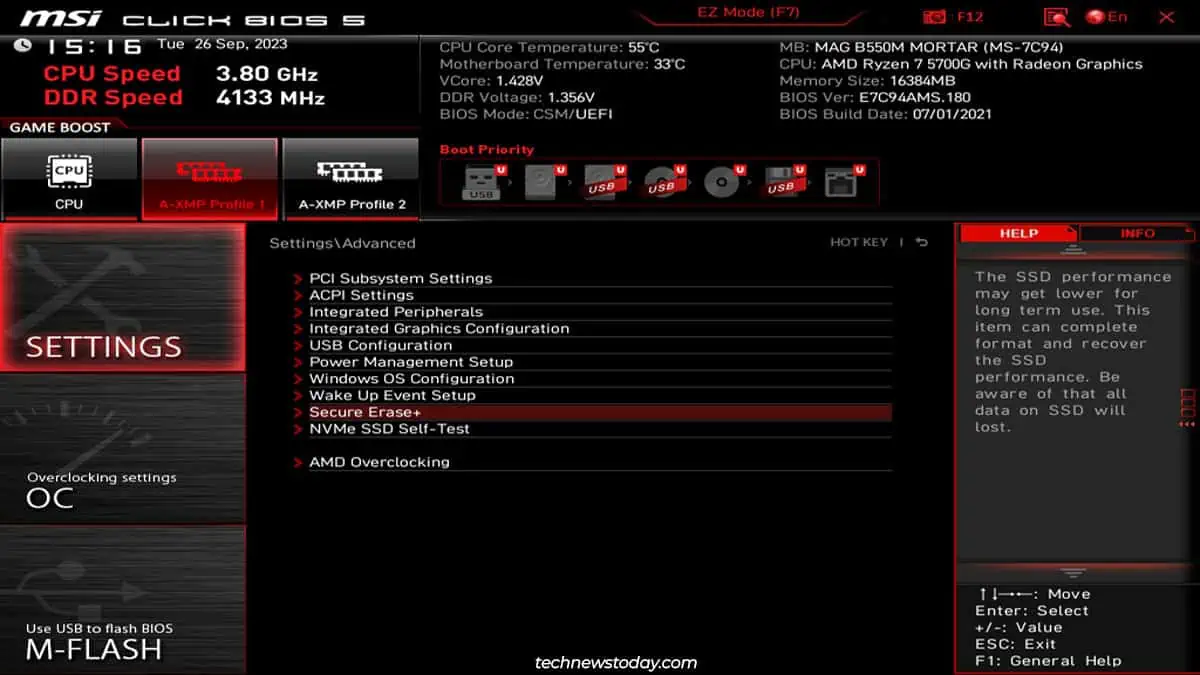
Step 3. Press the “Settings” button on the left side and click on the “Advanced” tab.
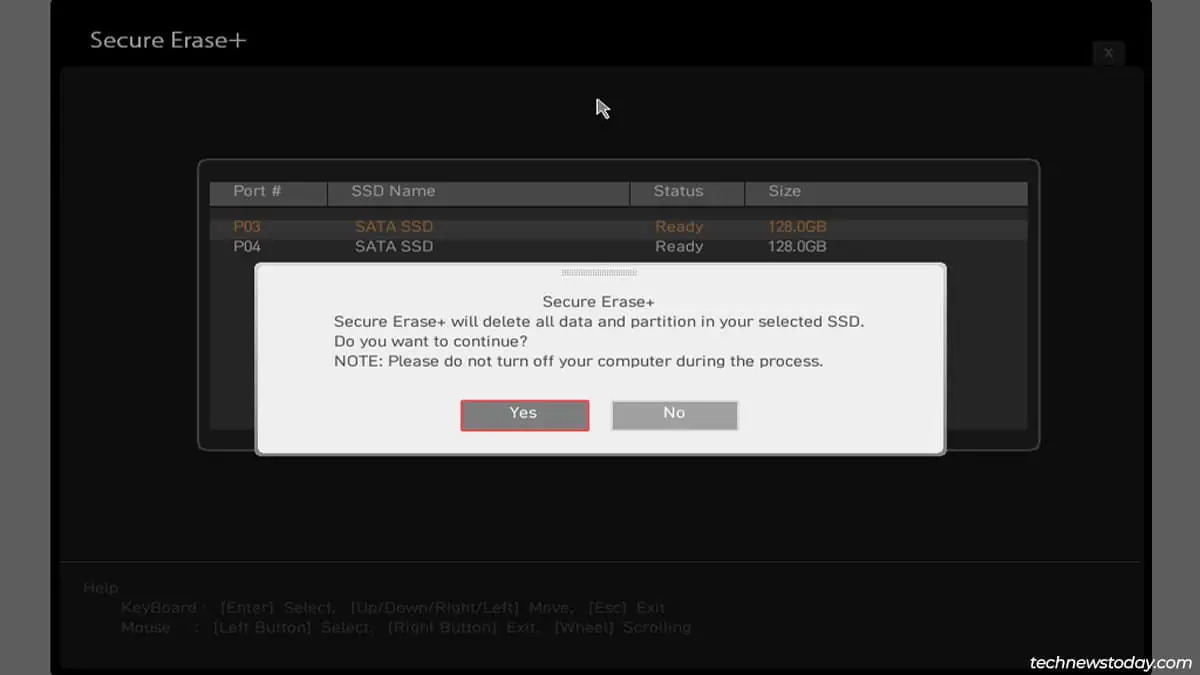
Step 4. Select the “Secure Erase” option from the menu.
Step 5. Click “Yes” in the confirmation pop-up.
Step 6. Locate and select the M.2 SSD you wish to format.
Step 7. Click “Yes” in the prompt window and start formatting. When the process is finished, your PC will reboot automatically.
Format M.2 SSDs with Third-Party Software
If you prefer a faster method to format your M.2 SSD, third-party software may be a better option that you can take into consideration. Currently, there are many professional partition or disk management software in the market, that specialize in hard drive formatting, and you can choose any of them to finish the job. Here we will take EaseUs Partition Master as an example to show you how to use such software.
Step 1. Download the disk management software from its official website and launch it.
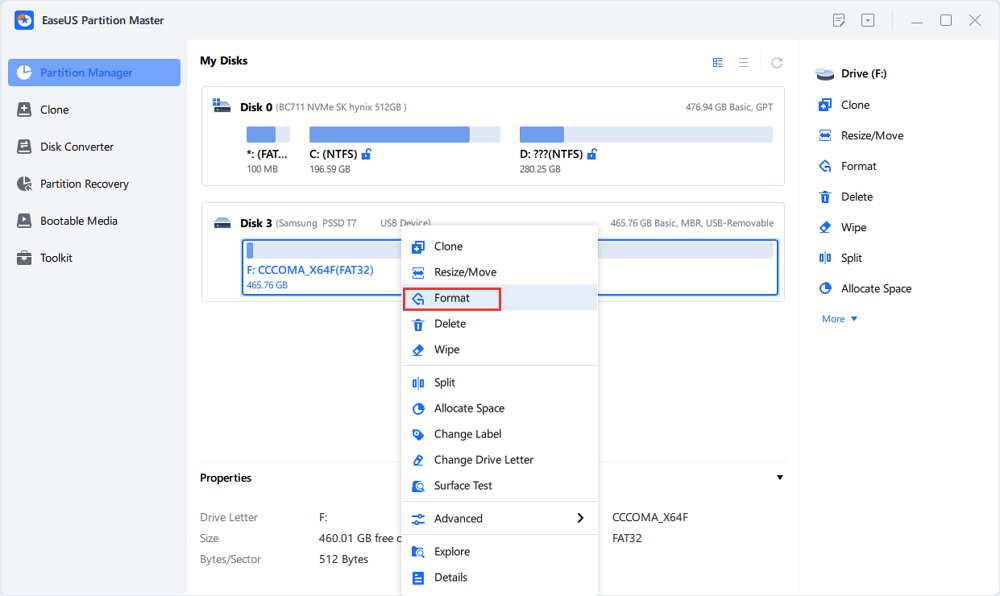
Step 2. In the primary interface, right-click on your M.2 SSD and select the “Format” option from the menu.
Step 3. Now a pop-up window will appear on your screen. Follow the instructions to assign a new partition label, specify your desired file system, and choose the cluster size.
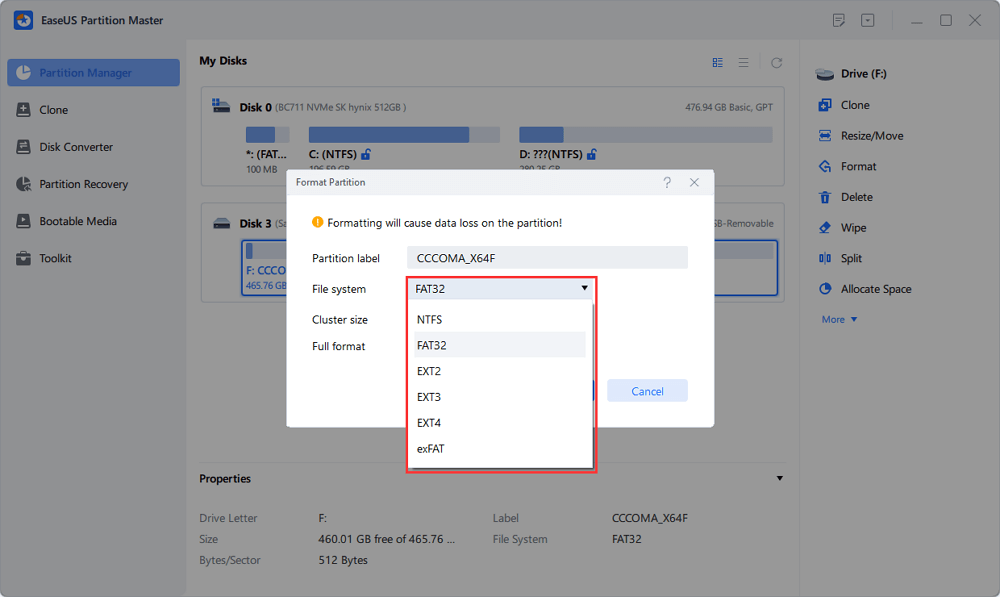
Step 4. When you confirm everything is ready, press the “OK” button.
Step 5. In the warning window, click “Yes” to proceed.
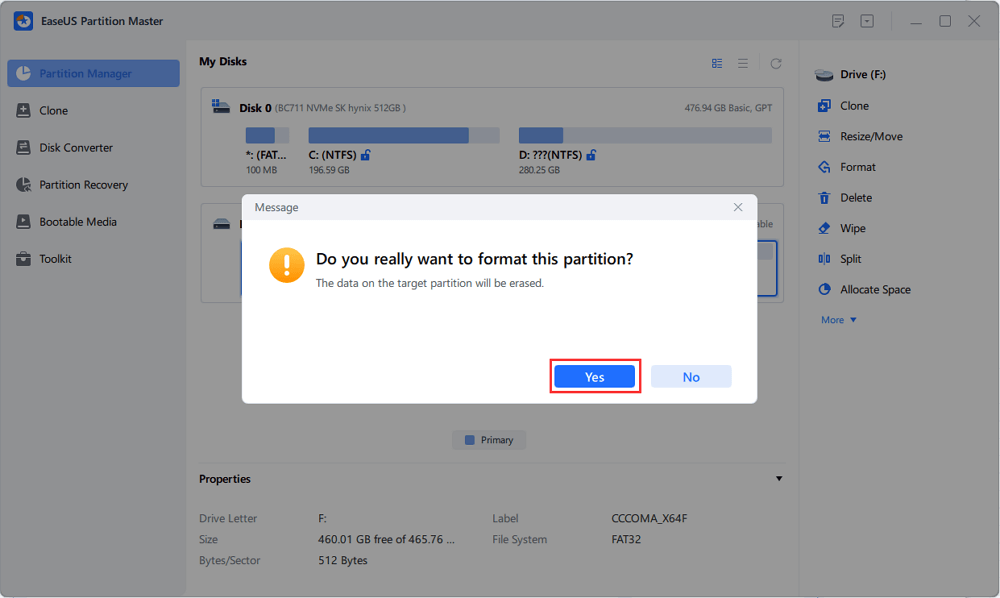
Step 6. Click the “Execute 1 Task(s)” button at the top-left corner to check the changes you made previously, and then press “Apply” to begin formatting your SSD M.2 drive. At present, you only need to wait for the process to complete.
How to Format M.2 SSDs on Mac
In addition to Windows, M.2 SSDs are becoming more and more popular on Mac. If you are using an M.2 drive for your macOS, below are the detailed steps to format it:
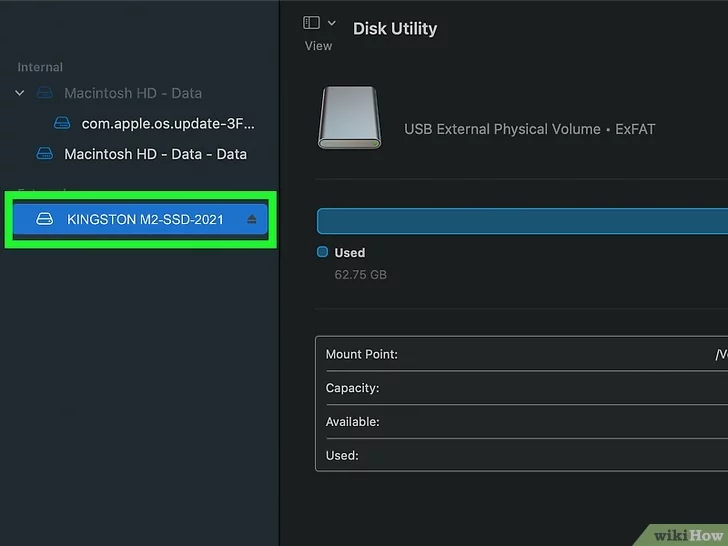
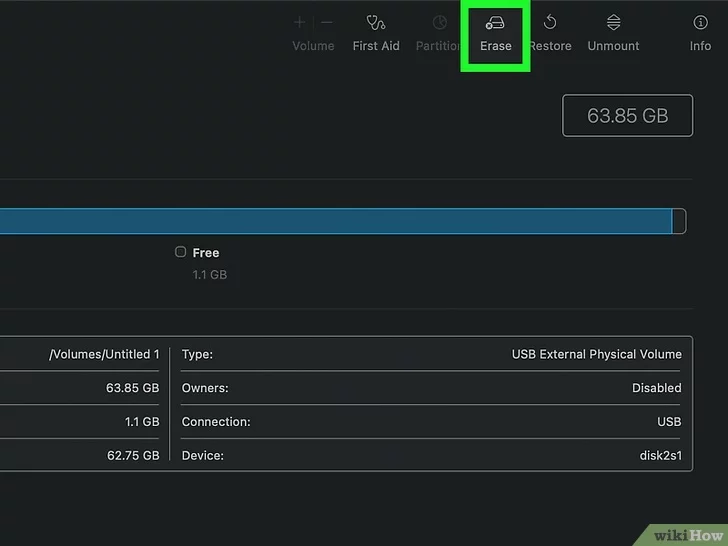
Step 1. Navigate to the Applications folder, click on the Utilities folder, and then select the Disk Utility application.
Step 2. After the program is opened, locate the M.2 SSD you want to format from the list of your drives on the left panel.
Step 3. Click on the “Erase” button at the top-center part of the window.
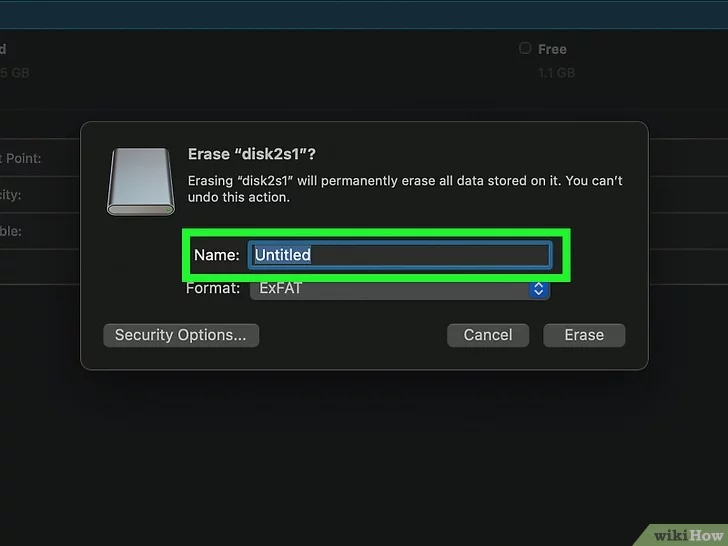
Step 4. In the new pop-up, enter a name for your drive in the “Name” field.
Step 5. Then select a format by expanding the “Format” field. Typically the default option is “APFS”, which is the latest and fastest file system offered by Apple. But you can also choose a different format if you would like, such as the “Mac OS Extended (Journaled)” format.
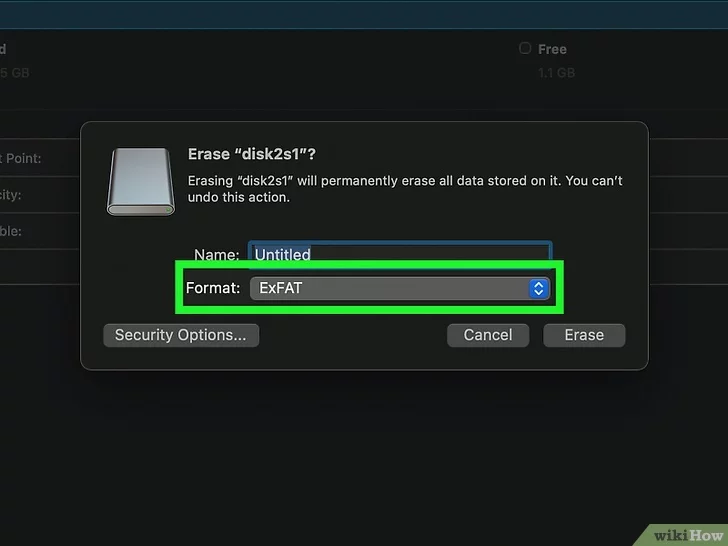
Step 6. “GUID Partition Map” is the default scheme and you do not need to change it.
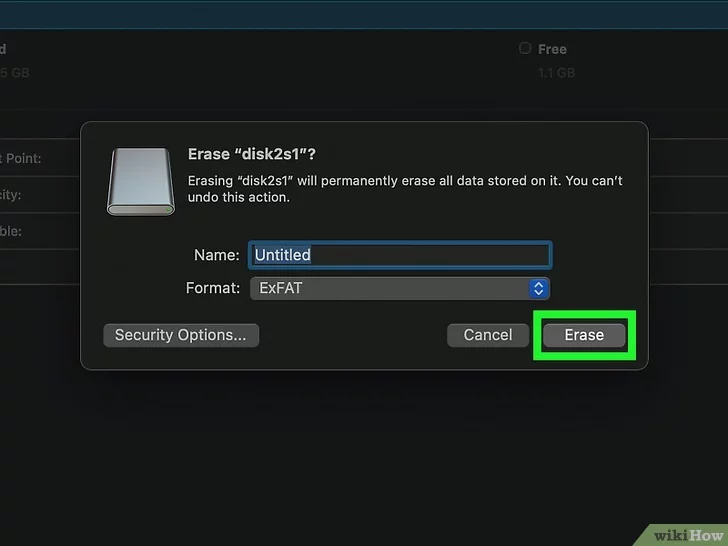
Step 7. When everything is ready, click the “Erase” button and the formatting will start.
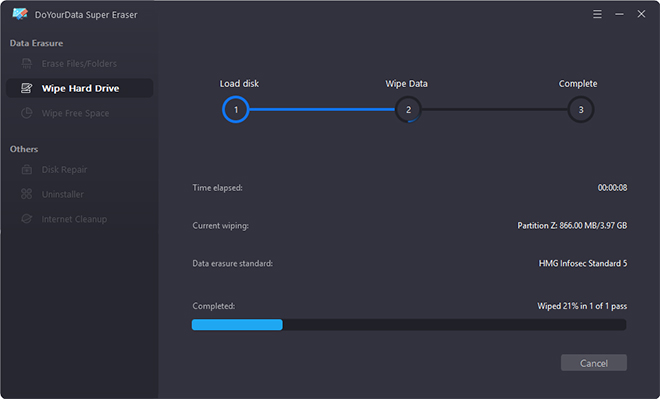
How to Wipe Data from An M.2 SSD
In some instances, you may need to wipe data from your M.2 SSD. For example, you plan to donate or sell your drive. At times like this, it is important to know how to wipe your data existing on the device. Using third-party software is a viable option because it behaves more comprehensively and securely and there are numerous such professional applications for choices. Here is how to wipe data from M.2 SSDs with third-party software:
Step 1. Choose and download reliable data erasure software.
Step 2. Remember to create a backup of your important data on your M.2 drive before wiping it.
Step 3. Launch the software and select the M.2 SSD you are going to erase from the available devices in the primary interface.
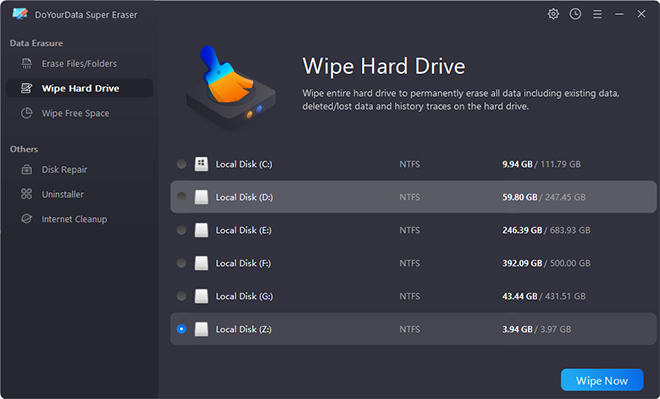
Step 4. Click the button that represents starting the wiping progress to permanently and securely delete your data from your SSD M.2 drive. Now you just need to wait for the process to be accomplished.
What to Do If I Accidentally Delete Data From My M.2 SSD
Sometimes you are likely to encounter accidental data deletion from your M.2 SSD unluckily. When it comes to such disasters, running specialized and credible data recovery software is the fastest solution to help you recover your lost data, for instance, ONERECOVERY. The recovery process is similar and straightforward in most of these software and let’s have a look at the steps.
Step 1. Download and open the data recovery software.
Step 2. Choose the M.2 SSD containing your deleted data.

Step 3. A deep scan will be initiated automatically on the drive to retrieve the recoverable data.
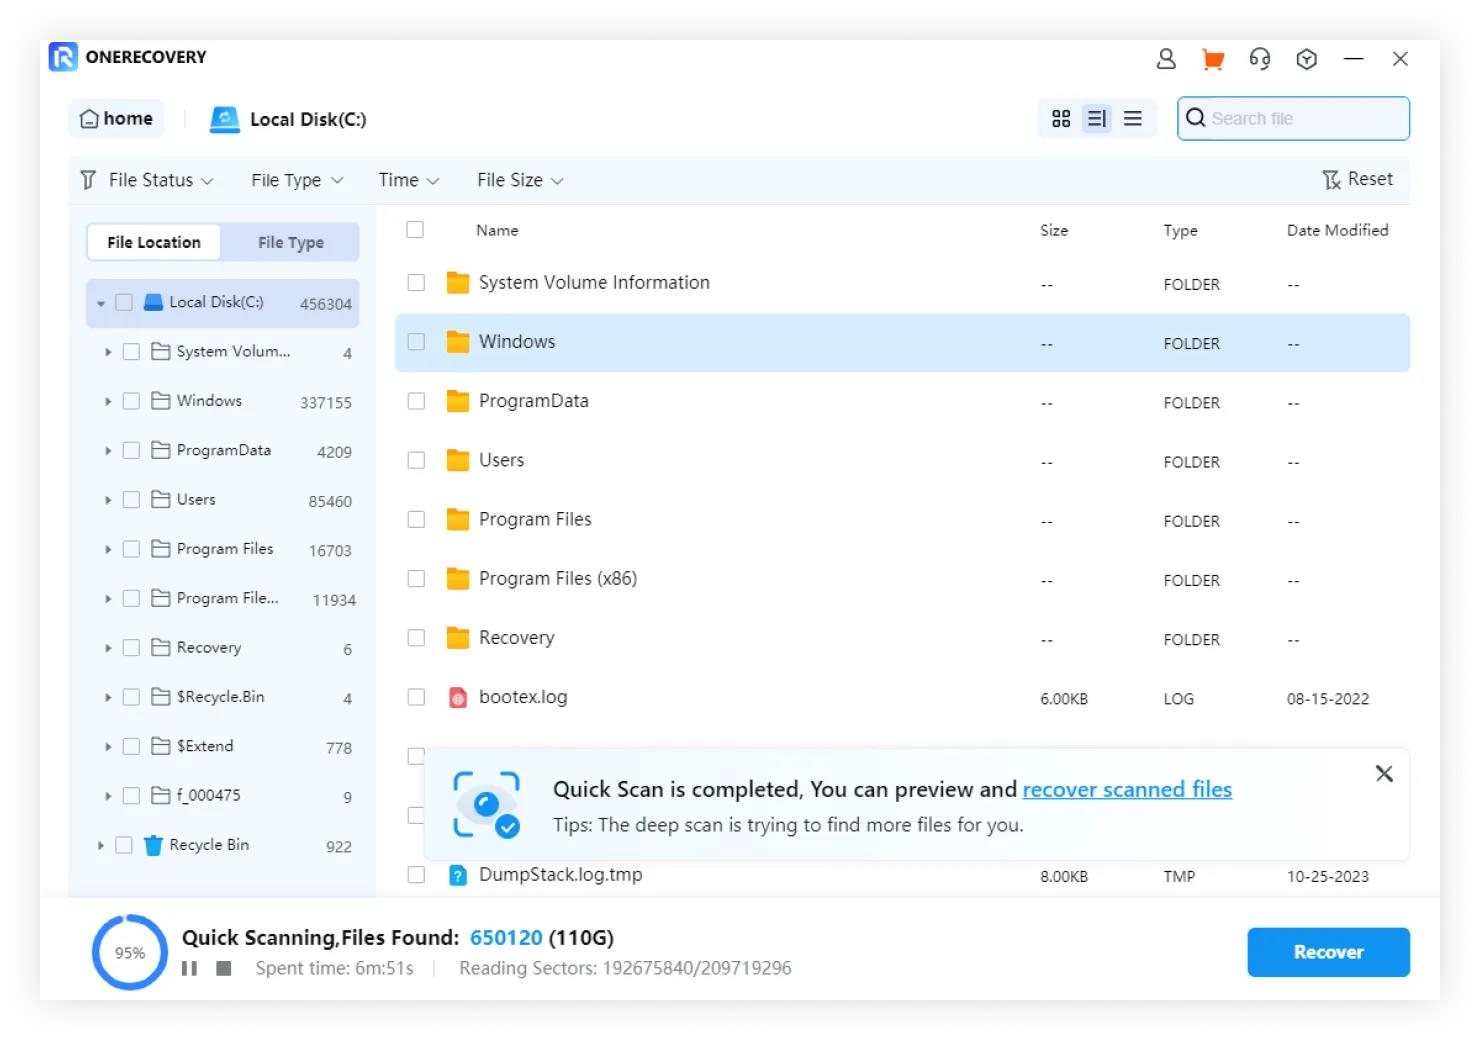
Step 4. When the scan is complete, preview and select the scanning results on the right panel.
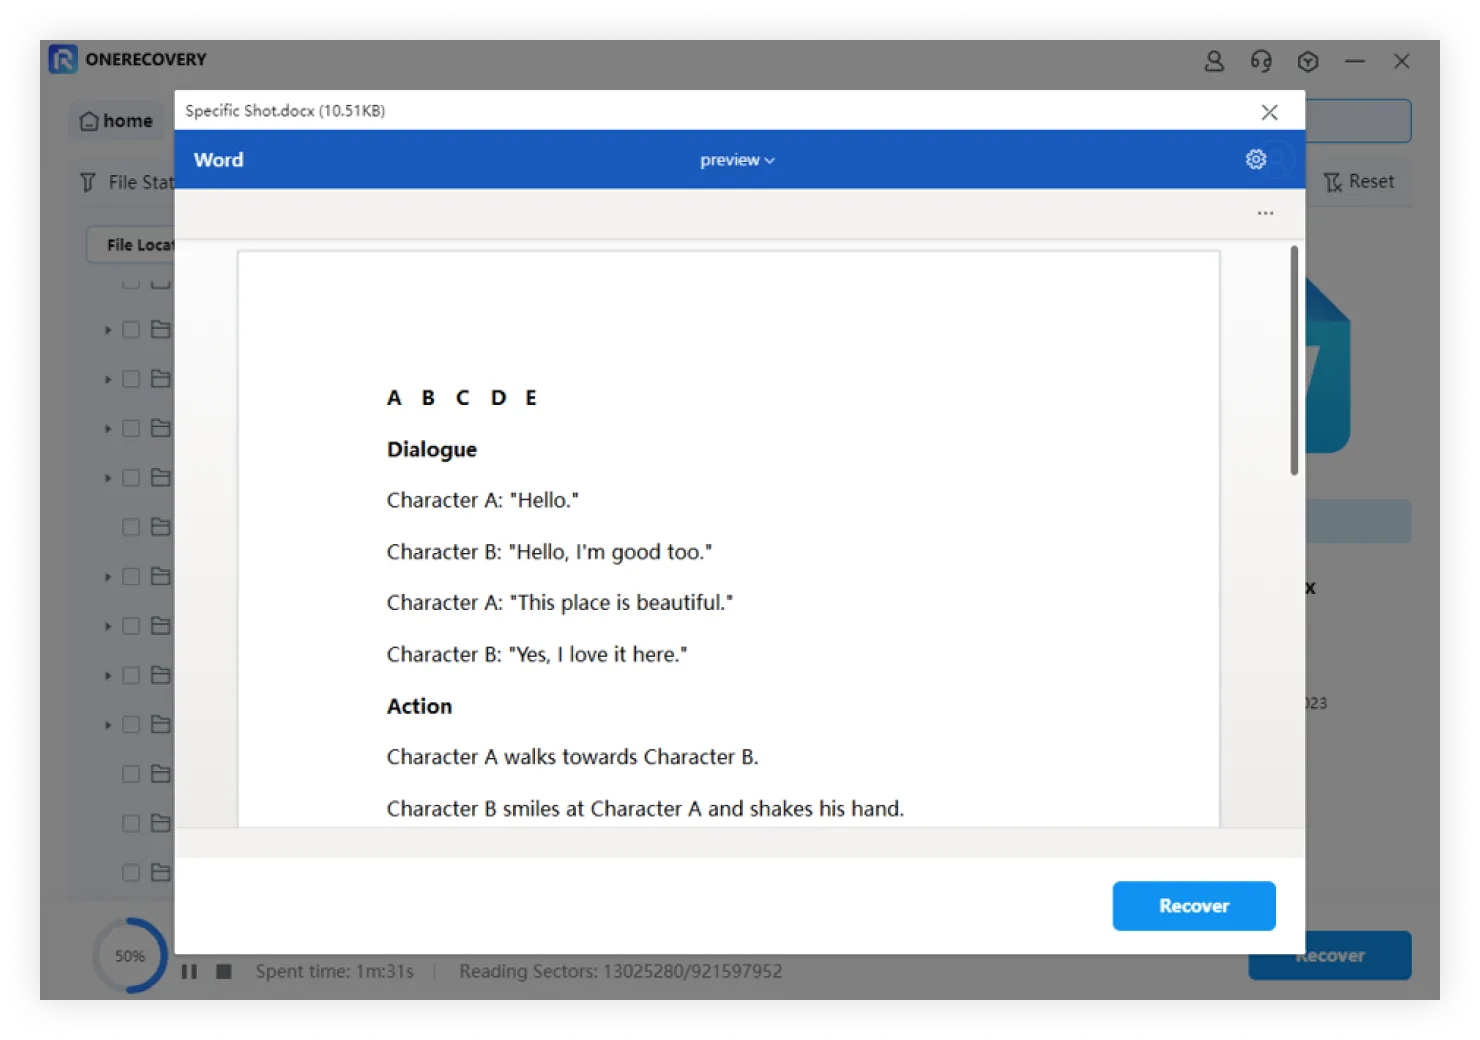
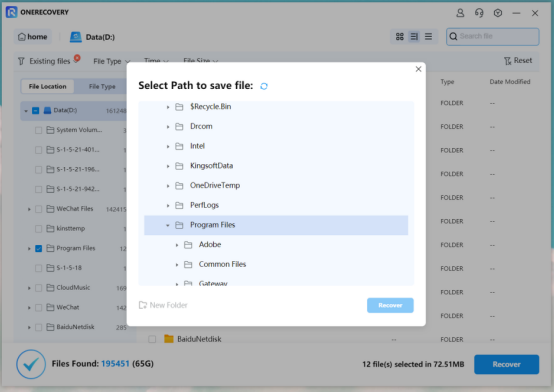
Step 5. After that, click the “Recover” button and select a new location to save your recovered data. Notice that you cannot choose the original M.2 SSD.
Step 6. At last, press the “Recover” button for confirmation and then you are able to regain your erased files.
Conclusion
It is essential for beginners to learn about how to format an M.2 SSD. This post provides detailed guidance on the M.2 SSD formatting on different systems. Simply follow the above methods and you can easily finish the job. If you have any other puzzles in this field, please feel free to leave a comment and we will try hard to help you as soon as possible.
📖 Further readings
How to Partition an SSD (Windows, Mac & Linux)
I’m thrilled to be part of the OneRecovery team as a writer. I’m passionate about simplifying the complex world of data recovery and making it easy for everyone to understand. My focus? Well, I love diving into tutorials on hard drive recovery, crash computer data retrieval, photo repair, and many more. But that’s not all—I’m all about exploring the creative side too, so expect plenty of engaging and imaginative posts on various aspects of data recovery software. Join me on this journey as I share insights, tips, and tricks that make data recovery a breeze!